The suppliers represent external sources and they are involved in inbound external transfers.
In the Serialized Logistics application:
- You can register the suppliers and their products.
- You can establish a partnership with a supplier in Movilitas.Cloud.
- You can upload an Electronic Product Code Information Services (EPCIS) file received from the supplier. The EPCIS file contains the trade items and containers that are ready for logistics, for example, unpacking, reaggregation, or shipping.
- You can upload a Comma Separated Values (CSV) file received from the supplier. The CSV file contains the trade items and containers that are ready for logistics, for example, unpacking, reaggregation, or shipping.
- You can verify the EPCIS file received from the supplier in partnership, through a collaboration channel, or over API.
- You can download the shipment details received from the supplier in Microsoft Excel format. The Excel file describes the child trade items, aggregation levels (SSCCs), and company prefixes in subsequent columns. Note: Aggregated (multi-level) trade items are not supported. A maximum of two aggregation levels involving containers (SSCCs) is supported.
- For the USA market, you can view the exceptions that occurred during receipt.
- For the USA market, you can get the complete profile of a supplier from the Pulse Profile system.
List of Procedures
- Creating a Supplier (Master Data)
- Registering the Shipping Addresses of a Supplier
- Creating the Products of a Supplier
- Establishing a Partnership with a Supplier in Movilitas.Cloud
- Removing the Partnership with a Supplier in Movilitas.Cloud
- Searching for a Supplier
- Verifying the EPCIS File Received in Partnership, through a Collaboration Channel, or over API
- Uploading an EPCIS File
- Uploading a CSV File
- Viewing Exceptions (DSCSA USA Only)
- Viewing a Pulse Profile (DSCSA USA Only)
- Updating a Supplier (Master Data and Shipping Address)
- Editing the Products of a Supplier
- Unassigning a Product from the Supplier
- Deactivating a Supplier
- Reactivating a Supplier
- Deleting a Supplier
Creating a Supplier (Master Data)
You can create a supplier by providing its master data.
Procedure
1. In the Serialized Logistics application, select Site management --> Suppliers tab. The application displays the list of suppliers and the Master data form on the Create supplier panel.
Note: When viewing the details of a supplier, you can open the Create supplier form by clicking Create.
Example:

2. Fill in the form as described below. The required fields are marked with an asterisk (*) in the form.
| Field | Country | Description |
|---|---|---|
| Supplier name | All | Enter the supplier name. The supplier name must be unique within the tenant. (USA only) If a few characters are entered for a supplier in the USA market, the application searches the Pulse Profile system and offers hits in a drop-down:
|
| Supplier SGLN | All | Enter the location number of the supplier in the SGLN format: <GS1 company prefix>.<location reference>.<extension or "0" when no extension>. The supplier SGLN must be unique within the tenant. For example, "1234567.00012.0". If you receive the shipment details from a supplier in an EPCIS file, the supplier SGLN is required. To use the built-in GLN to SGLN converter, click on the conversion button (Help me to define the SGLN) on the right.
The application displays a pop-up. Provide the following data and click Convert:
Example:
The provided GLN value is converted to the SGLN format and the field is populated. Example:
|
| Supplier tag | All | Enter the supplier tag that must be unique within the tenant. The tag identifies the supplier in the following cases:
TIP: If you want to use multiple words, connect them with a hyphen (-) or an underscore (_), for example, "demo-supplier-online-help". |
| City | All | Enter the city where the supplier is located. |
| Street | All | Enter the street. The form offers three rows (levels) for the street data. |
| State | All | Enter the state. |
| ZIP code | All | Enter the postal code. |
| Select country | All | Select the country. Start entering the country name to filter the countries. |
| Supplier email | Bahrain | Enter the email address of the supplier. This setting is relevant when you act as a 3PL for this supplier and you want to send EPCIS files containing the transfer details to the supplier (Marketing Authorization Holder - MAH). |
| E-mail address for EPCIS exception handling | USA US territory:
| Enter the contact email address to handle inbound EPCIS exceptions. The field is only available when the country of the supplier is the United States or a US territory. |
| E-mail address for Verifications | USA US territory:
| Enter the contact email address in case of issues with verifications. The field is only available when the country of the supplier is the United States or a US territory. |
| E-mail address for Trace request | USA US territory:
| Enter the contact email address to send the TI trace requests. The field is only available when the country of the supplier is the United States or a US territory. |
| Collaboration channel | All | If a collaboration (business) channel is configured to interact with the supplier, select the channel you want to associate with the supplier:
|
| AS2 partner | All | If the collaboration channel is AS2, select the AS2 partner from the drop-down. The application offers the AS2 service providers onboarded in Movilitas.Cloud. If you cannot find the AS2 partner in the list, contact Movilitas.Cloud Support. The field is available when an AS2 channel is associated with the supplier in the Collaboration channel field. |
| Unpack and remove SSCCs on receipt EPCIS | All | If the supplier uses virtual SSCCs (containers) in their EPCIS files while physically the trade items are not put into these containers, select this checkbox. When an EPCIS file is received from the supplier:
|
| Exemption from DSCSA | USA US territory:
| If openFDA has exempted the supplier from being DSCSA-compliant for a certain period of time (exemption period), select this checkbox. The effect of the exemption logic is the following:
By default, the checkbox is cleared. The checkbox is available when the tenant's country is the USA or a US territory. Once the checkbox is selected:
|
| Exemption end date | USA US territory:
| Specify the end date of the exemption that the supplier received from openFDA by using the datepicker. Once the specified date has passed, the application does not treat the supplier as exempt. On the day after the exemption end date, the application sends a notification email to the administrators of the tenant. The field is available when the Exemption from DSCSA checkbox is selected. |
| Exemption documentation | USA US territory:
| Upload the exemption documentation from openFDA provided by the supplier. Click on the Attach button and select the file from your computer. The allowed file format is PDF, maximum 5 MB in size. If you do not have the exemption documentation, contact your supplier. If you hover over the question mark icon in the UI, you can find the same information. The exemption documentation serves two purposes:
|
| Require EPCIS before receipt | All | Select this checkbox to make receiving an EPCIS file from the supplier mandatory before receiving the items in the warehouse. For the USA market, selecting the checkbox overrides and ignores the exemption from DSCSA setting. Selecting the checkbox before the exemption end date indicates that the supplier is ready before the end of the exemption period. By default, the checkbox is cleared. |
| Act as 3PL for this supplier | All | If you perform third-party logistics (3PL) on behalf of the supplier for all products from the supplier, select this checkbox. If you act in non-3PL mode for the supplier, leave this checkbox in cleared status (default). If you act in mixed mode (3PL and non-3PL) for the supplier, leave this checkbox in cleared status (default) and configure the setting at the product level. |
| Tatmeen (UAE) channel | All | If the supplier imports products into the United Arab Emirates (UAE) market and you act as a 3PL for this supplier, select the previously configured Tatmeen regulatory channel that is associated with the supplier. The field is available when the Act as 3PL for this supplier checkbox is selected and a Tatmeen regulatory channel is configured for the tenant. |
| Saudi Arabia channel for import | All | If the supplier imports products into Saudi Arabia and you act as a 3PL for this supplier, select the previously configured SFDA regulatory channel that is associated with the supplier. The field is available when the Act as 3PL for this supplier checkbox is selected and an SFDA regulatory channel is configured for the tenant. |
| Collaboration Channel - outbound EPCIS message on behalf of MAH | All | If you act as a 3PL for this supplier and you want to send EPCIS shipping messages to SAP ICH on behalf of the supplier (MAH), select the previously configured SAP ICH channel. The field is available when the Act as 3PL for this supplier checkbox is selected and an SAP ICH channel is configured for the tenant. |
| Decommission export on arrival EPCIS | All | Select the checkbox to activate automatic bulk export to the NMVS upon arrival of an EPCIS file from the supplier. The checkbox is available when an Arvato (NMVS) regulatory channel is configured for the tenant. Once the checkbox is selected, the application displays the NMVS Channel drop-down to select the Arvato (NMVS) regulatory channel through which the bulk transaction is performed. |
| NMVS Channel | All | Select the Arvato (NMVS) regulatory channel through which the bulk export transaction is performed. The field is available when the Decommission export on arrival EPCIS checkbox is selected. |


3. Click Save Supplier.
Next Steps
Register the shipping address(es) of the supplier. For more information, see Registering the Shipping Address of a Supplier.
Create the products supplied by the supplier. For more information, see Creating the Products of a Supplier.
Upload an EPCIS file containing the trade items and containers from the supplier. For more information, see Uploading an EPCIS File.
You can establish a partnership with the supplier in Movilitas.Cloud. For more information, see Establishing a Partnership with a Supplier in Movilitas.Cloud.
Back to the list of procedures
Registering the Shipping Addresses of a Supplier
The shipping address holds the ship-from information.
Procedure
1. In the Serialized Logistics application, select Site management --> Suppliers tab. The application displays the list of suppliers.
2. Find and select the supplier.
3. On the Update supplier panel, select the Shipping Address tab.
In the following example, the selected supplier does not have any shipping address yet:

4. To add a shipping address, click Add Shipping Address. The application displays the Create shipping address pop-up with a form.

5. Fill in the form as described below. The required fields are marked with an asterisk (*) in the form.
| Field | Description |
|---|---|
| Shipping address name | Enter the name of the shipping address, for example, the company name. |
| Shipping address ID | Enter a shipping address ID that is unique within the supplier. |
| Shipping address SGLN | Enter the location number of the facility in the SGLN format: <GS1 company prefix>.<location reference>.<extension or "0" when no extension>. For example, "1234567.00012.0". This SGLN is the ship-from location that sends the shipment. To use the built-in GLN to SGLN converter, click on the conversion button (Help me to define the SGLN) on the right.
The application displays a pop-up. Provide the following data and click Convert:
Example:
The provided GLN value is converted to the SGLN format and the field is populated. |
| City | Enter the city. |
| Street | Enter the street. The form offers three rows (levels) for the street data. |
| State | Enter the state. |
| ZIP code | Enter the postal code. |
| Select country | Select the country. Start entering the country name to filter the countries. |


Example:

6. Click Save. The shipping address is added to the list.
Example:

Back to the list of procedures
Creating the Products of a Supplier
Procedure
1. In the Serialized Logistics application, select Site management --> Suppliers tab. The application displays the list of suppliers.
2. Find and select the supplier.
3. On the Update supplier panel, select the Products tab. The application displays the list of products from the supplier.
In the following example, the selected supplier does not have any product yet:

4. Click Create Product. The application displays the Create product window with a form.
Example:

5. Fill in the form as described in the table below. The required fields are marked with an asterisk (*) in the form.
| Field | Description |
|---|---|
| Select product code schema | Select the product code schema.
|
| Product code | Enter the product code. You can provide a GTIN or a custom value depending on the selected schema. The entered product code must be unique for the tenant. |
| Product has no aggregation below it | If a product from a supplier that has a GTIN starting with a non-0 indicator digit does not have the underlying hierarchy (not aggregated product or no EPCIS file from the supplier), select this checkbox. The setting makes it possible to perform actions on the trade items of this product in the mobile application:
If the checkbox is cleared (default) for a product of this type, it is not possible to receive, pack, or ship the trade items of this product in the mobile application. Note:
|
| Product name | Enter the product name. Free-form text field. |
| Unit of measurement | Enter the unit of measurement, for example, liter, kilogram, or units. |
| Minimum shelf life at delivery | Provide the minimum shelf life at delivery in months by entering the number or by using the arrows on the right. |
| GS1 company prefix | Enter the GS1 company prefix of the product. This setting is relevant to outbound activities when you want to send EPCIS files containing the shipment details. |
| Act as 3PL for this product | If you act as 3PL for the product, select this checkbox. Otherwise (non-3PL mode), leave the checkbox cleared (default).
The setting has an impact on who is the seller (sender/source owning party) in the outbound EPCIS file:
The checkbox is visible only if the Act as 3PL for this supplier checkbox is cleared in the supplier master data.
|
| Supplier is MAH | Select the checkbox if the supplier is the Marketing Authorization Holder (MAH) of this product. By selecting the checkbox, the application displays the Specific MAH Countries drop-down. |
| Specific MAH Countries | If the supplier is the MAH in certain countries only and there are multiple suppliers of the same product, select the countries where the supplier is the MAH. IMPORTANT: The same product can be assigned to multiple suppliers but only one supplier can be the MAH in a country.
|
| Supplier is designated Wholesaler | Select the checkbox if the supplier is a designated (contracted) wholesaler of this product. Only applicable when an Arvato regulatory channel is set for the tenant to connect to a National system (NMVS) to perform FMD actions. After selecting the checkbox, Movilitas.Cloud collects the product master data from the National system through the corresponding Arvato regulatory channel. The application offers the designated wholesaler(s) in the Select designated wholesaler drop-down with an auto-selected value. Other cases:
|
| Select designated wholesaler | Select the designated wholesaler in the drop-down list. The application offers an auto-selected value that you can change when there are multiple choices. The selected value is remembered. |
| Exempt from DSCSA | Select the checkbox if the product is exempt from DSCSA (USA). The checkbox is visible when the product belongs to the USA market. If the product must meet the DSCSA requirements, keep the checkbox cleared (default). |
In the following example, we are providing the details of a product that has a custom product code:

In the following example, the supplier of the entered product is the MAH.
- The product belongs to only this supplier so the Specific MAH Countries drop-down is not set.
- The tenant acts as 3PL for the supplier because the Act as 3PL for this product checkbox is hidden.

In the following example, the supplier of the entered product is a designated wholesaler (FMD Europe):

In the following example, the product belongs to the USA market because the company prefix starts with "03". The product is not exempt from DSCSA. It is possible to fetch the product master data from openFDA:

Note: If the entered product code with the specified schema is existing in the database, the already known fields are pre-filled and read-only in the Create product form. You can still edit the product code schema, the product code, and the empty fields.
6. Save the product. Scenarios:
Scenario DSCSA (USA)
Click Fetch from openFDA and Save. The application creates the product, links the product to the supplier, and fetches product master data from openFDA. The product master data is required in the outbound DSCSA EPCIS file.
Scenario Non-DSCSA (USA) and Non-FMD (Europe)
Click Save. The application creates the product and links the product to the supplier.
Scenario FMD (Europe)
Click Save. The application investigates whether the supplier is flagged as a designated wholesaler:
- If no, the product is created and added to the list. You can add a new product by repeating the above procedure.
- If yes and the supplier master data can be overwritten with the data from the National system, the application asks you to confirm overwriting:

- When selecting Yes, the supplier master data (name and address fields) are overwritten, as applicable. The product is created and added to the list. You can add a new product by repeating the above procedure.
- When selecting No, the supplier master data (name and address fields) are left intact but the product is created and added to the list. You can add a new product by repeating the above procedure.
Back to the list of procedures
Establishing a Partnership with a Supplier in Movilitas.Cloud
By establishing a partnership in Movilitas.Cloud, the supplier and the client are integrated within Movilitas.Cloud with their customized views and functions. The partnership enables the supplier and the client to exchange data in an efficient, controlled, and secure manner.
You can invite a supplier to be a partner in Movilitas.Cloud by providing the contact email address.
- If the supplier does not have a tenant in Movilitas.Cloud, the supplier registers a tenant. Depending on the payment model, the supplier becomes a full-paying customer in Movilitas.Cloud or the client that sent the invitation pays the invoices and the supplier is in "Partner" mode. Then, the supplier accepts the invitation and gets access to the Serialized Logistics application in a customized view. The partner client that sent the invitation is automatically available in the supplier view.
- If the supplier already has a tenant in Movilitas.Cloud, the supplier reviews the partner request, accepts the invitation, and gets access to the Serialized Logistics application in a customized view. The partner client that sent the invitation is automatically available in the supplier view.
Procedure
1. In the Serialized Logistics application, select Site management --> Suppliers tab. The application displays the list of suppliers.
2. Find and select the supplier to view its details. The application displays the master data of the supplier on the Update supplier panel and the empty Invite partner panel.
Example:

3. On the Invite partner panel, enter the contact email address.
Example:

4. Click Invite Partner.
| Case | System Response | Action |
|---|---|---|
| The contact email address is not known in the system. | The application sends a registration email to the address. The client has to register a tenant in Movilitas.Cloud and then accept the partner request. Until the partner request is accepted, the request is in pending status. Example:
| Track the status of the partner request on the Tenant Dashboard, under the Partner management tab. You can cancel the request by clicking on the cancel icon on the right. |
| The contact email address belongs to one tenant in Movilitas.Cloud. | The application sends a partner review request email to the address. Note: The email address must belong to a user with the “Administrator” role so that the partnership can be established. Until the partner request is accepted, the request is in pending status. Example:
| Track the status of the partner request on the Tenant Dashboard, under the Partner management tab. You can cancel the request by clicking on the cancel icon on the right. |
| The contact email address belongs to multiple tenants in Movilitas.Cloud. | The application displays the Multiple partner options window to select a tenant from the list. | 1. Select a tenant and click Confirm.
2. Track the status of the partner request on the Tenant Dashboard, under the Partner management tab. You can cancel the request by clicking on the cancel icon on the right. |


Once the partner request is accepted, the partnership is live. The application displays the active partnership as follows:
| Indicators | Description | Example |
|---|---|---|
| Partnership status indicator next to the supplier name in the list | The status indicator displays the payment model in place:
If there is no partnership status indicator, that means a partnership is not established with the client in Movilitas.Cloud. |  |
| Invite partner panel |
| The following example illustrates tenant "Partner Supplier" with payment model "Partner": |
Back to the list of procedures
Removing the Partnership with a Supplier in Movilitas.Cloud
You can remove the partnership with a supplier in Movilitas.Cloud. After the partnership is removed, the integration between the supplier and the client is degraded. The data exchange between the supplier and the client in Movilitas.Cloud is canceled.
Procedure
1. In the Serialized Logistics application, select Site management --> Suppliers tab. The application displays the list of suppliers.
2. Find and select the supplier to view its details. The application displays the master data of the supplier on the Update supplier panel and the active partner on the Invite partner panel.
3. On the Invite partner panel, click on the delete icon (Remove partner) on the right.

The application asks you to confirm the action.

4. In the confirmation window, click Yes.
- The application removes the partnership with the supplier.
- The data exchange between the supplier and the client in Movilitas.Cloud is canceled.
- The supplier still has the tenant in Movilitas.Cloud but the configuration is not updated from the client anymore.
Note: Deactivating the supplier (with EPCIS uploads) also results in the removal of partnership with the supplier.
Back to the list of procedures
Searching for a Supplier
Procedure
1. In the Serialized Logistics application, select Site management --> Suppliers tab.
The application displays the list of suppliers. If there is an indicator in the With upload column next to the supplier on the Suppliers panel, there is at least one EPCIS upload on the supplier.
2. Enter the supplier name in the search field.
- The list of suppliers is filtered based on the search criteria.
- You can reset the filter by clicking on the Reset filters icon.
3. (Optional) Select the Inactives toggle button to make inactive suppliers visible in the list.
Inactive suppliers are displayed in grey in the list.
4. Select the supplier to view its details.
- Check the supplier master data on the Master data tab. You can find screenshot examples in this procedure.
- Check the shipping addresses on the Shipping address tab. For screenshot examples, see Registering the Shipping Addresses of a Supplier.
- Check the products from the supplier on the Products tab. The application displays the list of products with product code, product name, unit of measurement, and minimum shelf life at delivery. For screenshot examples, see Creating the Products of a Supplier, Editing the Products of a Supplier, and Unassigning a Product from the Supplier.
- Check the EPCIS file uploads on the Uploads tab. A log is created for each upload.
- The application displays:
- A snapshot of the containers, trade items, and hierarchy as defined in the file.
- The Advanced Shipping Notification.
- You can download the EPCIS file.
- You can download the shipment details received from the supplier in Microsoft Excel format. The Excel file describes the child trade items, aggregation levels (SSCCs), and company prefixes in subsequent columns. Note: Aggregated (multi-level) trade items are not supported. A maximum of two aggregation levels involving containers (SSCCs) is supported.
- The tab also collects the EPCIS files received from SAP ICH.
- The tab also collects the EPCIS files received from TraceLink.
- The tab also collects the EPCIS files received from AS2.
- The tab also collects the EPCIS files received in partnership.
- For more information, see Verifying the EPCIS File Received in Partnership, through a Collaboration Channel, or over API and Uploading an EPCIS File.
- The application displays:
In the following example, a supplier is selected. The application displays the supplier master data:
- Name and address (city, street, ZIP code, and country).
- The supplier SGLN (location) is provided because the SGLN is required to process the EPCIS files from the supplier.
- The supplier does not send any EPCIS from an external system so the Collaboration channel field is left blank. The user manually uploads EPCIS files from the supplier. An EPCIS file is not yet uploaded on the supplier, because there is no indicator in the With upload column. The supplier can be deleted at this point (no EPCIS upload yet).
- The Decommission export on arrival EPCIS checkbox is selected, so the automatic export to the NMVS upon arrival of an EPCIS file from the supplier is activated. An Arvato (NMVS) regulatory channel is associated with the supplier.
- The supplier is not a partner in Movilitas.Cloud.
- Other fields are left blank (not applicable).

In the following example, the tenant acts as a 3PL for the supplier. The application displays the supplier master data:
- Name and address (city and country).
- The Supplier email field is populated because the tenant sends EPCIS files to the supplier by email. Applicable when the shipment is sent to Bahrain.
- The supplier SGLN (location) is provided because the SGLN is required to process the EPCIS files from the supplier.
- The supplier does not send any EPCIS from an external system so the Collaboration channel field is left blank. The user manually uploads EPCIS files from the supplier. At least one EPCIS file is uploaded on the supplier, because there is an indicator in the With upload column. The supplier can be deactivated but cannot be deleted anymore.
- The Require EPCIS before receipt checkbox is selected. It is mandatory to upload EPCIS files from the supplier before receiving items in the warehouse.
- The Act as 3PL for this supplier checkbox is selected.
- The tenant has a Tatmeen (UAE) channel and an SFDA (Saudi Arabia) channel but the supplier does not report anything to the UAE or Saudi Arabia, so both the Tatmeen (UAE) channel field and the Saudi Arabia channel for import field are left blank.
- The supplier is not a partner in Movilitas.Cloud.

In the following example, the tenant acts as a 3PL for the supplier. The application displays the supplier master data:
- Name and address (city and country).
- The supplier SGLN (location) is provided because the SGLN is required to process the EPCIS files from the supplier.
- The supplier sends EPCIS files from TraceLink so a previously configured TraceLink channel is associated with the supplier in the Collaboration channel field. The same channel is used for reporting certain actions to the supplier, for example, the receipt of items from the supplier in the warehouse. At least one EPCIS file is uploaded on the supplier, because there is an indicator in the With upload column. The supplier can be deactivated but cannot be deleted anymore.
- The Require EPCIS before receipt checkbox is selected. It is mandatory to receive EPCIS files from the supplier before receiving items in the warehouse.
- The Act as 3PL for this supplier checkbox is selected.
- The tenant ships products to the UAE on behalf of the supplier, but a Tatmeen channel is not configured because the shipment is reported to the supplier through the TraceLink collaboration channel.
- Although the tenant also has an SFDA regulatory channel because the tenant ships products to Saudi Arabia, the supplier does not import products to Saudi Arabia so the Saudi Arabia channel for import field is left blank. The shipment is reported to the supplier through the TraceLink collaboration channel.
- The Supplier email field is left blank because the tenant does not send EPCIS files to the supplier by email (no shipments to Bahrain).
- The supplier is not a partner in Movilitas.Cloud.

In the following example, the tenant established a partnership with the supplier in Movilitas.Cloud. The application displays the supplier master data:
- The supplier is in "Partner" mode. The tenant that sent the invitation pays the invoices.
- Address fields and the SGLN are populated. An EPCIS file or CSV file is not yet uploaded on the supplier, because there is no indicator in the With upload column. The supplier can be deleted at this point (no upload yet).
- Other fields are left blank (not applicable).

In the following example, the tenant acts as a 3PL for the supplier. The application displays the supplier master data:
- Name and address (city and country).
- The supplier SGLN (location) is provided because the SGLN is required to process the EPCIS files from the supplier.
- The supplier sends EPCIS files from SAP ICH, so a previously configured SAP ICH channel is associated with the supplier in the Collaboration channel field. At least one EPCIS file is uploaded on the supplier, because there is an indicator in the With upload column. The supplier can be deactivated but cannot be deleted anymore.
- The Act as 3PL for this supplier checkbox is selected.
- The tenant sends EPCIS messages to SAP ICH on behalf of the supplier (MAH), so a previously configured SAP ICH channel is associated with the supplier in the Collaboration Channel - outbound EPCIS message on behalf of MAH field.
- The supplier is not a partner in Movilitas.Cloud.

In the following example, the tenant is a distributor in the USA which receives items from the supplier. The application displays the supplier master data:
- Name and address.
- The supplier SGLN (location) is provided because the SGLN is required to process the EPCIS files from the supplier.
- The supplier sends EPCIS over API to Movilitas.Cloud, so the supplier tag is specified that is used in the API request to identify the supplier. A previously configured Serialized Logistics V2 API channel is also associated with the supplier in the Collaboration channel field. At least one EPCIS file is uploaded on the supplier, because there is an indicator in the With upload column. The supplier can be deactivated but cannot be deleted anymore.
- Contact email addresses to perform DSCSA-related tasks are added.
- The Unpack and remove SSCCs on receipt EPCIS checkbox is selected. The supplier uses virtual SSCCs; while the EPCIS file describes containers, the physical shipment consists of trade items without containers. This setting makes it possible to receive another EPCIS file with the same SSCCs (containers).
- The Require EPCIS before receipt checkbox is cleared. The supplier might not be able to provide an EPCIS file in all cases.
- The Pulse logo button is available to fetch the complete profile of the supplier from the Pulse Profile system and show the details in a pop-up.
- The supplier is not a partner in Movilitas.Cloud.
- Other fields are left blank (not applicable).

In the following example, the tenant is a distributor in the USA which receives items from the supplier. The application displays the supplier master data:
- Name and address.
- The supplier SGLN (location) is provided.
- The Exemption from DSCSA checkbox is selected, so the supplier is temporarily exempt from DSCSA by openFDA until the date specified in the Exemption end date field. During the exemption period, the supplier can ship items without sending an EPCIS file.
- An exemption document (PDF) is also uploaded to prove the exemption. The file name is displayed in the Exemption documentation field.

In the following example, the tenant acts as a 3PL for the supplier. The application displays the supplier master data:
- Name and address.
- The supplier SGLN (location) is provided because the SGLN is required when shipping to the client on behalf of the supplier.
- The tenant uploads CSV files from the supplier. At least one CSV file is uploaded on the supplier, because there is an indicator in the With upload column. The supplier can be deactivated but cannot be deleted anymore.
- The Act as 3PL for this supplier checkbox is selected.
- The tenant ships products to the UAE on behalf of the supplier, but a Tatmeen channel is not configured because the supplier does not sell products in the UAE.
- Although the tenant also has an SFDA regulatory channel because the tenant ships products to Saudi Arabia, the supplier does not import products to Saudi Arabia so the Saudi Arabia channel for import field is left blank.
- The Supplier email field is left blank because the tenant does not send EPCIS files to the supplier by email (no shipments to Bahrain).
- The supplier is not a partner in Movilitas.Cloud.

Back to the list of procedures
Verifying the EPCIS File Received in Partnership, through a Collaboration Channel, or over API
The supplier can provide the input to you in an Electronic Product Code Information Services (EPCIS) file. The file describes the items that are shipped to your company (Advanced Shipping Notification). By receiving the file, the items and the shipping event are registered in the Serialized Logistics application.
You can receive the file in one of the following ways:
- In partnership with the supplier. In this case, the supplier uses Movilitas.Cloud to ship the items to your company. Once the transfer is created on the supplier's side, the EPCIS is automatically generated, placed, and processed in your view. Receiving an EPCIS in partnership is supported in the following scenarios:
- Your company is a distributor in the USA or a US territory.
- Your company is a wholesaler in the UAE and the supplier triggers the transfer from SAP ATTP to Movilitas.Cloud.
- From SAP ICH through the SAP ICH channel that is associated with the supplier as the collaboration channel for inbound EPCIS.
- From TraceLink through the TraceLink Partner channel that is associated with the supplier as the collaboration channel for inbound EPCIS.
- From AS2 through the AS2 channel that is associated with the supplier as the collaboration channel for inbound EPCIS.
- From LSPediA SFTP through the LSPediA channel that is associated with the supplier as the collaboration channel for inbound EPCIS.
- Over the Serialized Logistics V2 API.
- Outside Movilitas.Cloud. In that case, you can manually upload the EPCIS file on the supplier. For more information, see Uploading an EPCIS File.
After the file is received, the items are ready for warehouse activities (physical receipt, re-aggregation, decommissioning, and shipping).
When acting as a 3PL for the supplier, it is possible to receive previously shipped items again in a file. If the received items are in a hierarchy that is different from the known one due to repackaging, the application automatically performs unpacking and registers the items with the new hierarchy.
- Note: The Unpack and remove SSCCs on receipt EPCIS setting is considered during the process.
In the USA market:
- It is possible to receive an EPCIS file containing already known items to resolve a Data-no-Product (DnP) exception after 24 hours of the original shipment. If the received items are included in a new container (SSCC), the application registers the items with the new container.
- It is possible to receive an EPCIS file representing a drop shipment. A drop shipment means that the seller directly ships the items to the buyer's customer while the ownership is transferred to the buyer. For example, the manufacturer of the product fulfills your request through your supplier (distributor). The items are physically shipped to your warehouse while your supplier (distributor) becomes the owner. If the EPCIS file represents a drop shipment, there is an indicator icon with the seller's name next to the EPCIS upload.
- Note: The Unpack and remove SSCCs on receipt EPCIS setting is considered during the process.
Supported EPCIS versions:
- EPCIS 1.1
- EPCIS 1.2
Receiving the EPCIS file triggers automated actions as follows:
- If the product does not exist:
- The application creates the product and links it to the supplier. You can verify it under the Products tab on the Update supplier panel.
- If the tenant acts as 3PL for the product, manual action is required. You must select the Act as 3PL for this product checkbox and repeat the action across the hierarchy for an aggregated product (multi-level trade items like case > bundle > pack). For more information, see Editing the Products of a Supplier.
- If the tenant acts as 3PL for the supplier, the application flags the supplier as the Marketing Authorization Holder (MAH) of the product by default. The setting can be cleared manually.
- If the supplier is the MAH in certain countries only and there are multiple suppliers of the same product, manual action is required. You must select the countries where the supplier is the MAH. For more information, see Editing the Products of a Supplier.
- The application stores the company prefix of the product. You can verify it under the Products tab on the Update supplier panel.
- The application creates the product and links it to the supplier. You can verify it under the Products tab on the Update supplier panel.
- If the first EPCIS file from the supplier includes the supplier details, the application completes the supplier configuration (master data and shipping address). If the supplier master data is complete, but a new shipping address is included in the EPCIS file, the application adds the new shipping address to the supplier. As a prerequisite, the supplier must be registered with the following master data:
- Supplier name
- Supplier SGLN
- (USA market only) If the tenant is in the USA or a US territory:
- The application takes the product master data from the EPCIS file. If the master data is not present in the EPCIS file, the master data is fetched from openFDA (U.S. Department of Health and Human Services Food and Drug Administration).
- The application determines and stores the 10-digit National Drug Code (NDC) next to the Global Trade Item Number (GTIN) in the database. To determine the 10-digit NDC, a communication with openFDA might apply. If the 10-digit NDC cannot be determined even by connecting to openFDA, the 11-digit NDC from the EPCIS file is stored.
- If the product exists but the company prefix of the product is missing, the application completes the product configuration and stores the company prefix. You can verify it under the Products tab on the Update supplier panel.
You can download the shipment details received from the supplier in Microsoft Excel format. The Excel file describes the child trade items, aggregation levels (SSCCs), and company prefixes in subsequent columns. Note: Aggregated (multi-level) trade items are not supported. A maximum of two aggregation levels involving containers (SSCCs) is supported.
Before You Begin
Make sure that the following are configured:
- SAP ICH channel - when receiving the EPCIS from SAP ICH.
- TraceLink Partner channel - when receiving the EPCIS from TraceLink.
- AS2 channel - when receiving the EPCIS through the AS2 service.
- LSPediA channel - when receiving the EPCIS from LSPediA SFTP.
- Serialized Logistics V2 API channel, and API key & API secret for the authentication token - when receiving the EPCIS over API.
- The supplier (sender), including the location data (SGLN).
- The warehouse (receiver), including the location data (SGLN).
- The collaboration channel is selected for the supplier - when receiving the EPCIS through a collaboration channel.
- Partnership with the supplier - when receiving the EPCIS in partnership with the supplier.
Procedure
1. In the Serialized Logistics application, select Site management --> Suppliers tab. The application displays the list of suppliers.
2. Find and select the supplier.
3. Click on the Uploads tab.
- The application displays a log of the received files with status in a paginated view.
- The application displays a search field to search the EPCIS files by purchase order, despatch advice, batch, or product code. You can reset the filter by clicking on the Reset filters icon.
- The application displays the Non Received Files toggle button to filter on non-received EPCIS files. The application marks an EPCIS file as received in the Indicators column if the physical receipt for that EPCIS file is done in the warehouse through the mobile application.
- If there is no checkmark icon, the physical receipt is ongoing or not yet started for that EPCIS file in the mobile application. Consult your business use case if receiving in the mobile application applies to your tenant.
- If there are multiple shipments (deliveries) for the same purchase order, the application considers only the non-received EPCIS files when matching the physical receipt against an EPCIS file.
- If the application cannot determine the matching EPCIS file while scanning/entering the first item, the logic prompts the user in the mobile application to select the EPCIS file for the receiving process.
- If multiple purchase orders (and deliveries) belong to the same EPCIS file, the application does not mark the EPCIS file as received until all related orders (deliveries) are received in the mobile application.
- If the application cannot determine the matching EPCIS file while scanning/entering the first item, the logic prompts the user in the mobile application to select the EPCIS file for the receiving process.
- (USA market only) The application displays a shopping cart icon in the Indicators column next to the EPCIS file that represents a drop shipment. After hovering over the shopping cart icon, the application displays the seller's name.
The following example illustrates EPCIS files from SAP ICH. The file at the bottom of the list has a checkmark icon in the Indicators column, showing that the physical receipt for that EPCIS file is completed, so the EPCIS file is marked as received. After hovering over the checkmark icon, the application displays that the EPCIS file is received:


The following example illustrates an EPCIS file from SAP ICH that represents a drop shipment in the USA market. After hovering over the shopping cart icon in the Indicators column, the application displays the seller's name:


The following example illustrates a successfully uploaded EPCIS file from TraceLink. The file is a general supplier EPCIS file (not a drop shipment):

4. Find the file.
- Search by purchase order, despatch advice, batch, or product code.
- Filter on non-received files by selecting the Non Received Files toggle button.
- Check the upload time.
- Check the file name.
For the file name, the following applies:
- For EPCIS files from SAP ICH, the file name shows the origin and the date and timestamp in the following scheme: EPCIS_From_SAP_ICH_<YYYY_MM_DDTHH:MM:SS.sssZ>.xml.
- For EPCIS files from TraceLink, the file name shows the TraceLink transaction type and the date and timestamp in the following scheme: <TRANSACTION_TYPE>_<YYYYMMDDHHMMSSsss>.xml. Note: If the TraceLink file is uploaded on the TraceLink Partner channel, only the file name is shown in the log.
- For EPCIS files from LSPediA SFTP, the file name shows the supplier name, sender GLN, receiver GLN, despatch advice, and the date and timestamp in the following scheme: <supplier_name>_<sender_GLN>_<receiver_GLN>_<despath_advice>-<number>_YYYYMMDDHHMMSS.xml
- (USA and US territory only) For EPCIS files received in partnership, the file name shows the market, the purchase order ID, and the date and timestamp in the following scheme: Epcis_united_states_<purchase_order_id>_<YYYY-MM-DDTHH:MM:SS.sssZ>.xml.
- (UAE only) For EPCIS files received in partnership, the file name shows the market, the despatch advice, and the date and timestamp in the following scheme: EPCIS_UAE_TATMEEN_<despatch_advice>_<YYYY-MM-DDTHH:MM:SS.sssZ>.xml
5. Verify that the file was successfully processed by status:
- Circular arrows icon (Processing) - The file processing is in progress.
- Checkmark icon (Success) - The file is processed successfully.
- Red exclamation mark icon (Error) - An error occurred while processing the file and the whole transaction is aborted.
If the processing is in progress, click on the refresh button at the top-right corner of the Update supplier panel to get a status update.
- Repeat the action until the status turns into the checkmark icon or the red exclamation mark icon.
- The refresh button also updates the list of uploads with newly received files (if any).

6. For further details, expand the log. The application displays the same pieces of information independently of the file source:
- Download buttons
- Errors (if any)
- Containers
- Trade items
- Advanced Shipping Notification
- Purchase Orders
- Despatch Advice
- Batches
- List of product code, batch, and expiration date combinations.
Note: If the EPCIS file is large, the application displays the message EPCIS file is too large to show the contents instead of the containers and trade items.
Expanding a successfully processed file that was received in partnership in the USA:

Expanding a log that contains an error. The file is received from SAP ICH and the application displays the error message. In this example, the indicated trade item is already known in Movilitas.Cloud and it is in possession:

Expanding a log that contains a lot of errors. The file is received from SAP ICH. Instead of displaying the errors, the application displays the Download Errors file button to increase readability:

The following table summarizes the log types and the corresponding actions:
| Status | Description | Action |
|---|---|---|
| Success (Checkmark icon) | The file was processed successfully. No error. | Expand the log and perform the following:
|
| Error (Red exclamation mark icon) | An error occurred while processing the file and the whole transaction was aborted. No partial processing. The errors are either displayed (a few errors) or collected in a file (a lot of errors) that can be downloaded. | Expand the log and perform the following:
|
Back to the list of procedures
Uploading an EPCIS File
The supplier can provide the input to you in an Electronic Product Code Information Services (EPCIS) file. The file describes the items that are shipped to your company together with the Advanced Shipping Notification (shipping event). By uploading the EPCIS file, the items and the shipping event are registered in the Serialized Logistics application.
After the upload, the items are ready for warehouse activities (physical receipt, re-aggregation, decommissioning, and shipping).
When acting as a 3PL for the supplier, it is possible to receive previously shipped items again in a file. If the received items are in a hierarchy that is different from the known one due to repackaging, the application automatically performs unpacking and registers the items with the new hierarchy.
- Note: The Unpack and remove SSCCs on receipt EPCIS setting is considered during the process.
In the USA market:
- It is possible to receive an EPCIS file containing already known items to resolve a Data-no-Product (DnP) exception after 24 hours of the original shipment. If the received items are included in a new container (SSCC), the application registers the items with the new container.
- It is possible to receive an EPCIS file representing a drop shipment. A drop shipment means that the seller directly ships the items to the buyer's customer while the ownership is transferred to the buyer. For example, the manufacturer of the product fulfills your request through your supplier (distributor). The items are physically shipped to your warehouse while your supplier (distributor) becomes the owner. If the EPCIS file represents a drop shipment, there is an indicator icon with the seller's name next to the EPCIS upload.
- Note: The Unpack and remove SSCCs on receipt EPCIS setting is considered during the process.
Supported EPCIS versions:
- EPCIS 1.1
- EPCIS 1.2
Uploading the EPCIS file triggers automated actions as follows:
- If the product does not exist:
- The application creates the product and links it to the supplier. You can verify it under the Products tab on the Update supplier panel.
- If the tenant acts as 3PL for the product, manual action is required. You must select the Act as 3PL for this product checkbox and repeat the action across the hierarchy for an aggregated product (multi-level trade items like case > bundle > pack). For more information, see Editing the Products of a Supplier.
- If the tenant acts as 3PL for the supplier, the application flags the supplier as the Marketing Authorization Holder (MAH) of the product by default. The setting can be cleared manually.
- If the supplier is the MAH in certain countries only and there are multiple suppliers of the same product, manual action is required. You must select the countries where the supplier is the MAH. For more information, see Editing the Products of a Supplier.
- The application stores the company prefix of the product. You can verify it under the Products tab on the Update supplier panel.
- The application creates the product and links it to the supplier. You can verify it under the Products tab on the Update supplier panel.
- If the first EPCIS file from the supplier includes the supplier details, the application completes the supplier configuration (master data and shipping address). If the supplier master data is complete, but a new shipping address is included in the EPCIS file, the application adds the new shipping address to the supplier. As a prerequisite, the supplier must be registered with the following master data:
- Supplier name
- Supplier SGLN
- (USA market only) If the tenant is in the USA or a US territory:
- The application takes the product master data from the EPCIS file. If the master data is not present in the EPCIS file, the master data is fetched from openFDA (U.S. Department of Health and Human Services Food and Drug Administration).
- The application determines and stores the 10-digit National Drug Code (NDC) next to the Global Trade Item Number (GTIN) in the database. To determine the 10-digit NDC, a communication with openFDA might apply. If the 10-digit NDC cannot be determined even by connecting to openFDA, the 11-digit NDC from the EPCIS file is stored.
- If the product exists but the company prefix of the product is missing, the application completes the product configuration and stores the company prefix. You can verify it under the Products tab on the Update supplier panel.
You can download the shipment details received from the supplier in Microsoft Excel format. The Excel file describes the child trade items, aggregation levels (SSCCs), and company prefixes in subsequent columns. Note: Aggregated (multi-level) trade items are not supported in the Microsoft Excel file. A maximum of two aggregation levels involving containers (SSCCs) is supported.
Before You Begin
Make sure that the supplier (sender) and the tenant/warehouse (receiver) are configured, including the location data (SGLN).
Procedure
1. In the Serialized Logistics application, select Site management --> Suppliers tab. The application displays the list of suppliers.
2. Find and select the supplier.
3. Click on the Upload EPCIS button in the top-right corner of the Update supplier panel.
Example:

4. Select the EPCIS file from your computer. The application displays a confirmation window.

5. Click Yes.
The application checks whether the EPCIS file contains valid data.
- If yes, the application displays a green toast message at the bottom of the screen to confirm that the EPCIS file has been uploaded.
- If no, the application displays an appropriate error message. Investigate the error, correct the EPCIS file or the configuration, and retry the file upload.
6. If the upload is successful (green toast message), select the Uploads tab for the supplier.
- There is a log of the uploaded files with status in a paginated view.
- The recently uploaded file is at the top of the list. The application displays an icon with circular arrows (Processing) as the status to indicate that the file processing is in progress.
Example:

7. Click on the refresh button at the top-right corner of the Update supplier panel to get a status update.
- Repeat the action until the status turns into the checkmark icon or the red exclamation mark icon.
- The refresh button also updates the list of uploads with newly received files (if any).

8. Verify that the file was successfully processed.
- Checkmark icon (Success) - The file is processed successfully.
- Red exclamation mark icon (Error) - An error occurred while processing the file and the whole transaction is aborted.
(USA market only) If an upload is a drop shipment, the application shows a shopping cart icon in the Indicators column. After hovering over the shopping cart icon, the application displays the seller's name.
Example:

9. For further details, expand the log. The application displays the following:
- Download buttons
- Errors (if any)
- Containers
- Trade items
- Advanced Shipping Notification
- Purchase Orders
- Despatch Advice
- Batches
- List of product code, batch, and expiration date combinations.
Note: If the EPCIS file is large, the application displays the message EPCIS file is too large to show the contents instead of the containers and trade items.
Expanding a successful upload:

Expanding an upload that contains an error. The application displays the error message. In this example, the indicated container is already known in Movilitas.Cloud and it is in possession:

The following table summarizes the log types and the corresponding actions:
| Status | Description | Action |
|---|---|---|
| Success (Checkmark icon) | The file was processed successfully. No error. | Expand the log and perform the following:
|
| Error (Red exclamation mark icon) | An error occurred while processing the file and the whole transaction was aborted. No partial processing. The errors are either displayed (a few errors) or collected in a file (a lot of errors) that can be downloaded. | Expand the log and perform the following:
|
Back to the list of procedures
Uploading a CSV File
The supplier can provide the input to you in a Comma Separated Values (CSV) file. The file describes the items that are shipped to your company. A maximum of two aggregation levels involving containers (SSCCs) is supported. Aggregated (multi-level) trade items are not supported. By uploading the CSV file, the items are registered in the Serialized Logistics application.
After the upload, the items are ready for warehouse activities (physical receipt, re-aggregation, decommissioning, and shipping).
When acting as a 3PL for the supplier, it is possible to receive previously shipped items again in a file. If the received items are in a hierarchy that is different from the known one due to repackaging, the application automatically performs unpacking and registers the items with the new hierarchy.
Uploading the CSV file triggers automated actions as follows:
- If the product does not exist:
- The application creates the product and links it to the supplier. You can verify it under the Products tab on the Update supplier panel.
- If the tenant acts as 3PL for the product, manual action is required. You must select the Act as 3PL for this product checkbox. For more information, see Editing the Products of a Supplier.
- If the tenant acts as 3PL for the supplier, the application flags the supplier as the Marketing Authorization Holder (MAH) of the product by default. The setting can be cleared manually.
- If the supplier is the MAH in certain countries only and there are multiple suppliers of the same product, manual action is required. You must select the countries where the supplier is the MAH. For more information, see Editing the Products of a Supplier.
- The application stores the company prefix of the product. You can verify it under the Products tab on the Update supplier panel.
- The application creates the product and links it to the supplier. You can verify it under the Products tab on the Update supplier panel.
Before You Begin
Make sure that the supplier (sender) and the tenant/warehouse (receiver) are configured, including the location data (SGLN).
Procedure
1. In the Serialized Logistics application, select Site management --> Suppliers tab. The application displays the list of suppliers.
2. Find and select the supplier.
3. Click on the Upload CSV button in the top-right corner of the Update supplier panel.
Example:

The application opens a window that contains the following:
- A description of the CSV file format.
- The Download Template button to get the CSV template file. If you do not have the CSV file ready for uploading, download the template and fill it with your data.
- The Select File button to select a CSV file for uploading.

4. Click Select File and select the CSV file from your computer. The application displays a confirmation window.
Example:

5. Click Yes.
The application checks whether the CSV file contains valid and consistent data.
- If yes, the application displays a green toast message at the bottom of the screen to confirm that the CSV file has been uploaded.
- If no, the application displays an appropriate error message. Investigate the error, correct the CSV file, and retry the file upload. For more information on the errors, see Errors during CSV File Upload on the Supplier.
6. If the upload is successful (green toast message), select the Uploads tab for the supplier.
- There is a log of the uploaded files with status in a paginated view.
- The recently uploaded file is at the top of the list. The application displays an icon with circular arrows (Processing) as the status to indicate that the file processing is in progress.
Example:

7. Click on the refresh button at the top-right corner of the Update supplier panel to get a status update.
- Repeat the action until the status turns into the checkmark icon or the red exclamation mark icon.
- The refresh button also updates the list of uploads with newly received files (if any).

8. Verify that the file was successfully processed.
- Checkmark icon (Success) - The file is processed successfully.
- Red exclamation mark icon (Error) - An error occurred while processing the file and the whole transaction is aborted.
Example:

9. For further details, expand the log. The application displays the following:
- Download CSV File button
- Errors (if any)
- Containers
- Trade items
- Batches
- List of product code, batch, and expiration date combinations.
Expanding a successful upload:

Expanding an upload that contains an error. The application displays the error message. In this example, the indicated container is already known in Movilitas.Cloud and it is in possession (not yet shipped):

The following table summarizes the log types and the corresponding actions:
| Status | Description | Action |
|---|---|---|
| Success (Checkmark icon) | The file was processed successfully. No error. | Expand the log and perform the following:
|
| Error (Red exclamation mark icon) | An error occurred while processing the file and the whole transaction was aborted. No partial processing. | Expand the log and perform the following:
|
Back to the list of procedures
Viewing Exceptions (DSCSA USA Only)
You can view the exceptions that occurred while receiving items from a supplier in the USA or a US territory. The exceptions are listed with the following data:
- Order ID
- Delivery ID
- Despatch advice
- Purchase order
- DSCSA EPCIS file against which the physically scanned items are verified.
For each exception, you can view the items under the Product-no-data section (if any) and the Data-no-product section (if any). The input comes from the mobile application while receiving items for the order/delivery. The scanned items are verified against the DSCSA EPCIS file processed on the supplier before the receipt.
Procedure
1. In the Serialized Logistics application, select Site management --> Suppliers tab. The application displays the list of suppliers.
2. Find and select the supplier.
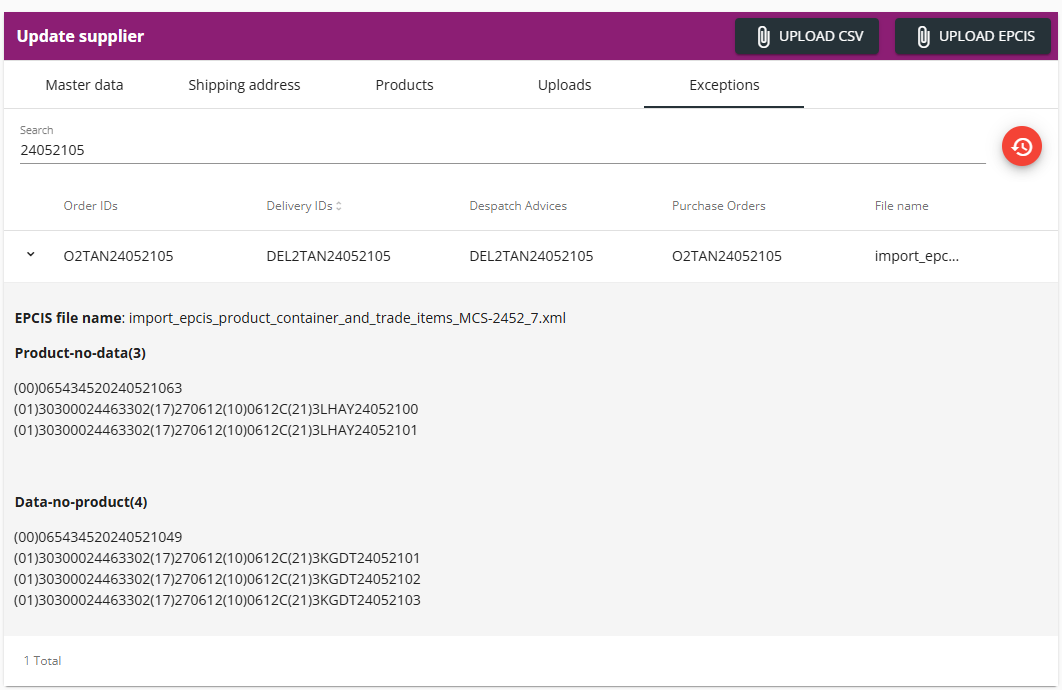
3. On the Update supplier panel, select the Exceptions tab. The application displays the list of exceptions.
You can sort the table in ascending or descending order by delivery ID.
Example:

4. Find the exception by using the search field.
- Search by order ID, delivery ID, despatch advice, purchase order ID, or file name. The application filters the exceptions based on the search criteria.
- If the file name is too long to show the complete name, you can hover over the displayed value.
- You can reset the filter by clicking on the Reset filters icon.
5. Expand the exception for the details.
The application displays the following:
| Section | Description |
|---|---|
| EPCIS file name | The DSCSA EPCIS file against which the physically scanned items are verified during receipt. |
| Product-no-data | If a scanned item is not part of the ASN (DSCSA EPCIS file) but the item matches a product/line item of the order (delivery), the application collects the item under the Product-no-data section. The quantity is indicated in brackets. The scanned item can be an SSCC (container) or an SGTIN (trade item). |
| Data-no-product | If not all the items are received from the DSCSA EPCIS file, the application collects the missing items under the Data-no-product section. The quantity is indicated in brackets. The missing item can be an SSCC (container) or an SGTIN (trade item). Note: If multiple orders (deliveries) belong to the same EPCIS file, data-no-product exceptions are detected after the last order (delivery) is received in the mobile application. |
Example:
Back to the list of procedures
Viewing a Pulse Profile (DSCSA USA Only)
If a supplier operates in the USA, you can get the complete profile of the supplier from the Pulse Profile system.
Procedure
1. In the Serialized Logistics application, select Site management --> Suppliers tab. The application displays the list of suppliers.
2. Find and select the supplier.
3. On the Update supplier panel, click on the Pulse logo button.
Example:

The application fetches the complete profile of the supplier from the Pulse Profile system and shows the details in a pop-up. However, the displayed information is not a proof of an active license or a license in good standing.
Example:

Back to the list of procedures
Updating a Supplier (Master Data and Shipping Address)
When updating a supplier, you can modify the master data including the business address (business location) and you can also manage the shipping addresses (ship-from locations). Updating the products of the supplier is described in Editing the Products of a Supplier.
Procedure
1. In the Serialized Logistics application, select Site management --> Suppliers tab. The application displays the list of suppliers.
2. Find and select the supplier.
3. In the Master data form on the Update supplier panel, modify the fields as needed.
| Field | Country | Description |
|---|---|---|
| Supplier name | All | Enter the supplier name. The supplier name must be unique within the tenant. (USA only) If a few characters are entered for a supplier in the USA market, the application searches the Pulse Profile system and offers hits in a drop-down:
|
| Supplier SGLN | All | Enter the location number of the supplier in the SGLN format: <GS1 company prefix>.<location reference>.<extension or "0" when no extension>. The supplier SGLN must be unique within the tenant. For example, "1234567.00012.0". If you receive the shipment details from a supplier in an EPCIS file, the supplier SGLN is required. To use the built-in GLN to SGLN converter, click on the conversion button (Help me to define the SGLN) on the right. The application displays a pop-up. Provide the following data and click Convert:
The provided GLN value is converted to the SGLN format and the field is populated. |
| Supplier tag | All | Enter the supplier tag that must be unique within the tenant. The tag identifies the supplier in the following cases:
TIP: If you want to use multiple words, connect them with a hyphen (-) or an underscore (_), for example, "demo-supplier-online-help". |
| City | All | Enter the city where the supplier is located. |
| Street | All | Enter the street. The form offers three rows (levels) for the street data. |
| State | All | Enter the state. |
| ZIP code | All | Enter the postal code. |
| Select country | All | Select the country. Start entering the country name to filter the countries. |
| Supplier email | Bahrain | Enter the email address of the supplier. This setting is relevant when you act as a 3PL for this supplier and you want to send EPCIS files containing the transfer details to the supplier (Marketing Authorization Holder - MAH). |
| E-mail address for EPCIS exception handling | USA US territory:
| Enter the contact email address to handle inbound EPCIS exceptions. The field is only available when the country of the supplier is the United States or a US territory. |
| E-mail address for Verifications | USA US territory:
| Enter the contact email address in case of issues with verifications. The field is only available when the country of the supplier is the United States or a US territory. |
| E-mail address for Trace request | USA US territory:
| Enter the contact email address to send the TI trace requests. The field is only available when the country of the supplier is the United States or a US territory. |
| Collaboration channel | All | If a collaboration (business) channel is configured to interact with the supplier, select the channel you want to associate with the supplier:
|
| AS2 partner | All | If the collaboration channel is AS2, select the AS2 partner from the drop-down. The application offers the AS2 service providers onboarded in Movilitas.Cloud. If you cannot find the AS2 partner in the list, contact Movilitas.Cloud Support. The field is available when an AS2 channel is associated with the supplier in the Collaboration channel field. |
| Unpack and remove SSCCs on receipt EPCIS | All | If the supplier uses virtual SSCCs (containers) in their EPCIS files while physically the trade items are not put into these containers, select this checkbox. When an EPCIS file is received from the supplier:
|
| Exemption from DSCSA | USA US territory:
| If openFDA has exempted the supplier from being DSCSA-compliant for a certain period of time (exemption period), select this checkbox. The effect of the exemption logic is the following:
By default, the checkbox is cleared. The checkbox is available when the tenant's country is the USA or a US territory. Once the checkbox is selected:
|
| Exemption end date | USA US territory:
| Specify the end date of the exemption that the supplier received from openFDA by using the datepicker. Once the specified date has passed, the application does not treat the supplier as exempt. On the day after the exemption end date, the application sends a notification email to the administrators of the tenant. The field is available when the Exemption from DSCSA checkbox is selected. |
| Exemption documentation | USA US territory:
| Upload the exemption documentation from openFDA provided by the supplier. Click on the Attach button and select the file from your computer. The allowed file format is PDF, maximum 5 MB in size. If you do not have the exemption documentation, contact your supplier. If you hover over the question mark icon in the UI, you can find the same information. The exemption documentation serves two purposes:
|
| Require EPCIS before receipt | All | Select this checkbox to make receiving an EPCIS file from the supplier mandatory before receiving the items in the warehouse. For the USA market, selecting the checkbox overrides and ignores the exemption from DSCSA setting. Selecting the checkbox before the exemption end date indicates that the supplier is ready before the end of the exemption period. By default, the checkbox is cleared. |
| Act as 3PL for this supplier | All | If you perform third-party logistics (3PL) on behalf of the supplier for all products from the supplier, select this checkbox. If you act in non-3PL mode for the supplier, leave this checkbox in cleared status (default). If you act in mixed mode (3PL and non-3PL) for the supplier, leave this checkbox in cleared status (default) and configure the setting at the product level. |
| Tatmeen (UAE) channel | All | If the supplier imports products into the United Arab Emirates (UAE) market and you act as a 3PL for this supplier, select the previously configured Tatmeen regulatory channel that is associated with the supplier. The field is available when the Act as 3PL for this supplier checkbox is selected and a Tatmeen regulatory channel is configured for the tenant. |
| Saudi Arabia channel for import | All | If the supplier imports products into Saudi Arabia and you act as a 3PL for this supplier, select the previously configured SFDA regulatory channel that is associated with the supplier. The field is available when the Act as 3PL for this supplier checkbox is selected and an SFDA regulatory channel is configured for the tenant. |
| Collaboration Channel - outbound EPCIS message on behalf of MAH | All | If you act as a 3PL for this supplier and you want to send EPCIS shipping messages to SAP ICH on behalf of the supplier (MAH), select the previously configured SAP ICH channel. The field is available when the Act as 3PL for this supplier checkbox is selected and an SAP ICH channel is configured for the tenant. |
| Decommission export on arrival EPCIS | All | Select the checkbox to activate automatic bulk export to the NMVS upon arrival of an EPCIS file from the supplier. The checkbox is available when an Arvato (NMVS) regulatory channel is configured for the tenant. Once selecting the checkbox, the application displays the NMVS Channel drop-down to select the Arvato (NMVS) regulatory channel through which the bulk transaction is performed. |
| NMVS Channel | All | Select the Arvato (NMVS) regulatory channel through which the bulk export transaction is performed. The field is available when the Decommission export on arrival EPCIS checkbox is selected. |
4. Click Save Supplier.
5. If applicable, select the Shipping address tab and manage the shipping addresses.
| Operation on Shipping Address | Description | ||||||||||||||||||
|---|---|---|---|---|---|---|---|---|---|---|---|---|---|---|---|---|---|---|---|
| Add | Click Add Shipping Address, fill in the form as described below, and click Save. The required fields are marked with an asterisk (*) in the form.
| ||||||||||||||||||
| Edit | Click on the edit icon, modify the fields in the opened form as described for the Add action, and click Save. Example:  | ||||||||||||||||||
| Delete | Click on the delete icon. Note: The application does not request confirmation but it immediately removes the delivery address from the list.
|

Back to the list of procedures
Editing the Products of a Supplier
For auto-created products, verifying and editing the products is a mandatory post-action in the following cases:
- The supplier is the MAH of the product in specific countries and there are multiple suppliers of the same product in different countries. You need to specify the MAH countries of the product for each supplier.
- The tenant acts as 3PL for the product. You need to set a flag for the product.
- If the product is an aggregated product (multi-level trade items like case > bundle > pack), you need to set the flag for all product codes in the hierarchy.
- The setting enables the tenant to act in mixed mode (3PL and non-3PL) for the same supplier by distinguishing the tenant mode at the product level.
Procedure
1. In the Serialized Logistics application, select Site management --> Suppliers tab. The application displays the list of suppliers.
2. Find and select the supplier.
3. On the Update supplier panel, select the Products tab. The application displays the list of products from the supplier.
You can sort the table in ascending or descending order based on the product code, product name, or company prefix.
Example:

4. Find the product by using the search field.
- Enter the product code, product name, or company prefix. The products are filtered based on the search criteria.
- You can reset the filter by clicking on the Reset filters icon.
Example:

5. Edit the product by clicking the edit icon in the Action column.
Note: The already known fields are pre-filled and read-only in the Update product form. You cannot edit the fields that are critical in terms of database consistency and were provided before. You can still edit the active fields, the checkboxes, and the Select designated wholesaler drop-down (when applicable).
| Field | Description |
|---|---|
| Select product code schema | Select the product code schema.
|
| Product code | Enter the product code. You can provide a custom value as the application supports custom product code schema. The entered product code must be unique for the tenant. |
| Product has no aggregation below it | If a product from a supplier that has a GTIN starting with a non-0 indicator digit does not have the underlying hierarchy (not aggregated product or no EPCIS file from the supplier), select this checkbox. The setting makes it possible to perform actions on the trade items of this product in the mobile application:
If the checkbox is cleared (default) for a product of this type, it is not possible to receive, pack, or ship the trade items of this product in the mobile application. Note:
|
| Product name | Enter the product name. Free-form text field. |
| Unit of measurement | Enter the unit of measurement, for example, liter, kilogram, or units. |
| Minimum shelf life at delivery | Provide the minimum shelf life at delivery in months by entering the number or by using the arrows on the right. |
| GS1 company prefix | Enter the GS1 company prefix of the product. This setting is relevant to outbound activities when you want to send EPCIS files containing the shipment details. |
| Act as 3PL for this product | If you act as 3PL for the product, select this checkbox. Otherwise (non-3PL mode), leave the checkbox cleared (default).
The setting has an impact on who is the seller (sender/source owning party) in the outbound EPCIS file:
|
| Supplier is MAH | Select the checkbox if the supplier is the Marketing Authorization Holder (MAH) of this product. By selecting the checkbox, the application displays the Specific MAH Countries drop-down. |
| Specific MAH Countries | If the supplier is the MAH in certain countries only and there are multiple suppliers of the same product, select the countries where the supplier is the MAH. IMPORTANT: The same product can be assigned to multiple suppliers but only one supplier can be the MAH in a country.
|
| Supplier is designated Wholesaler | Select the checkbox if the supplier is a designated (contracted) wholesaler of this product. Only applicable when an Arvato regulatory channel is set for the tenant to connect to a National system (NMVS) to perform FMD actions. After selecting the checkbox, Movilitas.Cloud collects the product master data from the National system through the corresponding Arvato regulatory channel. The application offers the designated wholesaler(s) in the Select designated wholesaler drop-down with an auto-selected value. Other cases:
|
| Select designated wholesaler | Select the designated wholesaler in the drop-down list. The application offers an auto-selected value that you can change when there are multiple choices. The selected value is remembered. |
| Exempt from DSCSA | Select the checkbox if the product is exempt from DSCSA (USA). The checkbox is visible when the product belongs to the USA market. If the product must meet the DSCSA requirements, keep the checkbox cleared (default). |
The following example illustrates the case when updating the company prefix of the product and selecting a country (Bahrain) where the supplier is the MAH of the product:
- If the product belongs to multiple suppliers, it is required to specify the country for each supplier.
- The tenant acts as 3PL for the supplier because the Act as 3PL for this product checkbox is hidden.

The following example illustrates the case when selecting the Product has no aggregation below it checkbox for the product:
- The product code starts with a non-0 indicator digit ("3") that does not have the underlying hierarchy (no EPCIS file from the supplier) but its trade items need to be packed into containers and shipped. The setting allows packing in the mobile application and therefore creating these items in the system.
- The tenant acts as 3PL for the supplier because the Act as 3PL for this product checkbox is hidden.

The following example illustrates the case when selecting the Act as 3PL for this product checkbox for a product in the USA:
- The tenant acts as 3PL for this specific product but may act as non-3PL for other products.
- If the product is an aggregated product (multi-level trade items like case > bundle > pack), the user must repeat selecting the checkbox for all product codes in the hierarchy.
The product must meet DSCSA requirements, so the Exempt from DSCSA checkbox is cleared.

The following example illustrates the case when editing a product for which the supplier is the designated wholesaler (FMD Europe):

6. Save the product. Scenarios:
Scenario DSCSA (USA)
To save the product and fetch master data from openFDA, click Fetch from openFDA and Save. The application updates the product and fetches product master data from openFDA. The product master data is required in the outbound DSCSA EPCIS file.
To save the product but not connect to openFDA, click Save.
Scenario Non-DSCSA (USA) and Non-FMD (Europe)
Click Save. The application updates the product.
Scenario FMD (Europe)
Click Save. The application investigates whether the supplier is flagged as a designated wholesaler:
- If no, the product is updated.
- If yes and the supplier master data can be overwritten with the data from the National system, the application asks you to confirm overwriting:

- When selecting Yes, the supplier master data (name and address fields) are overwritten, as applicable. The product is updated.
- When selecting No, the supplier master data (name and address fields) are left intact but the product is updated.
Back to the list of procedures
Unassigning a Product from the Supplier
Procedure
1. In the Serialized Logistics application, select Site management --> Suppliers tab. The application displays the list of suppliers.
2. Find and select the supplier.
3. On the Update supplier panel, select the Products tab. The application displays the list of products from the supplier.
You can sort the table in ascending or descending order based on the product code, product name, or company prefix.
Example:

4. Find the product by using the search field.
- Enter the product code, product name, or company prefix. The products are filtered based on the search criteria.
- You can reset the filter by clicking on the Reset filters icon.
Example:

5. Unassign a product from the supplier by clicking Unassign product from supplier in the Action column.
The application immediately executes the action without requesting confirmation. By performing this action, you only remove the link between the supplier and the product code, but the product remains in the database.
Back to the list of procedures
Deactivating a Supplier
Once a supplier has a file upload, you can only deactivate the supplier, but you cannot delete the supplier. If the supplier is inactive, it is not possible to upload a file on the supplier or receive a file from an external system for the supplier.
Procedure
1. In the Serialized Logistics application, select Site management --> Suppliers tab. The application displays the list of suppliers.
2. Find the supplier in the list you want to deactivate.
Example:

3. Click the deactivate icon and confirm the deactivation by clicking Yes.
Back to the list of procedures
Reactivating a Supplier
You can reactivate an inactive supplier. By default, inactive suppliers are hidden in the list. You can retrieve inactive suppliers by selecting the Inactives toggle button.
Procedure
1. In the Serialized Logistics application, select Site management --> Suppliers tab. The application displays the list of suppliers.
2. Select the Inactives toggle button to make inactive suppliers visible in the list.

3. Find the supplier in the list you want to reactivate.
An inactive supplier is displayed in grey in the list.
Example:

4. Click the reactivate icon and confirm the reactivation by clicking Yes.
Back to the list of procedures
Deleting a Supplier
If the supplier does not have any file upload, you can delete it.
Procedure
1. In the Serialized Logistics application, select Site management --> Suppliers tab. The application displays the list of suppliers.
2. Find the supplier in the list you want to delete.
Example:

3. Click the delete icon and confirm the deletion by clicking Yes.
Back to the list of procedures