You can use the Manufacturer V2 API to integrate the shopfloor and the enterprise resource planning (ERP) systems with the Serialized Manufacturing application.
The Manufacturer V2 API uses the Representational State Transfer (REST) standard to interact with other systems.
The Manufacturer V2 API is an extension of the Serialized Manufacturing application of Movilitas.Cloud that enables you to send requests from external systems to the application.
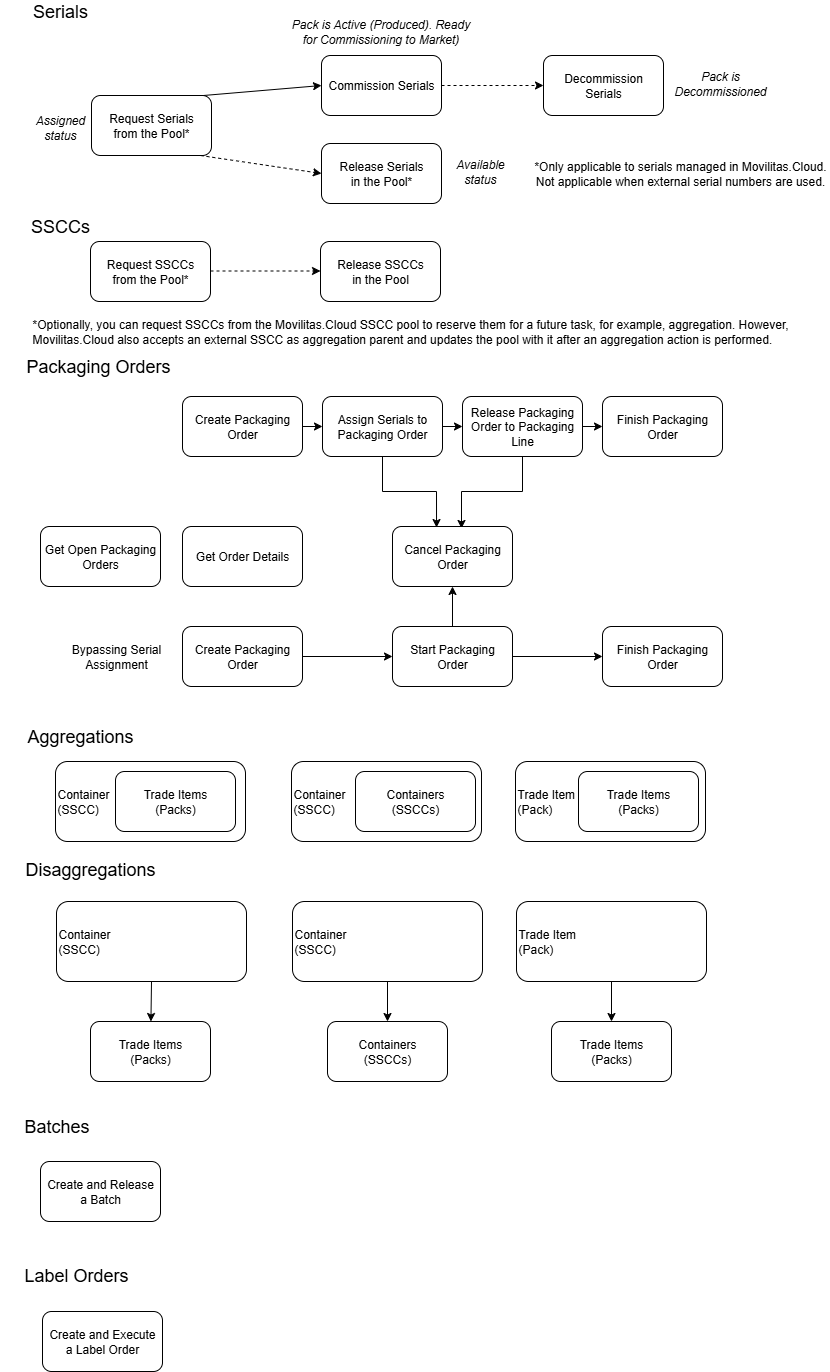
The following figure provides an overview of all the requests that you can send by using the Manufacturer V2 API:
This article describes how to assign serials from the serial pool in Movilitas.Cloud to one or more packaging orders using the Manufacturer V2 API. The order status changes from Open to Pending release.
API Tool to Use
In this document, we provide examples by using the cURL command-line tool. To send the API request, you can find a lot of user-friendly REST API tools on the Internet, for example, Postman.
Before You Begin
1. You must enable the Serialized Manufacturing application.
2. You must create an API key and secret.
3. You must create a shopfloor channel with the Manufacturer V2 API source. You will need the channel key for your requests.
4. You must configure the Serialized Manufacturing application and the channels required to connect to external systems.
5. You must have the authentication token to send requests over API. Select one of the following ways:
- Apply a dynamic token. Send an authentication request over the Authentication API. For more information about the Authentication API, open the Tenant Dashboard in Movilitas.Cloud, select API keys, and choose Authentication API Documentation. Also, see Authentication Request.
- Apply a static token. Generate a static token for your previously created API key.
For more information, see Configuring the Movilitas.Cloud APIs.
Make sure you have enough available (free) serials before sending the Assign Serials to Packaging Orders request. If there are not enough available serials in the pool:
- When using the Serial Number Management (SNM) channel, you can generate serials manually under the Serialized Manufacturing application --> Products --> Products --> Serial management tab.
- When an external system, for example, SAP ICH, provides the serials through a channel, you can request serials manually under the Serialized Manufacturing application --> Products --> Products --> Serial management tab.
- When automatic replenishment is set under the Serialized Manufacturing application --> Products --> Products --> Serial management tab, the application automatically fills the serial number pool in the background and makes the required number of serials available for the packaging order.
Procedure
1. Use the PATCH method and the following URL:
https://api.movilitas.cloud/v1/manufacturer/v2/api/packaging_order/assign_serials
2. For the header, define the content type (JSON), the authentication token, and the channel key.
The token can be given in one of the following ways:
- As x-access-token header.
- As Authorization header by using the Bearer schema.
Header Option 1
| Key | Action |
|---|---|
| Content-Type | Apply JSON format for the content. Use the value application/json. |
| x-access-token | Provide the authentication token. |
| x-channel-key | Provide the channel key of your Manufacturer V2 API channel. |
Header Option 2
| Key | Action |
|---|---|
| Content-Type | Apply JSON format for the content. Use the value application/json. |
| Authorization | Provide the authentication token as Bearer <token>. |
| x-channel-key | Provide the channel key of your Manufacturer V2 API channel. |
3. In the body of the request, define the parameters and their values based on the table below.
| Field | Required or Optional? | Type | Description |
|---|---|---|---|
| order_ids | Required | String[] | The array of order IDs. |
4. Send the request.
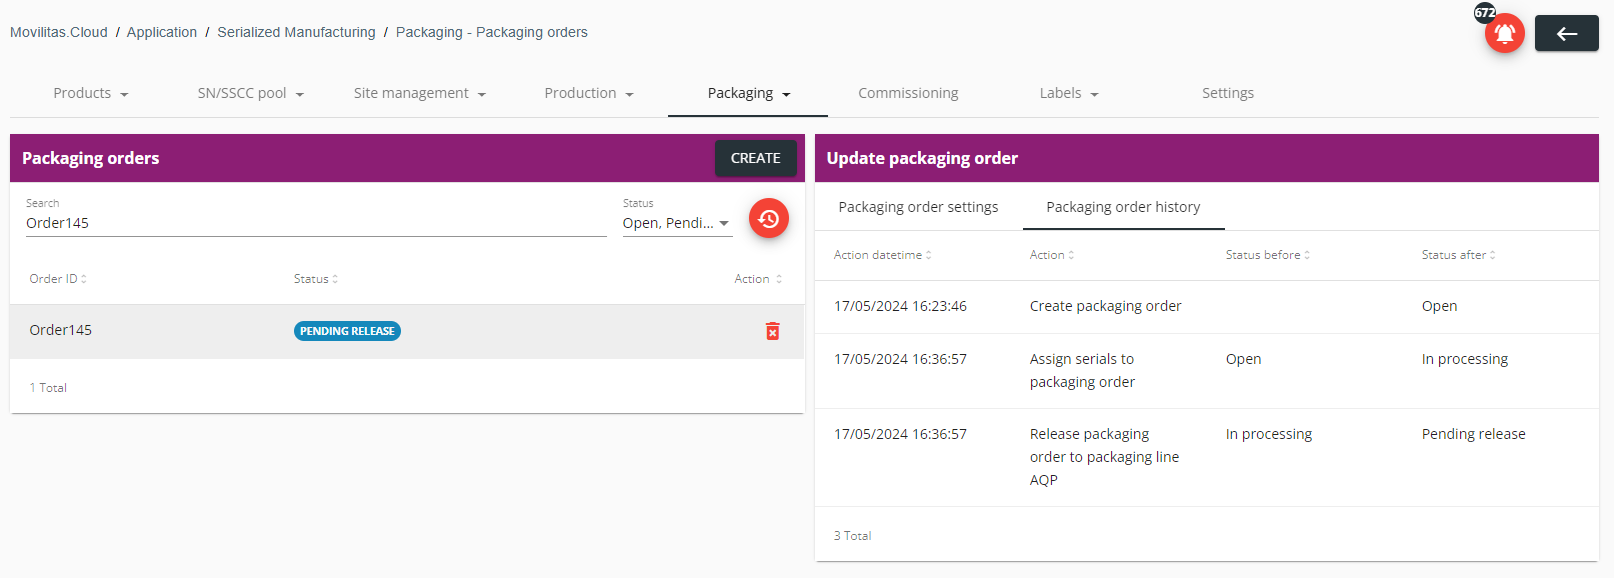
The application assigns serial numbers to the order and moves its status to Pending release. For more information, go to the Serialized Manufacturing application --> Packaging --> Packaging orders tab, select the order, and check the Update packaging order panel --> Packaging order history tab.
Sample cURL Request
curl -X PATCH \
  https://api.movilitas.cloud/v1/manufacturer/v2/api/packaging_order/assign_serials \
  -H 'Content-Type: application/json' \
  -H 'x-access-token: eyJhbGciOiJIUzI1NiIsInR5cCI6IkpXVCJ9.eyJrZXkiOiJzX2FqazQyS2' \
  -H 'x-channel-key: Ky1SpfEXmjj05fW3USBFD3pgoEi9AQ29Atsnj4Zy' \
  -d '{
    "order_ids": [
        "Order142",
        "Order145"
    ]
}'
Sample Response (Success 200)
{
    "success": true,
    "message": "Serial assignment process started",
    "data": [
        {
            "order_id": "Order142",
            "order_description": "test",
            "product_code": "11223344556677",
            "product_code_schema": "GTIN",
            "batch": "BATCH003",
            "expiry_date": "221200",
            "quantity": 10,
            "extra_percentage": 0,
            "serialized": true,
            "packaging_line_tag": "test-packaging-line-1"
        },
        {
            "order_id": "Order145",
            "order_description": "Packaging Order 145",
            "product_code": "02022090117459",
            "product_code_schema": "GTIN",
            "batch": "B2405121",
            "expiry_date": "290512",
            "quantity": 10,
            "extra_percentage": 10,
            "serialized": true,
            "packaging_line_tag": "test-packaging-line-1"
        }
    ]
}
Admin UI Example
The following screenshot illustrates the second order, "Order145":
Error Types and Resolution
This section lists some of the most general error types when sending the request.
| Error Message or Error Type | Error Code | Description |
|---|---|---|
| No token provided | ERR0001 | No authentication token is provided. Ensure that you add the authentication token to the header of the request. |
| Failed to authenticate token | ERR0000 | Failed to authenticate the provided token. Double-check if your token has expired or has been revoked. Obtain a valid token by generating a static one or by getting a dynamic one through Authentication API. |
| Channel ID is missing or it needs to be in correct format | - | The channel key of your Manufacturer V2 API channel is not specified in the request. To get the channel key, go to Tenant Dashboard --> Channels in the Admin UI, open your Manufacturer V2 API channel, and find the channel key on the top of the Edit shopfloor channel panel. |
| Request body could not be parsed | - | The syntax of the request body is not correct, for example, a comma is missing at the end of a field. Make sure that the request body is defined in the correct way and that you use JSON format. |
| Validation error | - | The given data is invalid. It does not follow the required data type or pattern. The response includes details about the specific issue. Follow the explanation in the response and correct your data. |
| Packaging order(s) not found: [<order_ids>] | - | The packaging orders do not exist in the application with the given order IDs. Make sure that the orders exist and that you give the correct IDs. |