You can manage the application-level settings under the Serialized Manufacturing application --> Settings tab:
- You can give a GS1 Digital Link Resolver URL that is encoded as part of a barcode on a printed label.
- You can manage market profiles.
- You can activate or deactivate the automatic release of packaging orders.
- You can allow the creator to release batches or make it mandatory to involve another user in this procedure.
- You can activate repackaging functions.
- You can set a default serial number source and activate automatic serial number replenishment.
- You can control the access to the Admin UI for users with the "User" or "Support" role.
The market profiles are essential for multiple activities in the application, like:
- Product registration.
- Creating and releasing packaging orders.
- Commissioning items to a market.
- Sending VRS responses (USA market only).
Note: To access this page, the "Administrator" role is required.
List of Procedures
- Configuring the GS1 Digital Link Settings Panel
- Configuring the Settings Panel (Markets and Functions)
- Creating a Tenant in CARO (USA Only)
- Configuring the USA Market Profile for VRS (USA Only)
- Controlling the Access for Users with the User or Support Role
Configuring the GS1 Digital Link Settings Panel
You want to provide electronic content through an external GS1 Digital Link Resolver server. The GS1 Digital Link Resolver URL is encoded as part of a barcode (like a QR code) that you can print by using the Serialized Manufacturing application.
If a person scans the QR code by using a mobile device, the person is redirected to a webpage that provides information about the scanned product. To redirect the person to the webpage, you need to specify the GS1 Digital Link Resolver server URL.
Before You Begin
Make sure that you have a valid GS1 Digital Link Resolver server URL and that your company prepared the server for processing the requests. The server is external and you cannot control it in Movilitas.Cloud.
Procedure
1. In the Serialized Manufacturing application, click on the Settings tab. The application displays the Settings page.
Example:

2. Enter the URL in the GS1 Digital Link Resolver URL field.
Example:

3. Click Save Settings.
Back to the list of procedures
Configuring the Settings Panel (Markets and Functions)
Before You Begin
Make sure that you have configured the regulatory and business channels to communicate with external systems.
In the pharmaceutical industry:
- For the European (EU) market, you can establish a connection to one of the following:
- EU Hub (EMVO).
- SAP ATTP.
- Arvato CSDB.
- For the African (AF) market, you can establish a connection to the TRVST platform.
- For the Indonesian (IDN) market, you can establish a connection to the BPOM system (National Agency of Drug and Food Control in Indonesia).
- For the Chinese (CHN) market, you can establish a connection to the SAP ICH or TraceLink system.
- For the Russian (RUS) market, you can establish a connection to one of the following:
- TraceLink as a TraceLink Partner.
- SAP ATTP.
- For the United Arab Emirates (UAE) market, you can establish a connection to TraceLink as a TraceLink Partner.
- For the Kazakhstan (KAZ) market, you can establish a connection to one of the following:
- Order Management Station (OMS) Cloud.
- TraceLink as a TraceLink Partner.
- For the Uzbekistan (UZB) market, you can establish a connection to one of the following:
- Code Order Management Station (OMS).
- TraceLink as a TraceLink Partner.
- For the Kyrgyzstan (KGZ) market, you can establish a connection to TraceLink as a TraceLink Partner.
- For the United Kingdom (UK) market, you can establish a connection to Novumgen SFTP.
- For the United States of America (USA) market, you can perform the following:
- Configure the Verification Router Service (VRS) responder settings.
- Establish a connection to SAP ATTP.
You can set a default serial number source and activate automatic serial number replenishment. The following serial number sources are supported:
- SAP ATTP.
- SAP ICH.
- Serial number management (SNM) - In-house serial number generation.
- TraceLink as a TraceLink Partner.
- Novumgen.
- Arvato CSDB.
Procedure
1. In the Serialized Manufacturing application, click on the Settings tab. The application displays the Settings page.
Example:

2. To create a market profile, click Create on the Settings panel. The application displays the Create market profile dialog.

3. Select the market.
4. Configure the market as described in the table below.
| Market | Action |
|---|---|
| EU | Select an EU Hub channel, an SAP ATTP channel, or an Arvato CSDB channel. For the SAP ATTP channel:
|
| AF | Select a TRVST channel and specify the default company prefix. If the company prefix is not specified for the product, this value is used when sending a message to TRVST. |
| IDN | Select a BPOM channel. |
| CHN | Select an SAP ICH or a TraceLink Partner channel. You can activate automatic commissioning to SAP ICH or TraceLink from the packaging line by selecting the Automatic release to the market checkbox. Each time the packaging line updates Movilitas.Cloud, the produced items are immediately commissioned, for example, to TraceLink without human intervention. The commissioning message (SNX_DISPOSITION_ASSIGNED) is logged on the TraceLink Partner channel. |
| RUS | Select a TraceLink Partner channel or an SAP ATTP channel. For the SAP ATTP channel:
|
| UAE | Select a TraceLink Partner channel. |
| KAZ | Select an OMS Cloud channel or a TraceLink Partner channel. |
| UZB | Select a Code OMS channel or a TraceLink Partner channel. |
| KGZ | Select a TraceLink Partner channel. |
| UK | Select a Novumgen channel. |
| USA | If you want to commission or decommission items to SAP ATTP, select an SAP ATTP channel.
If you use Movilitas.Cloud as a VRS provider, provide the default VRS response GLN and responder contact information, and configure the verifiable credentials settings. For more details, see Creating a Tenant in CARO (USA Only) and Configuring the USA Market Profile for VRS (USA Only). |
AF market example:

UAE market example:

EU market example with SAP ATTP channel:

USA market example with SAP ATTP channel but without VRS settings:

5. Click Save. The application displays the created market profile in the list.
6. To update a market profile, click the edit icon for a market profile and modify the market settings.
7. To delete a market profile, click the delete icon for a market profile and confirm the deletion.
8. If you want to automatically release the packaging orders to the packaging line, select Automatic release of packaging orders.
Note: This checkbox is applicable when your company applies packaging lines.
9. If you want to involve another user to release a previously created batch, select A second user is required to release the batch (default setting is selected).
- Applicable to the scenarios when you create the batch under the Products --> Batches tab and not over API.
- This is a quality assurance step when another user reviews and confirms the batch before the batch can be used in a serialization activity (printing or packaging controlled by Movilitas.Cloud).
- If the checkbox is cleared, the same user can create and release the batch.
10. If you want to activate functions related to repackaging, select Repackaging.
11. Configure a default serial number source and activate automatic serial number replenishment.
- Select a business channel in the Default serial number source drop-down:
- SAP ATTP.
- SAP ICH.
- Serial number management (SNM) - In-house serial number generation.
- TraceLink Partner.
- Novumgen.
- Arvato CSDB.
- Select the Auto Replenish checkbox.
Products created after the default setting automatically inherit the default setting, unless you manually change the serial management setting of the product.
The following example illustrates the Settings panel with multiple market profiles, activated functions, and the default serial number source setting.

Back to the list of procedures
Creating a Tenant in CARO (USA Only)
To obtain and use a verifiable credential for your VRS response, you need to own a digital identifier (DID) in a digital wallet provider (for example, CARO) as per your state license.
In the Credentialing of ATP for Regulatory Observance (CARO) system, the digital identifier is assigned to a tenant (ATP enterprise account), and the tenant is linked to a VRS service provider (Movilitas.Cloud).
If you do not have a tenant in CARO, Movilitas.Cloud enables you to first initiate the tenant creation in CARO. Then, CARO will contact you for further details. In the end, you will have a digital identifier (DID) that is essential to apply a verifiable credential in your VRS response.
Note: Only applicable when CARO (Spherity) is your digital wallet provider. Tenant creation in XATP (LedgerDomain) from Movilitas.Cloud is not supported. If you want to connect to XATP, skip this procedure and do the onboarding outside Movilitas.Cloud.
Procedure
1. In the market profile pop-up window, click Create Tenant on CARO.
The following example illustrates the case when creating the USA market profile:

The application displays a pop-up window to confirm the action.
2. Click Yes in the pop-up window.

Movilitas.Cloud sends the enterprise name (tenant in Movilitas.Cloud) and the email of the logged-in user to CARO.
If the request is successful, the button disappears and the application displays the following text in green at the bottom of the screen: Tenant request is successful. You will be contacted by CARO for further details. Please check your mail.
Next Steps
Once the tenant is set up in CARO and you have a valid DID, you are ready to configuring the USA market profile settings.
Back to the list of procedures
Configuring the USA Market Profile for VRS (USA Only)
This section focuses on the VRS settings and does not discuss channel settings. Channel settings is not needed for VRS and can be omitted.
Before You Begin
If you want to apply a verifiable credential in your VRS response, make sure that you own the necessary assets:
- A valid digital identifier (DID) in CARO or in XATP (digital wallet providers).
- An API key (XATP only).
Procedure
1. In the market profile pop-up window, leave the Channel field blank.
2. Provide the default Global Location Number (GLN) for VRS responses in the Default VRS Response GLN field. Follow the GS1 standard when providing the GLN.
- This GLN will be used in the response when a request comes in for a Global Trade Item Number (GTIN).
- This value is overwritten by the VRS Responder GLN value set at the product level.
3. Provide the responder's contact information. At least one of the following contact data must be given so that the responder can successfully respond:
- Telephone
4. To include verifiable credentials in your responses, select the Enable Verifiable Credentials checkbox. The application displays the Select identifier drop-down and the Accept messages without verifiable credentials? checkbox.
The following example illustrates the case when creating the USA market profile. A request to create a tenant in CARO was sent because the Create Tenant on CARO button is not displayed:

Note: If you want to connect to XATP for the verifiable credential and not to CARO or you have not initiated a tenant creation in CARO from Movilitas.Cloud, the application displays the Create Tenant on CARO button at the bottom left corner until a digital identifier is provided.
5. In the Select identifier drop-down, manage your digital identifiers (DIDs) that were created in CARO or in XATP. Select an identifier to use with the VRS responses.
| Action | Description |
|---|---|
| Add an identifier | 1. Click on the Select identifier drop-down. Example:  2. Click Add new +. The application displays the Add new identifier window. 3. Select the ATP wallet provider.
4. Based on the selected provider, add the identifier details.
CARO example:
5. Click Add. |
| Edit an identifier | 1. Click on the Select identifier drop-down and click on the edit icon next to the identifier. Example:  2. In the Update identifier pop-up, modify the fields as needed. CARO example:
3. Click Update. |
| Delete an identifier | 1. Click on the Select identifier drop-down and click on the delete icon next to the identifier. Example:  The application deletes the identifier immediately without any confirmation request. |
| Select an identifier | 1. Click on the Select identifier drop-down. 2. Select an identifier from the list. |


6. To accept VRS requests without verifiable credentials, select the Accept messages without verifiable credentials? checkbox.
- By default, verifiable credentials are required, and the checkbox is cleared. If a VRS request without verifiable credentials comes in, the application sends an error message.
- If VRS requests without verifiable credentials are accepted (the checkbox is selected), the application sends the VRS response even if the VRS request does not include the verifiable credentials.
7. To reject responding to the VRS request because the product is not in possession of the requester, select the Do not respond if product is not in possession of requester checkbox.
By default, the checkbox is cleared meaning that the application responds to the VRS request even if the product in the VRS request is not in possession of the requester.
The following example illustrates the case when creating the USA market profile:
- Default VRS response GLN is set.
- Contact information (email and telephone) is provided.
- Verifiable credentials are included in the responses and the identifier is selected.
- VRS requests without verifiable credentials are not accepted.
- The application does not respond if the product in the VRS request is not in possession of the requester.

8. Click Save.
Next Steps
Register products and add products to the Lookup Directory (LD). For more information, see Managing Products.
Perform serialization.
When a VRS request comes in, a VRS response is provided. You can view the VRS responses by going to the Reports & Analysis application --> DSCSA --> Responses tab.
Back to the list of procedures
Controlling the Access for Users with the User or Support Role
You can customize the access to the Serialized Manufacturing application in the Admin UI for each user that has the "User" or "Support" role:
- The access is controlled on a tab basis. The tabs are organized in a tree view with selectable checkboxes. Access to the tab can be turned on or off. The application offers a default setting.
- When a user has access to a tab, this means full access to that tab, including its child tabs with some limitations. The following actions cannot be performed with the "User" or "Support" role:
- Uploading product master data to the EU Hub.
- Requesting master data report from the EU Hub / Downloading master data report from the EU Hub.
- Partner invitation.
- Editing the computer/label/printer settings for a NiceLabel Label Cloud printing destination.
- A tab can contain a parameter that takes values from a page to which the user does not have access. In this case, the application offers the available values for selection but the user cannot manipulate the source page.
- You cannot give access to the Settings tab for a user with the "User" or "Support" role.
For more information, see Roles and Access to the Serialized Manufacturing Application.
Procedure
1. In the Serialized Manufacturing application, click on the Settings tab. The application displays the Settings page.
2. On the Access Control for Users with User or Support role panel, find the user.
To search for a user, enter the email address in the search field.
- The list of users is filtered based on the search criteria.
- You can reset the filter by clicking on the Reset Filters icon.
3. Select the user to control the access to the Serialized Manufacturing application in the Admin UI.
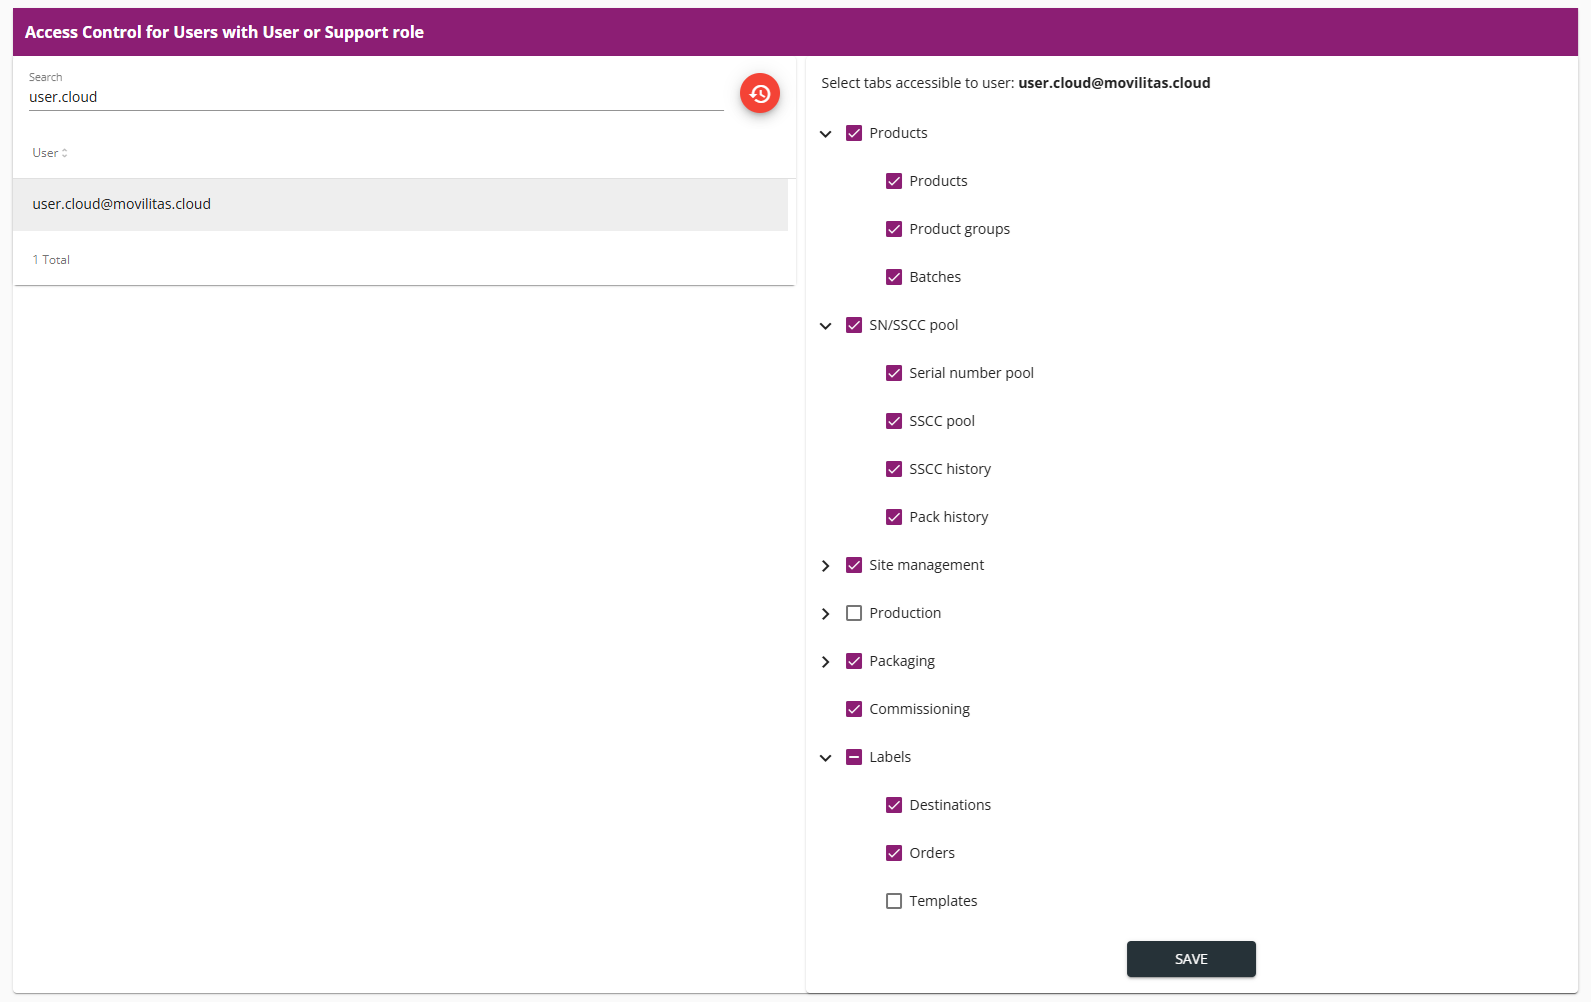
The application displays the application tabs in a tree view with the current access of the user.
In the following example, the application displays the default access of a user. The tree view is not expanded for all parent tabs:
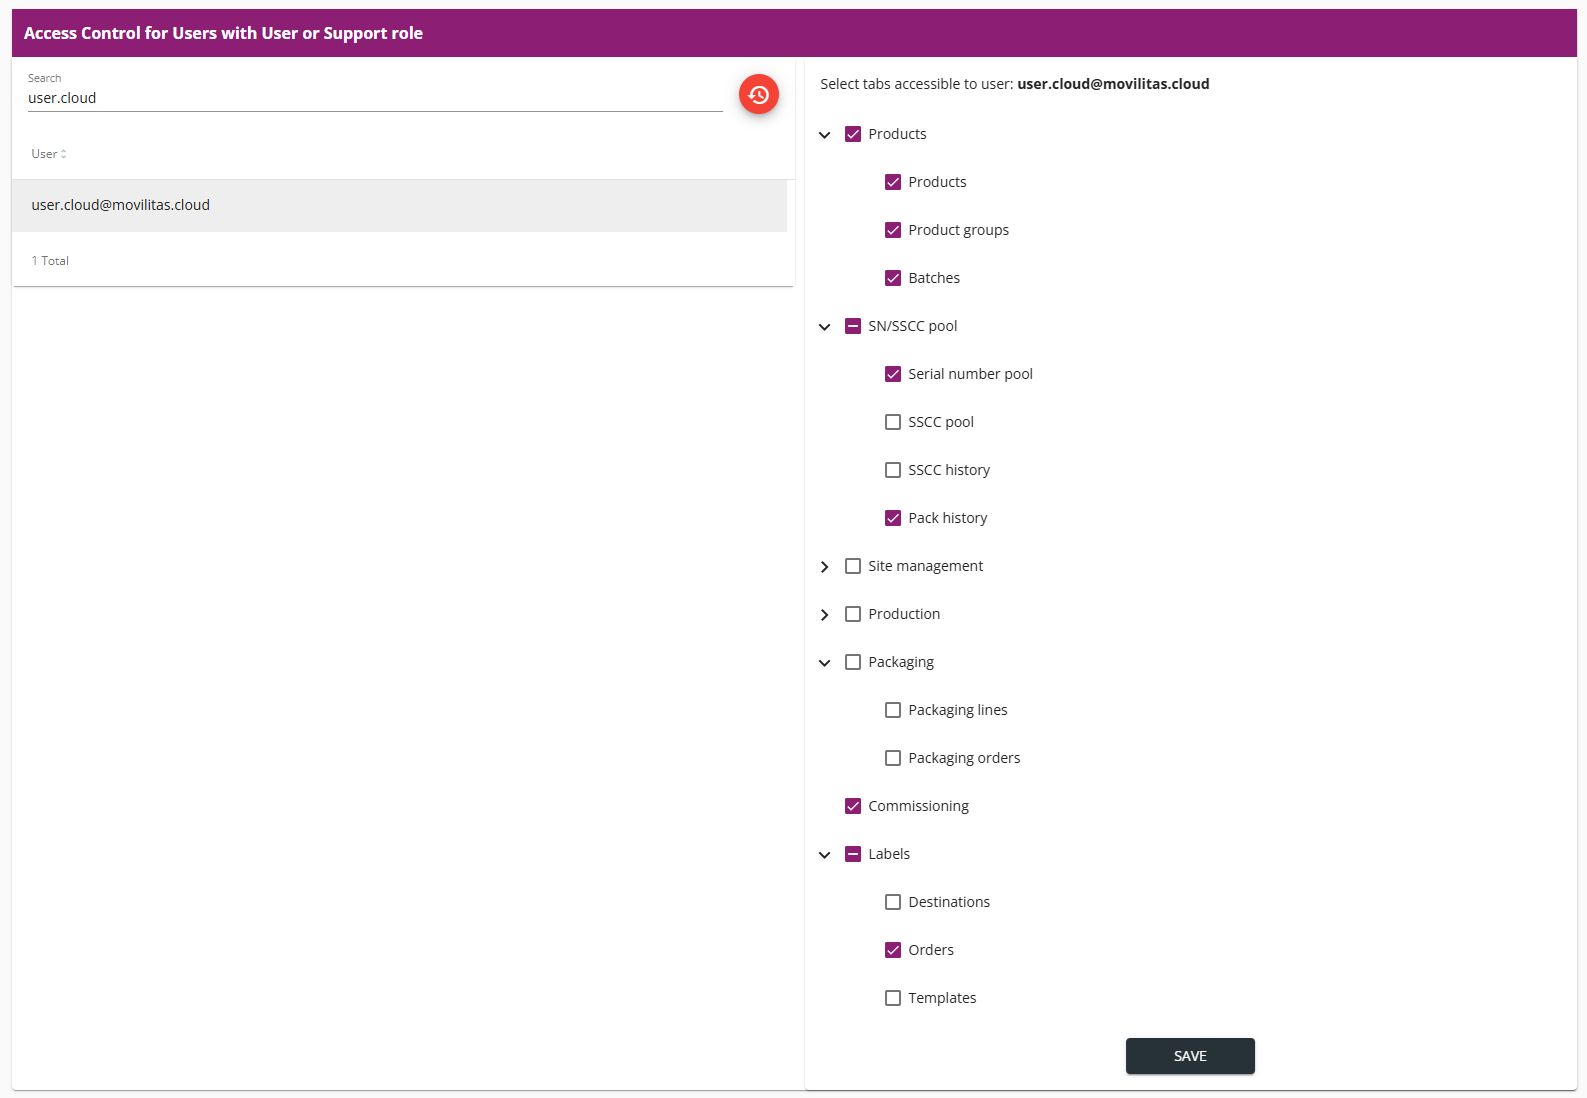
4. Customize the user access.
- To give access to a tab, select the related checkbox.
- To give access to all child tabs (group of tabs), select the checkbox next to the parent tab.
- To deny access to a tab, clear the related checkbox.
- To deny access to all child tabs (group of tabs), clear the checkbox next to the parent tab.
Example:
5. Click Save.
The setting becomes effective as follows:
- Immediately at the backend (server side).
- With the next login of the user that has the “User” or "Support" role in the UI (client side).
Back to the list of procedures