Movilitas.Cloud application provides SAP Information Collaboration Hub (ICH) business channel enabling the users to connect to the SAP ICH system.
The SAP ICH channel can be used to send messages to SAP ICH and also to receive messages from SAP ICH.
Currently, the SAP ICH channel can be used in the following applications:
- Serialized Logistics for Pharma
- Wholesaler FMD
- Serialized Manufacturing
- Serialized Logistics
Outgoing messages
The users can do the following:
- Sending verification requests and receiving the verification result.
- Sending EPCIS messages about the following actions and receiving the response: pack, unpack, commission, decommission, ship, receive, and serial number request.
Incoming messages
The users can do the following:
- Sending an EPCIS shipment message from SAP ICH.
- Sending an IDOC Delvry as a closed envelope from SAP ICH.
- Sending an ASN IDOC as a closed envelope from SAP ICH.
- Uploading an IDOC Delvry file in XML format on the SAP ICH channel page.
- Uploading an ASN IDOC file in XML format on the SAP ICH channel page.
Access to the SAP ICH Channel Page
Users can access the SAP ICH channel page with one of the following roles:
- Administrator - Full access to the page that includes channel configuration, viewing logs, downloading the logged files, manually uploading an IDOC, and resending failed messages.
- Support - Limited access to the page that includes viewing logs, downloading the logged files, and resending failed messages.
Unless stated otherwise, the screenshots and the description represent the "Administrator" role viewpoint.
List of Procedures
- Configuring an SAP ICH Channel
- Setting Up the Connection to Receive Messages from SAP ICH
- Uploading an IDOC
- Monitoring Incoming Messages
- Monitoring Outgoing Messages
- Monitoring Verifications
For more information on the general channel actions, see Managing Channels for a Tenant (Overview).
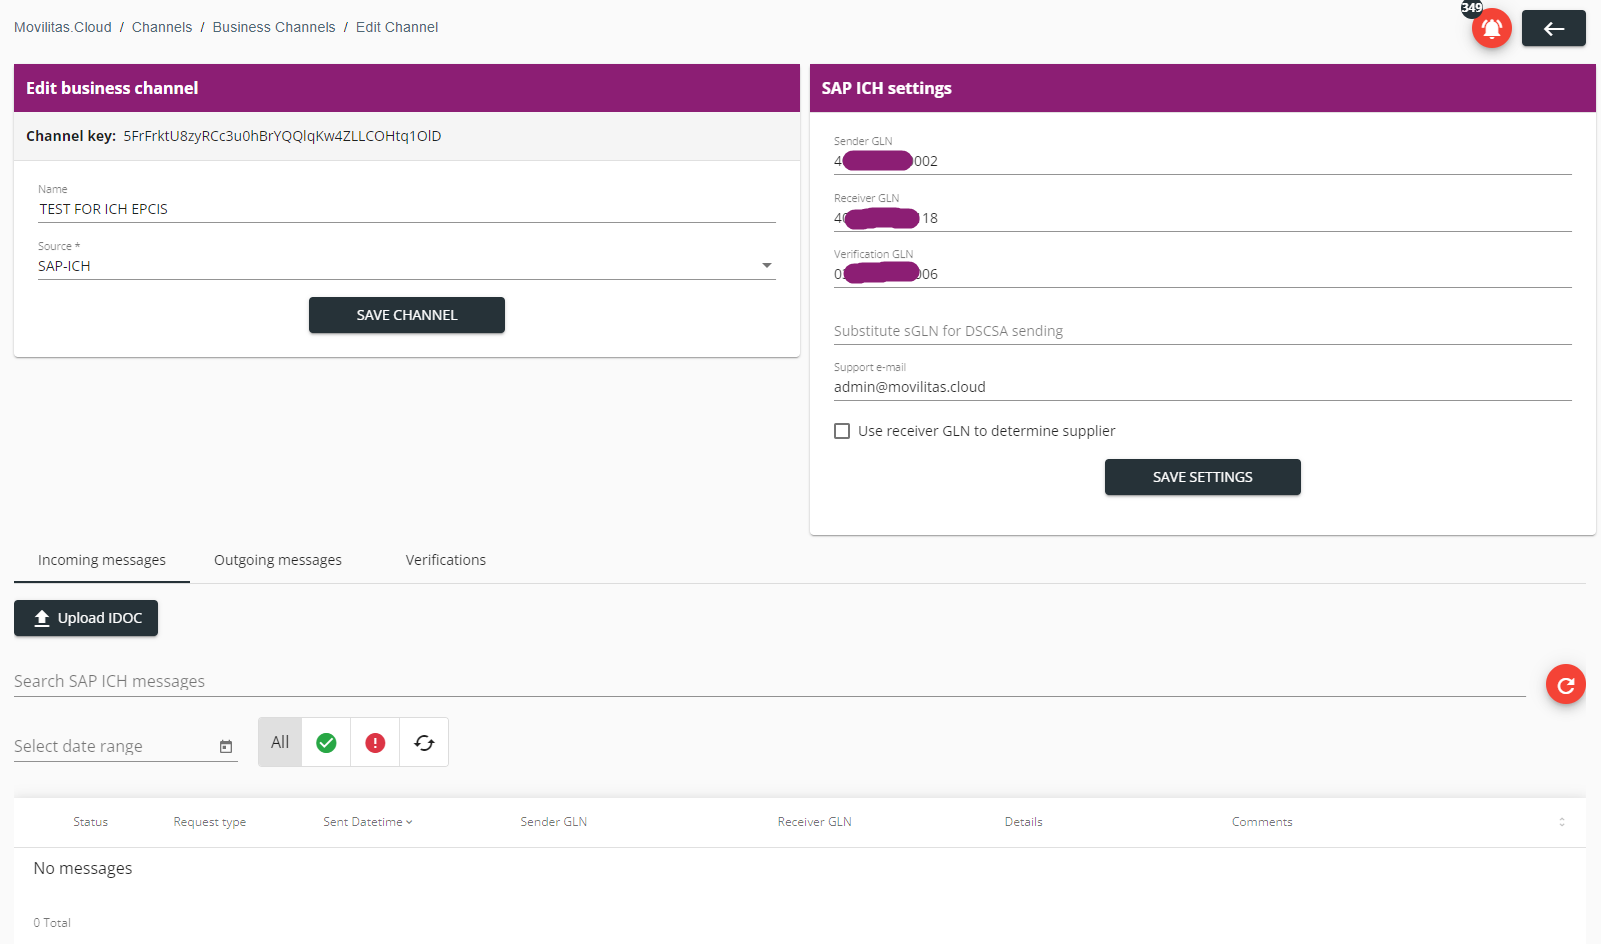
Configuring an SAP ICH Channel
To configure an SAP ICH channel, the "Administrator" role is required. For the "Support" role, the channel settings are read-only.
Procedure
1. Go to Movilitas.Cloud Console --> My tenants.
2. Select the tenant or click Open tenant next to it.
3. On the Tenant Dashboard, select the Channels tab. The application displays the list of channels assigned to the tenant.

4. Depending on your setup, create a new SAP ICH channel or modify an existing one. Follow one of the procedures described in the table below.
| # | Create a Channel | Modify an Existing Channel |
|---|---|---|
| 4.1 | Click the + icon (Create channel). The application displays the Create channel dialog. | To search for an SAP ICH channel, use the search field and the filters:
|
| 4.2 | Select Business channel as the type and click Create. The application displays the Create Channel page with an empty form to give the basic parameters of the channel. | To view the channel information, click on the channel name or the edit icon (Edit channel) next to the channel. The application displays the Edit Channel page with the current channel settings. |
| 4.3 | Enter a name for the channel and select SAP-ICH as the source. | N/A |
| 4.4 | Click Create Channel. The application informs you about the additional costs. After confirming the creation, the application displays the Edit Channel page with a form where you can provide the connection details for the channel. | N/A |
Example when creating an SAP ICH channel:

5. Provide the SAP ICH settings as explained in the table below.
IMPORTANT: The field names relate to the outgoing traffic (to SAP ICH) but the settings are also used to handle incoming traffic (from SAP ICH). For incoming traffic, the sender and receiver are the other way around. You define the participants in the communication.
| Parameter | Action |
|---|---|
| Sender GLN | Enter the Global Location Number (GLN) of the sending entity. |
| Receiver GLN | Enter the GLN of the receiving entity. |
| Verification GLN | Enter the GLN of the company that requests the verification. |
| Substitute sGLN for DSCSA sending | Enter the SGLN of the entity that you would like to include as the sender in the outgoing DSCSA shipping (EPCIS) messages. Before the SGLN value, also enter "urn:epc:id:sgln:". For example: urn:epc:id:sgln:1234567.98765.0 This field is only applicable when the following conditions are met:
Otherwise, leave the field blank. Based on the given SGLN value, the system finds the matching supplier in the Serialized Logistics application and uses that supplier data in the DSCSA shipping message as the sender. IMPORTANT: As a prerequisite, you must register the supplier with the given SGLN value in the Serialized Logistics application (master data). No match or multiple matches leads to an error. |
| Support e-mail | Enter the email address where Movilitas.Cloud can send notifications about errors on the channel. |
| Use receiver GLN to determine supplier | Select the checkbox to let the system identify the supplier of the incoming EPCIS file based on the receiver GLN of the channel. If the checkbox is cleared, the system identifies the supplier based on the source owning party SGLN in the received EPCIS file. |
6. Click Save Settings.
7. (Optional) If needed, change the name of the channel and click Save Channel.
Next Steps
If you want to send messages from SAP ICH to Movilitas.Cloud, set up the connection to Movilitas.Cloud.
Configure the relevant application with the SAP ICH channel.
Back to the list of procedures
Setting Up the Connection to Receive Messages from SAP ICH
To configure an SAP ICH channel, the "Administrator" role is required. For the "Support" role, the channel settings are read-only.
You can send EPCIS shipment and IDOC Delvry messages to Movilitas.Cloud. Incoming traffic can be utilized in the Serialized Logistics application only.
Make sure that you provide the GLN values on the SAP ICH Settings panel and that the GLN values are in line with the GLN values in the EPCIS / IDOC Delvry file that you will send:
- Sender GLN on the channel settings = Receiver in the EPCIS or IDOC Delvry file.
- Receiver GLN on the channel settings = Sender in the EPCIS or IDOC Delvry file.
- When multiple suppliers send EPCIS files from SAP ICH, leave the Receiver GLN field blank; however, in this case, the Use receiver GLN to determine supplier checkbox is not applicable and the logic checks the EPCIS file to identify the supplier.
IMPORTANT: The connection details and the authentication data (certificate information) are shared with the SAP ICH team only (not public). Before sending a message, contact the SAP ICH team to complete the connection setup for you.
Back to the list of procedures
Uploading an IDOC
You can upload an IDOC Delvry or an ASN IDOC file in XML format. This function can be useful when you cannot send the IDOC from SAP ICH for any reason.
To upload an IDOC file, the "Administrator" role is required. For the "Support" role, the upload function is inactive.
IDOC Delvry
The IDOC Delvry specifies a delivery. Uploading an IDOC Delvry triggers the following automated actions in the Serialized Logistics application:
- If the client does not exist, the application creates the client. After the auto-creation, the user needs to perform some manual post-actions:
- The user must manually give the client location (SGLN).
- To use a receiver SGLN different from the client SGLN in the outbound DSCSA EPCIS file to SAP ICH for the client in the USA or a US territory, the user must set a flag and specify the receiver SGLN.
- To fulfill replacement orders for the client in the USA or a US territory, a letter must be sent by email instead of a DSCSA EPCIS file to SAP ICH. The user must deactivate sending EPCIS files for the client and set the output option to "Create replacement letter (only if you are a 3PL)".
- To fulfill limited shipments for the client in the USA or a US territory, a letter must be sent by email instead of a DSCSA EPCIS file to SAP ICH. The user must deactivate sending EPCIS files for the client and set the output option to "Create limited shipment letter (only if you are a 3PL)".
- If the client is a 3PL in the USA or a US territory and the ownership of the shipped items is unchanged, neither a DSCSA EPCIS file nor a letter is needed. The user must deactivate sending EPCIS files for the client and set the output option to "Client is 3PL".
- If the delivery addresses are 3PLs of the client and the user wants to use the delivery address SGLN as the receiver in the outbound DSCSA EPCIS file to SAP ICH, the user must set a flag for the client.
- If the client is in a country other than the USA or a US territory and the user wants to send a regular EPCIS file to SAP ICH without DSCSA-specific data, the user must set a flag for the client.
- If the delivery address of the client does not exist, the application creates the delivery address of the client. After the auto-creation, the following applies:
- The user must manually give the delivery address SGLN unless the client is involved in a replacement order.
- For a client involved in a replacement order, the delivery address SGLN is auto-filled and fixed (0000000.00000.0), it does not need manual post-action.
- For a client where the delivery addresses are 3PLs of the client (like donations) and multiple delivery addresses belong to the same 3PL partner, the user must set a special flag and specify the common receiver SGLN to be used as the receiver in the DSCSA EPCIS in each applicable client delivery address setting.
- The application creates the delivery.
- Each delivery is assigned to a warehouse based on the warehouse site (sublocation) information of the IDOC.
- If the outbound external order that contains the delivery does not exist, the order is also created.
- The logic checks whether the delivery (order) contains chilled goods. If this is the case, the Chilled goods checkbox (flag) is set at the order level and applied to all deliveries of the order.
- Under-delivery and over-delivery tolerance values (%) are set at the order level with the first delivery and applied to all deliveries of the order. If the tolerance values cannot be set because the line items of the first delivery have different tolerance values, there is a fallback to 100% under-delivery and 0% over-delivery tolerance values, which are applied to all deliveries of the order. Tolerance values are configurable at the order level.
- If the IDOC contains National Drug Codes (NDCs) for the USA market, the application converts the NDCs into Global Trade Item Numbers (GTINs), stores the company prefixes, fetches product master data from openFDA, links the products to the supplier, and displays the GTINs and product data in the order.
- The application links the outbound order (and all grouped deliveries) to the delivery address of the client and this information is used when generating the outbound EPCIS file.
For more information, see the Site management > Clients tab and the Orders > Outbound orders tab in the Serialized Logistics application.
ASN IDOC
The ASN IDOC triggers the shipping of a validated delivery automatically:
- In the regular execution flow, an EPCIS file is sent to SAP ICH.
- For a replacement order, a DSCSA letter is sent by email.
- For a limited shipment, a DSCSA letter is sent by email.
Procedure
1. Go to Movilitas.Cloud Console --> My tenants.
2. Select the tenant or click Open tenant next to it.
3. On the Tenant Dashboard, select the Channels tab. The application displays the list of channels assigned to the tenant.

4. To search for an SAP ICH channel, use the search field and the filters:
- Enter the channel name in the search field.
- Select the status.
- Select SAP-ICH as the source.
- Select Business channel as the type.
5. To view the channel information, click on the channel name or the edit icon (Edit channel) next to the channel. The application displays the current channel settings and the log of incoming messages, by default.
The following example illustrates the case when incoming messages have not been logged on the channel yet. This means an IDOC file has not been uploaded or sent to Movilitas.Cloud yet (empty logs):
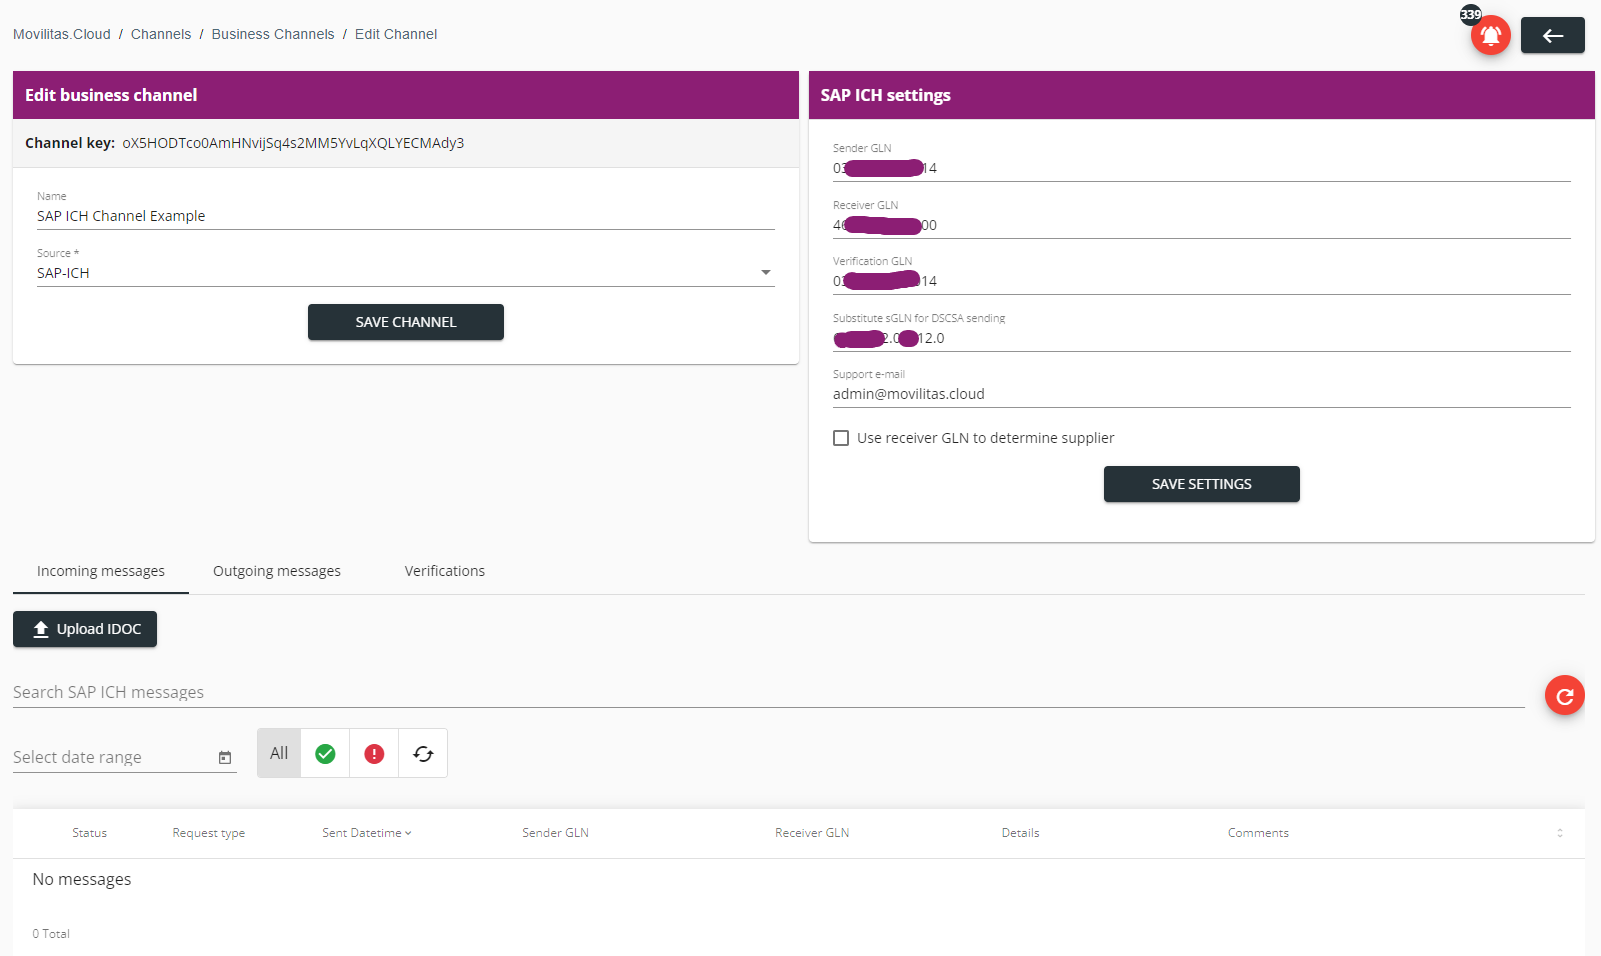
6. Select Incoming messages tab (default). The application displays the Upload IDOC button.

7. Click Upload IDOC.
8. Select the file from your computer. Only XML files are allowed.
The application processes the file. The processing might take some time and when it ends, a log is created in the list.
The following example illustrates the case when uploading an IDOC Delvry file creates the first log. The upload is successful (green checkmark icon):
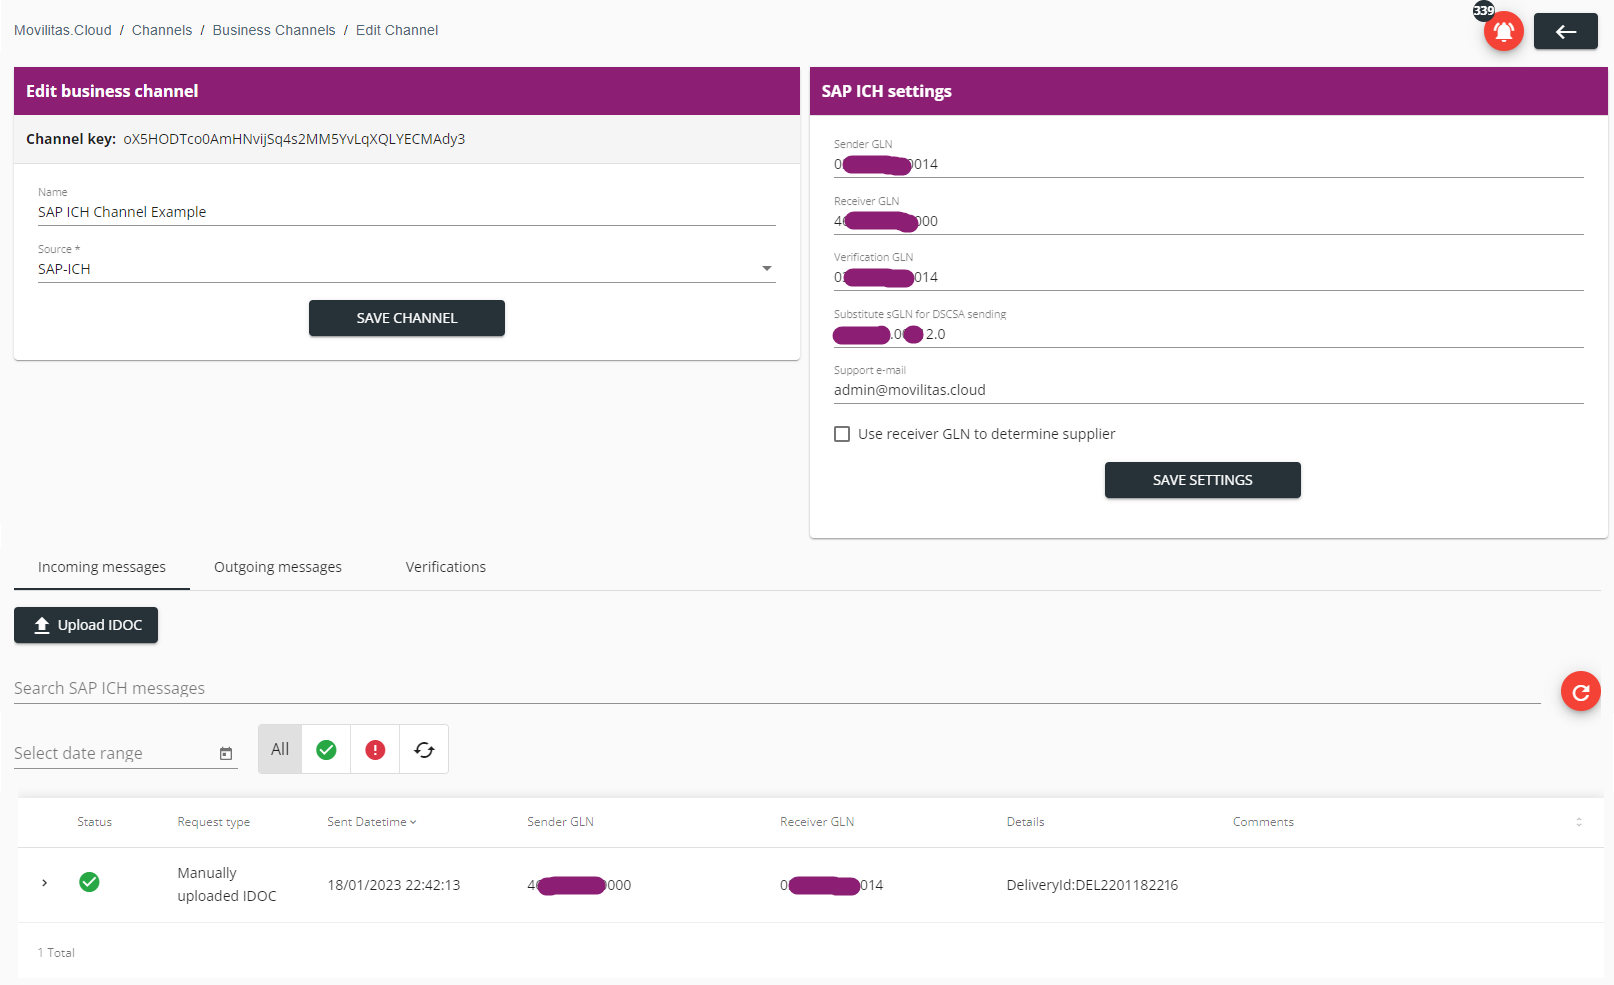
9. Find the log in the list and select the > (Expand) icon to check the IDOC content and other details.
Example:
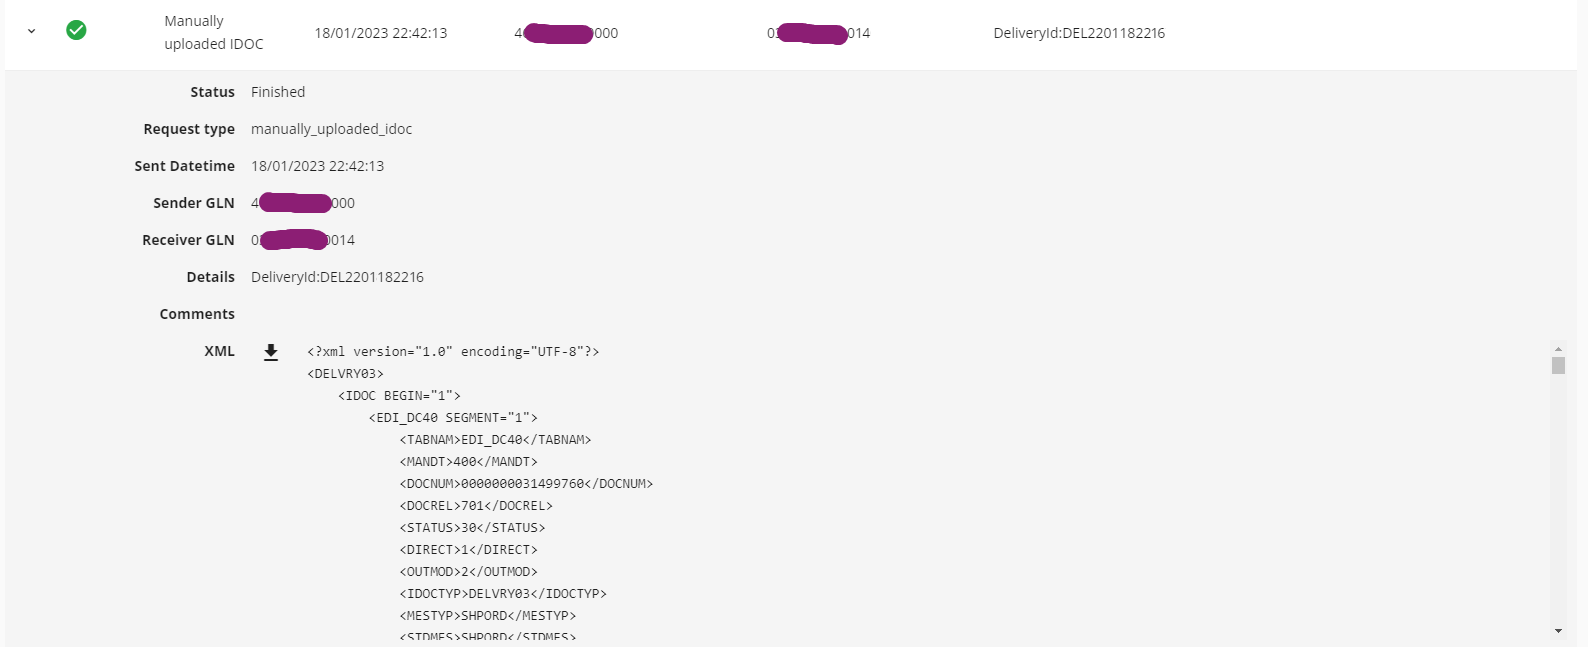
Note: For large files, the application offers the Download button but does not display the IDOC content.
Next Steps
When uploading an IDOC Delvry, go to the Serialized Logistics application:
- Under the Orders --> Outbound orders tab: Verify the delivery and the outbound external order under the Orders --> Outbound orders tab. For an order in Open status:
- Optionally, fill in the empty fields in the order settings, as needed.
- Confirm the Chilled goods checkbox status.
- Confirm the under-delivery tolerance and over-delivery tolerance values.
- Verify the warehouse and the route of each delivery within the order.
- Under the Site management --> Clients tab: Review the client. Complete the configuration.
- Provide the SGLN (location data) by using the built-in converter:
- Client master data (always).
- Client delivery address (except for replacement orders).
- To use a receiver SGLN different from the client SGLN in the outbound DSCSA EPCIS file, select the Use different Receiver sGLN for EPCIS checkbox and provide an SGLN in the Receiver SGLN field.
- To fulfill a replacement order, select the Don't send EPCIS file checkbox and choose the Create replacement letter (only if you are a 3PL) output option.
- To fulfill a limited shipment, select the Don't send EPCIS file checkbox and choose the Create limited shipment letter (only if you are a 3PL) output option.
- If the client is a 3PL in the USA or a US territory and the ownership of the shipped items is unchanged, neither a letter nor a DSCSA EPCIS file is needed. Select the Don't send EPCIS file checkbox and choose the Client is 3PL output option.
- If you want to use the delivery address SGLN as the receiver in the outbound DSCSA EPCIS file, select the Delivery addresses are 3PLs of the Client checkbox.
- If multiple delivery addresses belong to the same 3PL partner, select the Use different Receiver sGLN for EPCIS checkbox and specify the common receiver SGLN to be used as the receiver in the DSCSA EPCIS in each applicable client delivery address setting.
- If the client is in a country other than the USA or a US territory and you want to send a regular EPCIS file to SAP ICH without DSCSA-specific data, select the Send full EPCIS checkbox.
- Provide the SGLN (location data) by using the built-in converter:
When uploading an ASN IDOC:
- Verify the shipped delivery in the Serialized Logistics application:
- Delivery details: Orders --> Outbound orders --> Delivery view.
- Transfer details: Transfers --> Outbound external --> Orders.
- Verify the message sent to SAP ICH on the SAP ICH channel under the Outgoing messages tab:
- DSCSA shipping (DSCSA EPCIS).
- Full shipping (Regular EPCIS).
Back to the list of procedures
Monitoring Incoming Messages
You can view the details of the messages sent to Movilitas.Cloud from SAP ICH. You can also view the details of IDOC Delvry files that were manually uploaded on the channel.
Movilitas.Cloud supports the following incoming messages:
- EPCIS
- IDOC Delvry (from SAP ICH or by upload)
- ASN IDOC (from SAP ICH or by upload)
Procedure
1. Go to Movilitas.Cloud Console --> My tenants.
2. Select the tenant or click Open tenant next to it.
3. On the Tenant Dashboard, select the Channels tab. The application displays the list of channels assigned to the tenant.

4. To search for an SAP ICH channel, use the search field and the filters:
- Enter the channel name in the search field.
- Select the status.
- Select SAP-ICH as the source.
- Select Business channel as the type.
5. To view the channel information, click on the channel name or the edit icon (Edit channel) next to the channel. The application displays the current channel settings and the log of incoming messages, by default.
Example:
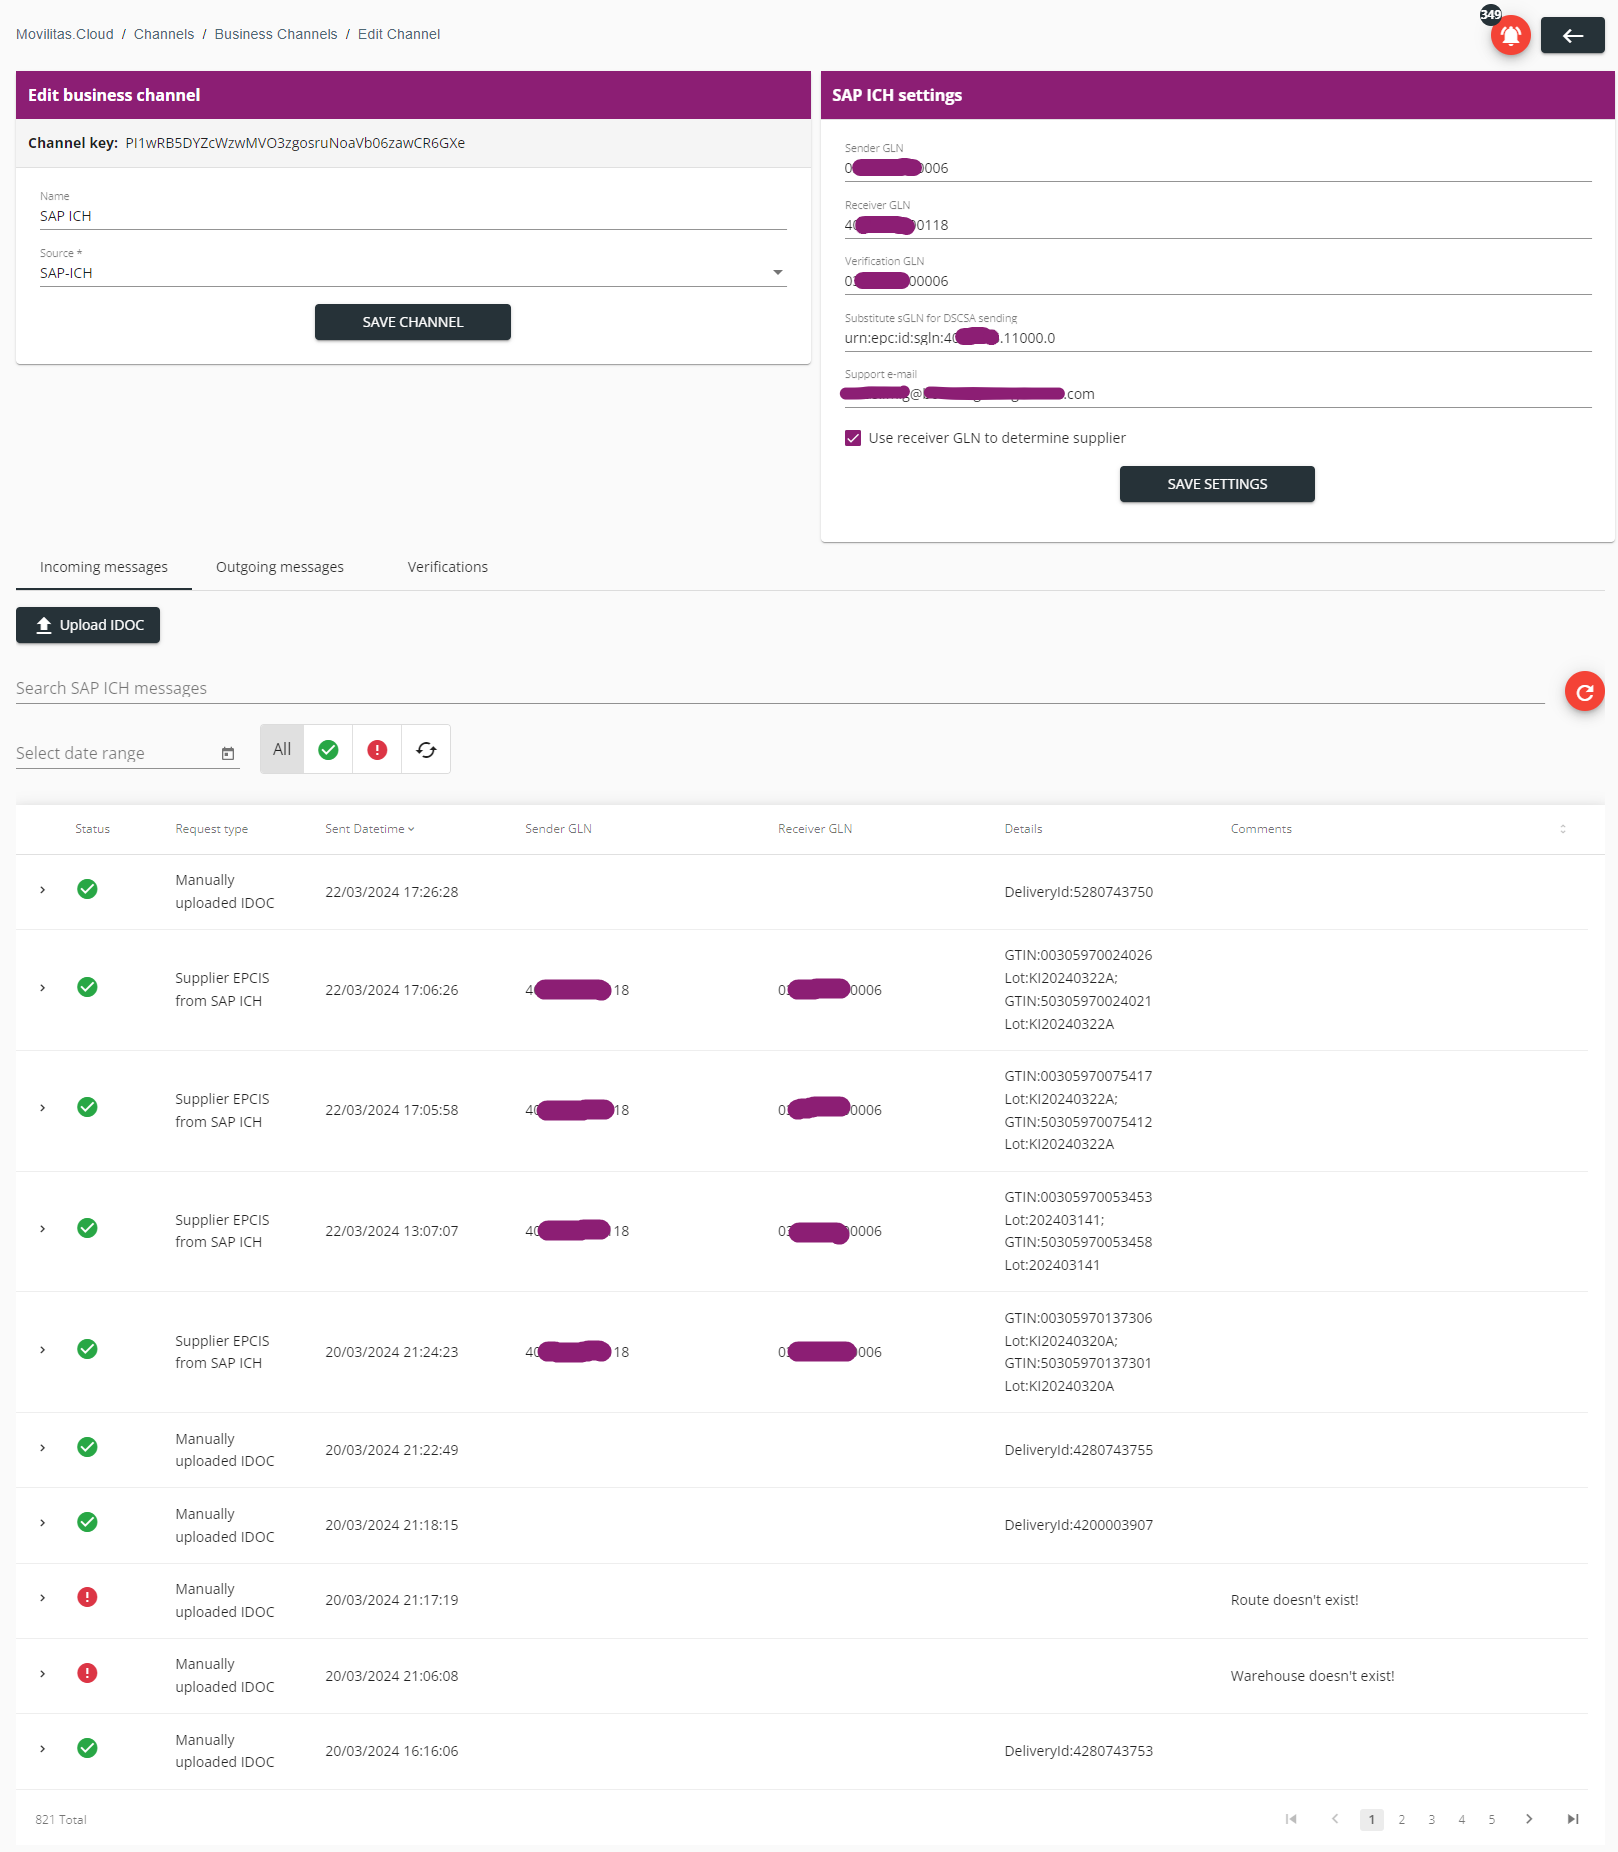
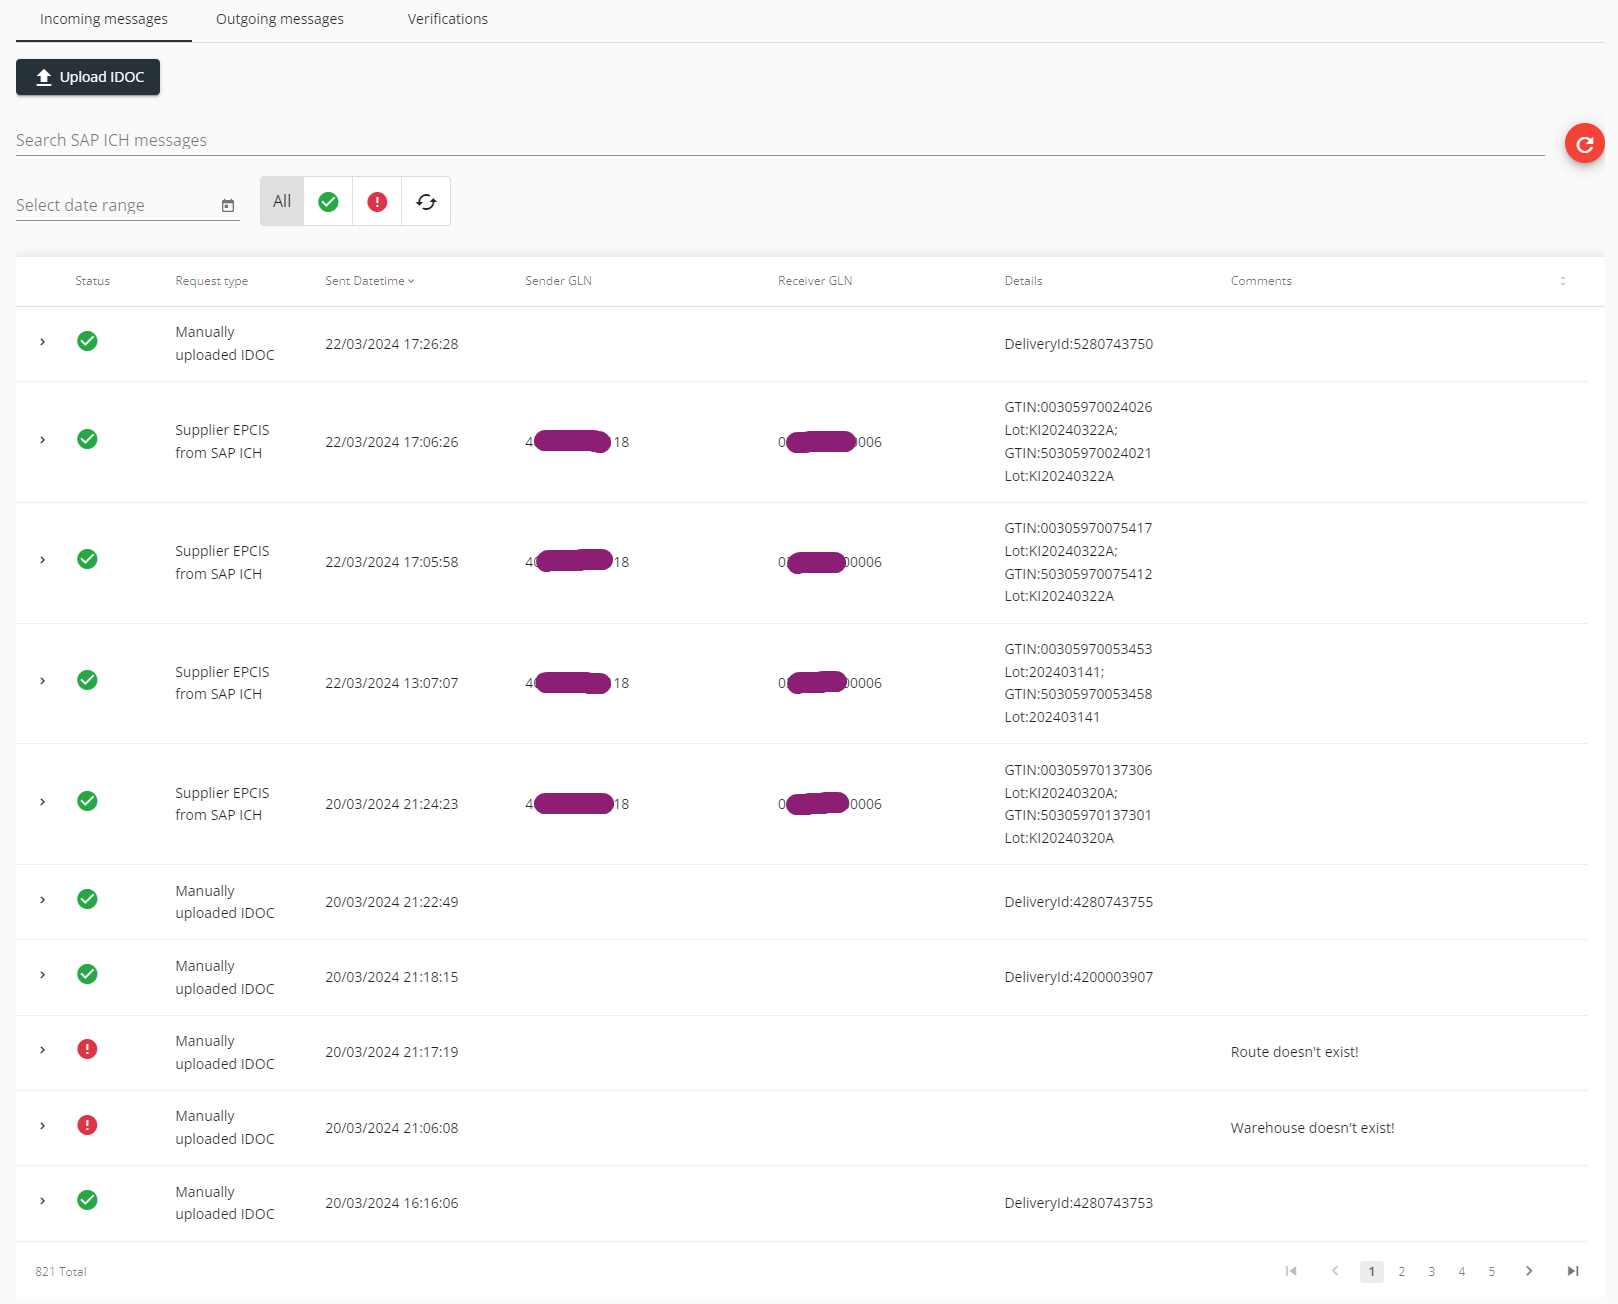
6. Select the Incoming messages tab (default). The application displays the log of incoming messages.
Example:
7. Find the message by using the filters:
- Date range - Select a date range by using the date picker.
- Log status - Select a status to list the messages with that specific status only:
- All - Messages with all statuses are listed. Default setting.
- Green checkmark icon - Finished.
- Red exclamation mark icon - Error.
- Circular arrows icon - Pending.
- Search field - Enter an expression from the XML or the Details column, as described in the table below. The list of messages is filtered based on the search criteria.
| Request type | Search Expressions |
|---|---|
| Supplier EPCIS from SAP ICH | Content from the Details column: GTIN or lot (batch) number. Content from the XML, for example, an SGTIN. |
| IDOC from SAP ICH | Content from the Details column: delivery ID. Content from the XML, for example, the route ID (<ROUTE>). |
| Manually uploaded IDOC | Content from the Details column: delivery ID. Content from the XML, for example, the route ID (<ROUTE>). |
IMPORTANT: Large messages are not included in the search results. The application displays a separate note to inform the user about it.
To clear the search criteria, click on the red circular arrow (Refresh) button in the top-right corner of the messages section.
For the messages, the following parameters and functions are displayed:
| Parameter/Function | Description |
|---|---|
| > (Expand) icon | You can view the details of the message after expanding the message:
|
| Status | Status of the message:
|
| Request type | The following request types are displayed on the Incoming messages tab:
|
| Sent Datetime | The timestamp when the message was sent or uploaded to Movilitas.Cloud. |
| Sender GLN | The GLN of the sending entity. |
| Receiver GLN | The GLN of the receiving entity. |
| Details | Details of the incoming message:
|
| Comments | An optional message providing further details when:
|
8. Take the necessary action on the message.
Pending Status (Circular arrows icon)
Movilitas.Cloud is processing the request. Wait for the processing to be finished.
Finished Status (Green checkmark icon)
Movilitas.Cloud processed the request that triggers automated actions in the Serialized Logistics application, as described in the table below.
| Request Type | Result | Action |
|---|---|---|
| Supplier EPCIS from SAP ICH |
| Verify the auto-created items in the Serialized Logistics application: 1. Supplier details: Site management --> Suppliers --> Master data tab and Shipping address tab. 2. Product data: Site management --> Suppliers --> Products tab. 3. Shipment data: Site management --> Suppliers --> Uploads tab. The file name indicates that it comes from SAP ICH. If there are issues with the shipment data, resolve the issue under the Site management --> Suppliers --> Uploads tab:
For more information, see Managing Suppliers. |
| Manually uploaded IDOC (IDOC Delvry) |
| 1. Go to the Serialized Logistics application. 2. Verify the client master data and delivery address under the Site management --> Clients tab. 3. Complete the client configuration and save the settings under the Site management --> Clients tab.
|
| IDOC from SAP ICH (IDOC Delvry) | ||
| Manually uploaded IDOC (ASN IDOC) | The ASN IDOC triggers the shipping of a validated delivery automatically:
| Verify the shipped delivery in the Serialized Logistics application: 1. Delivery details: Orders --> Outbound orders --> Delivery view. 2. Transfer details: Transfers --> Outbound external --> Orders. If applicable, Verify the message sent to SAP ICH on the SAP ICH channel under the Outgoing messages tab:
|
| IDOC from SAP ICH (ASN IDOC) |
Error Status (Red exclamation mark)
An incoming request can fail for multiple reasons, and the request type determines what errors might occur.
Follow the description in the next table.
| Request Type | Reasons for Error | Action |
|---|---|---|
| Supplier EPCIS from SAP ICH | 1. The supplier cannot be found and there is no drop shipment. Neither the source owning party SGLN, nor the destination owning party SGLN inside the EPCIS matches any supplier in the Serialized Logistics application. If the receiver GLN setting of the channel is used to determine the supplier, none of the suppliers has the same GLN setting in the SGLN format in the Serialized Logistics application. The EPCIS shipment cannot be processed. 2. An error blocks processing the events of the EPCIS. 3. Cannot upload an EPCIS file for an inactive supplier. | 1. Investigate the issue based on the information in the comment column. 2. Fix the issue.
3. Send the EPCIS shipment message to Movilitas.Cloud again. |
| Manually uploaded IDOC (IDOC Delvry) | 1. The IDOC message misses a required data or field. 2. The IDOC contains invalid or unknown data. For example:
3. The IDOC contains an already existing outbound order-delivery combination. 4. The client is not active. | 1. Investigate the issue based on the information in the comment column. 2. Fix the issue.
3. Send the IDOC message to Movilitas.Cloud again. |
| IDOC from SAP ICH (IDOC Delvry) | ||
| Manually uploaded IDOC (ASN IDOC) | 1. The delivery is unknown. 2. The delivery is not in Picking validated or Shipped status. Note: For deliveries in Shipped status, reshipping cannot be triggered, only an information message is logged that the IDOC processing was skipped. 3. The file describes an incorrect line item. 4. The file describes incorrect batch(es). 5. The file describes incorrect quantity. 6. The client is not found. | 1. Investigate the issue based on the information in the comment column. 2. Fix the issue.
3. Send the IDOC message to Movilitas.Cloud again. |
| IDOC from SAP ICH (ASN IDOC) |
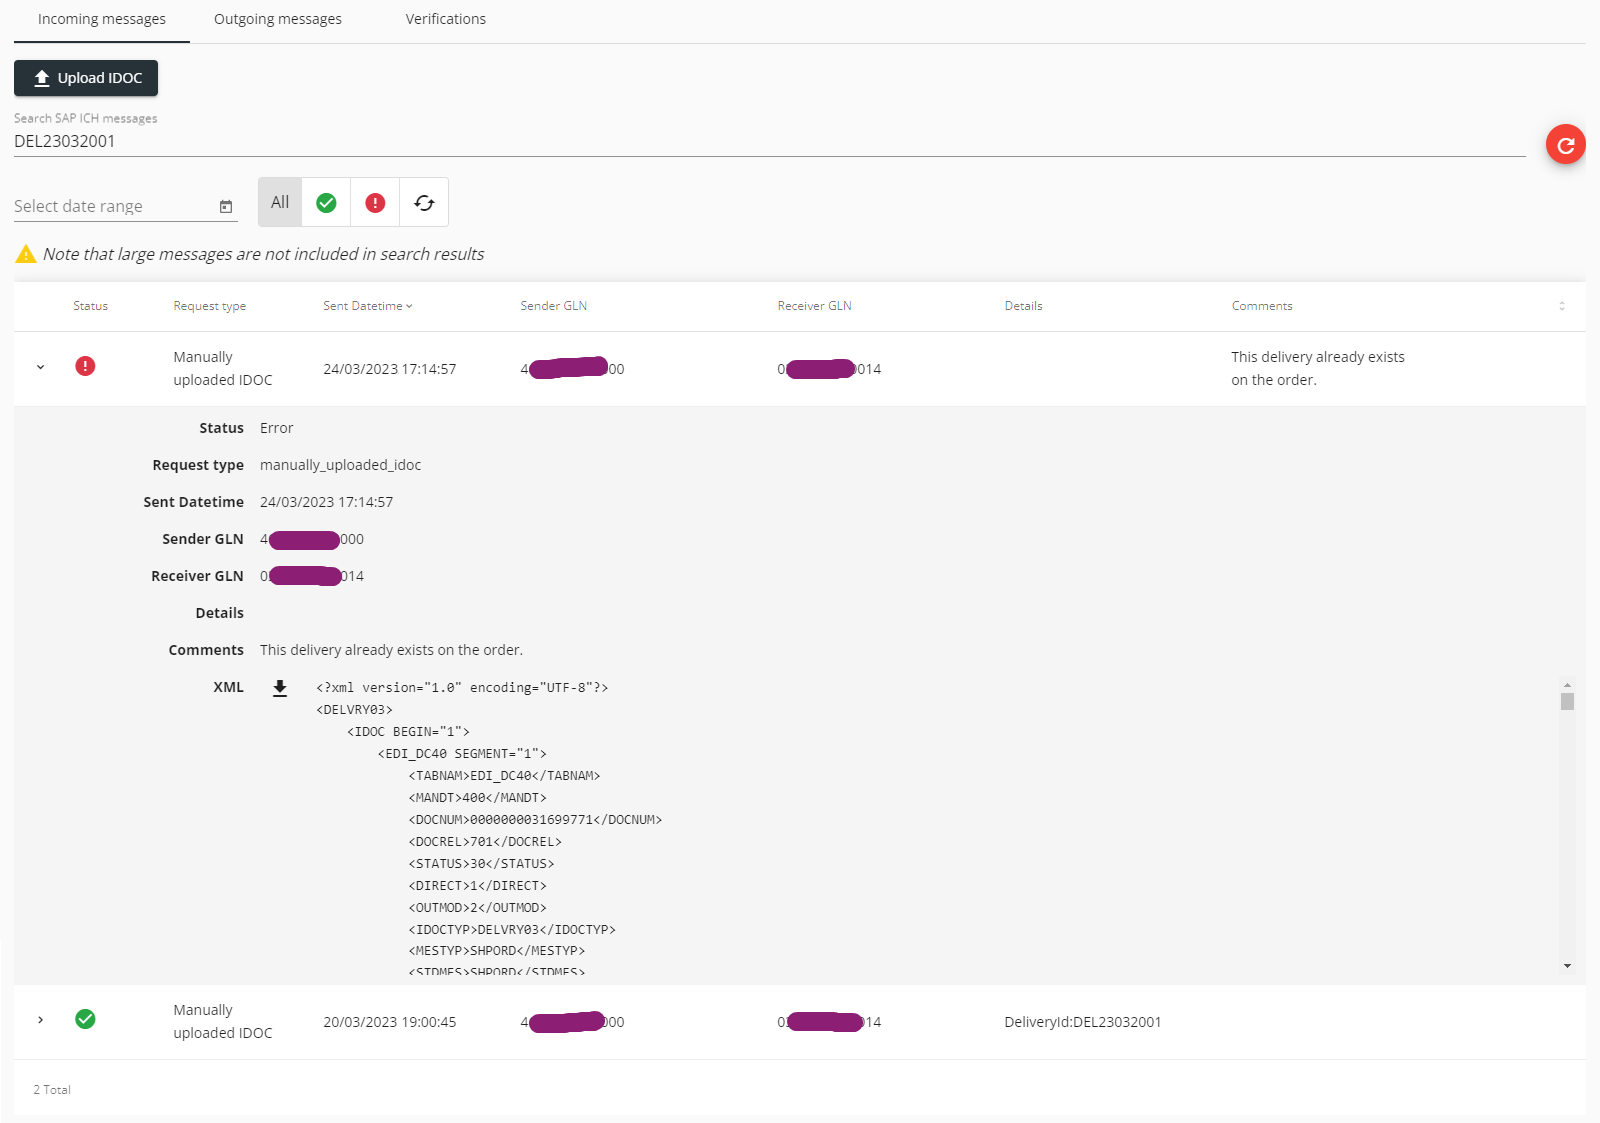
In the following example, we are searching for the IDOC Delvry that contains the delivery ID (VBELN) "DEL23032001":
- There are two search results.
- The one that raised an error is expanded. The IDOC describes an already existing delivery for the order.
- The system offers to download the file and displays the XML content.
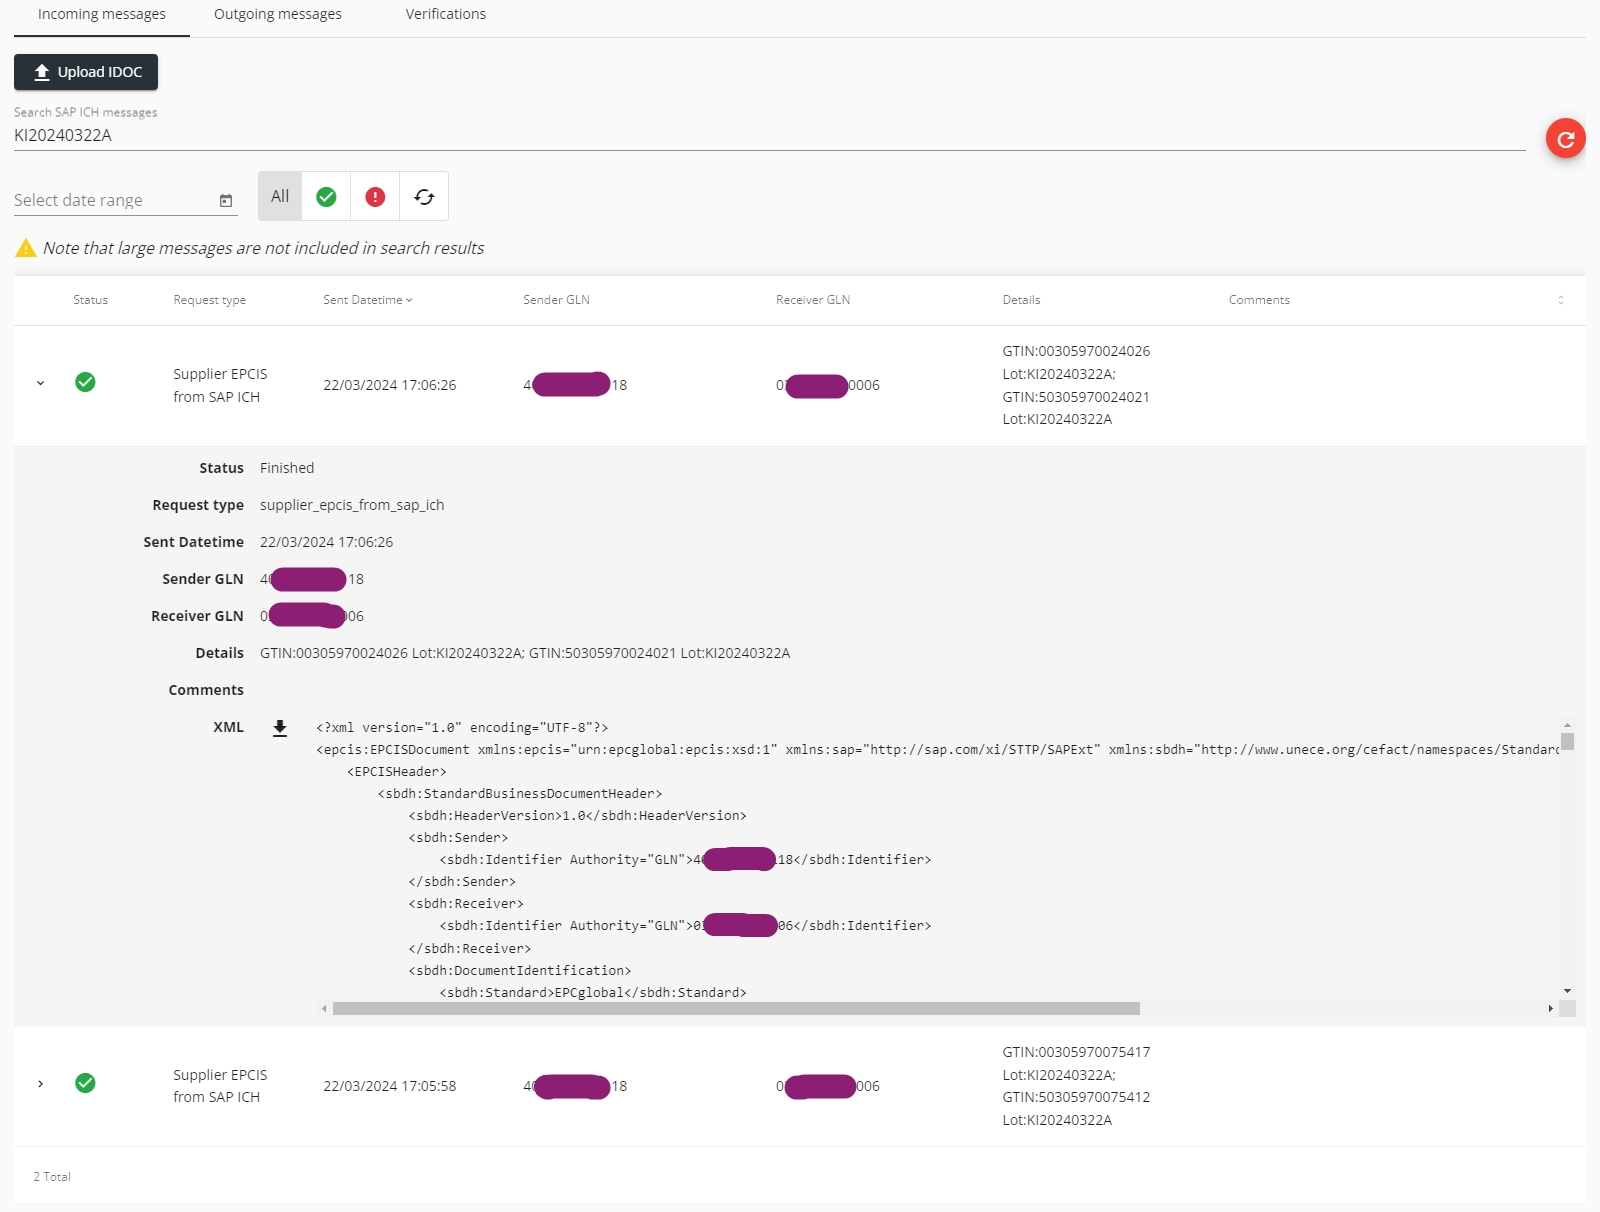
In the following example, we are searching for supplier EPCIS files that contain the lot (batch) "KI20240322A":
- There are two search results.
- The first log is expanded.
- The system offers to download the file and displays the XML content.
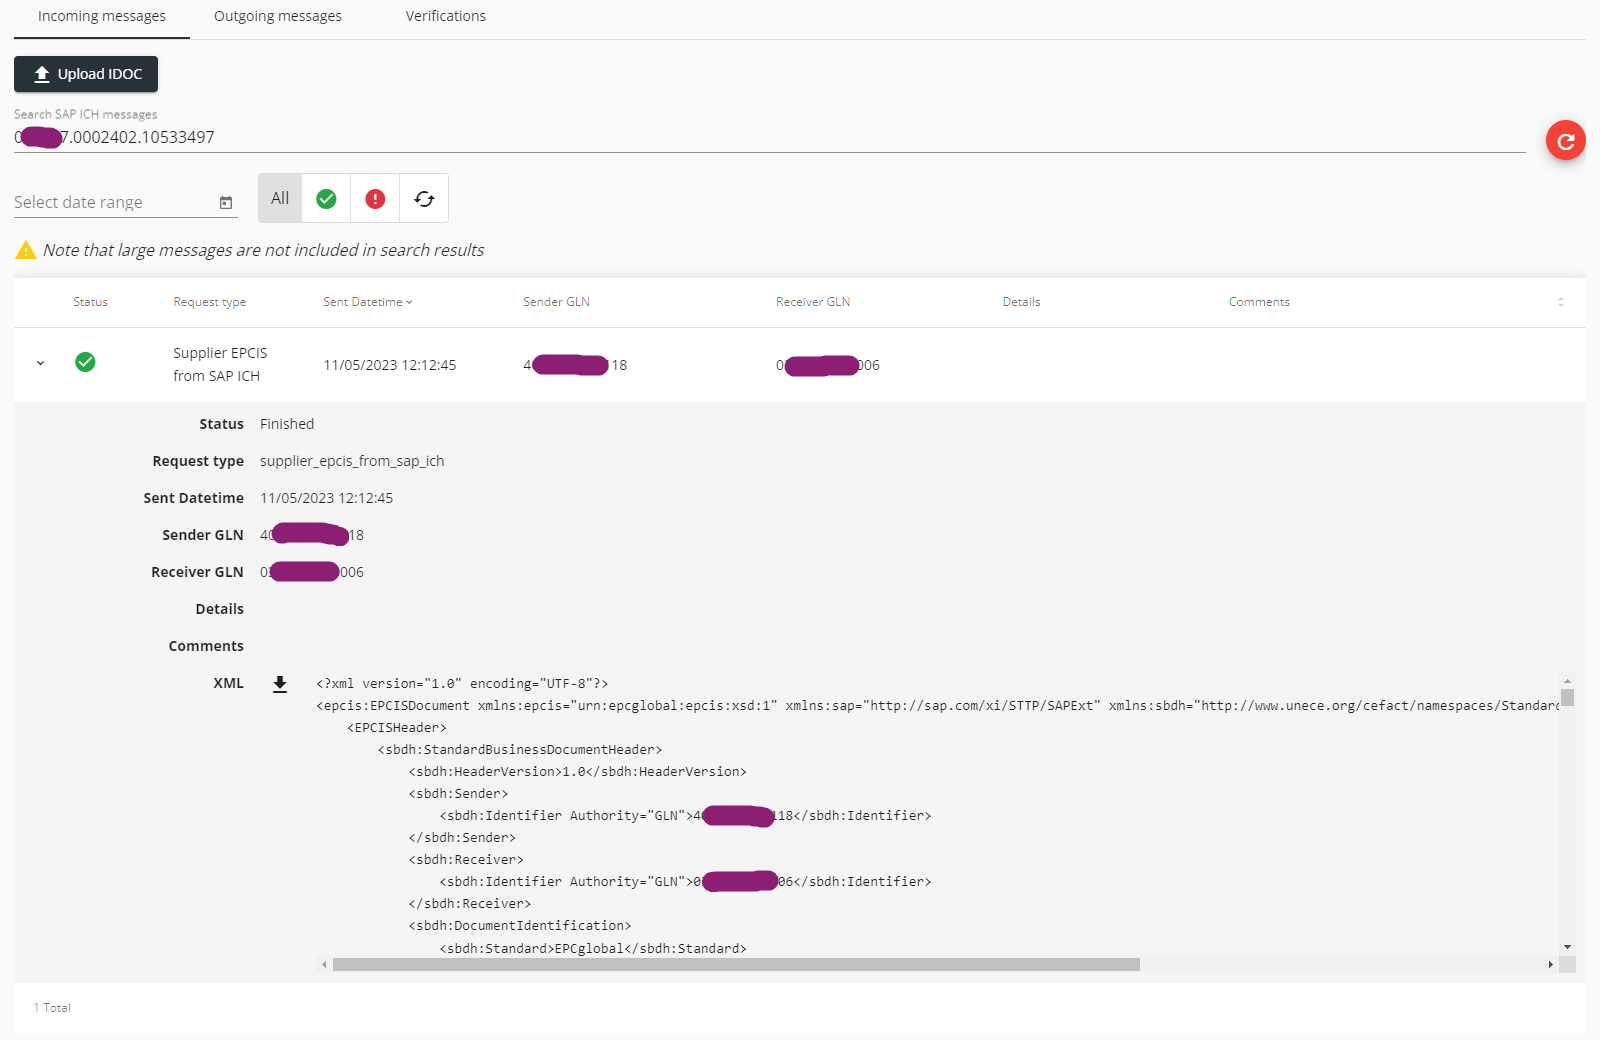
In the following example, we are searching for a supplier EPCIS that contains the SGTIN "030597.0002402.10533497":
- There is one search result that is expanded.
- The message is successful.
- The system offers to download the file and displays the XML content.
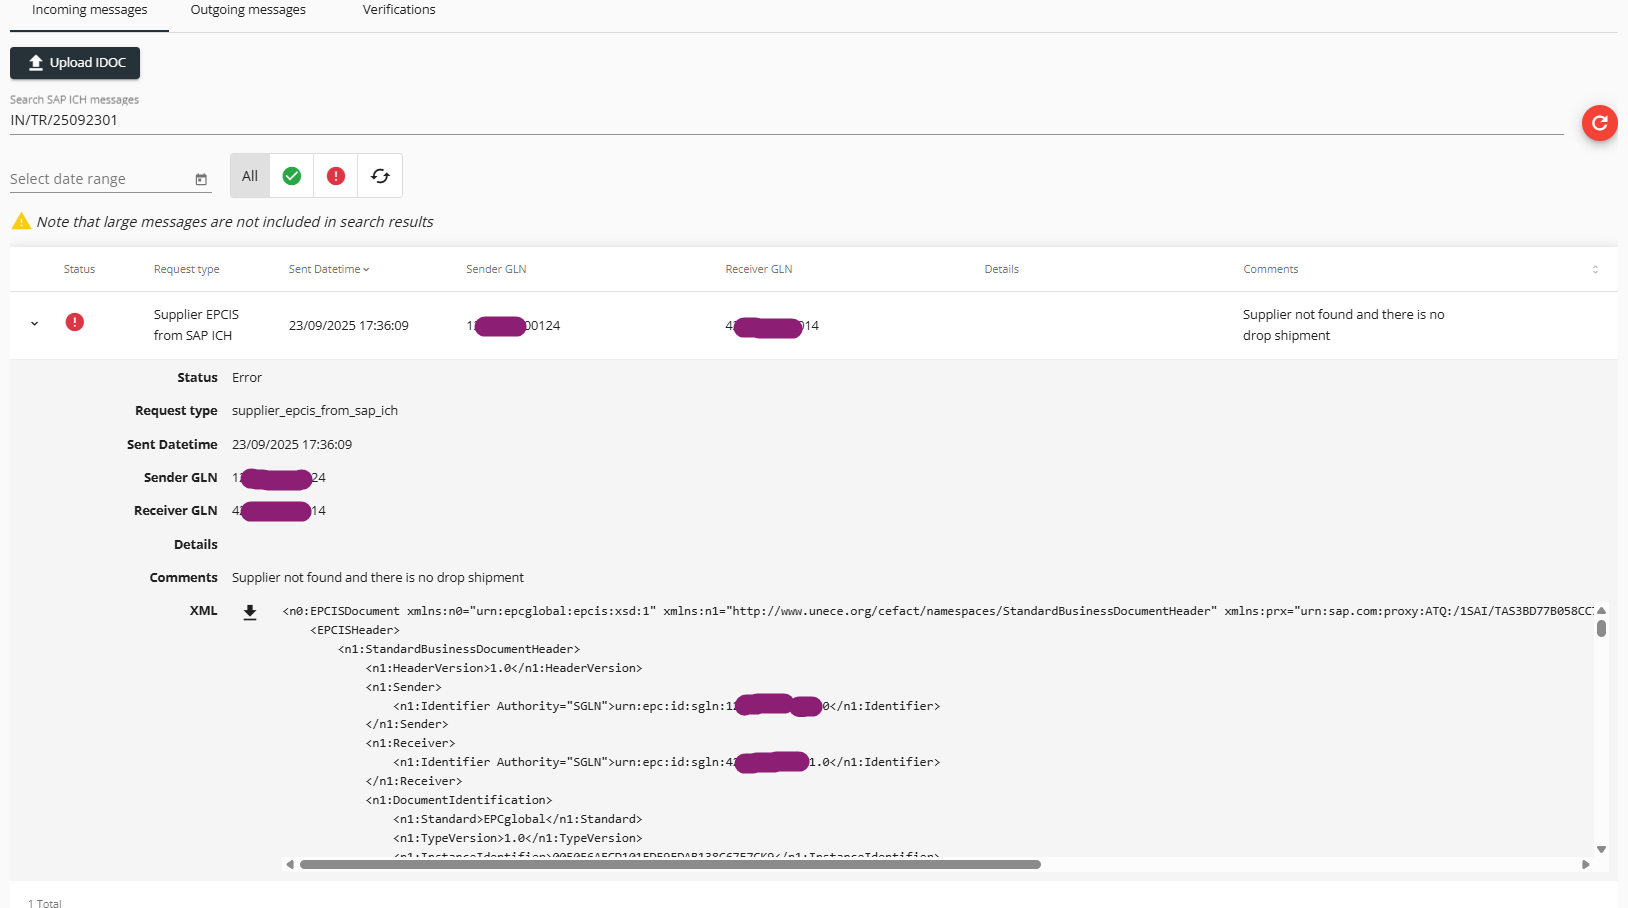
In the following example, we are searching for a supplier EPCIS based on the purchase order ID "IN/TR/25092301":
- There is one search result that is expanded.
- The message raised an error. The EPCIS failed because the supplier could not be identified in the Serialized Logistics application.
- The system offers to download the file and displays the XML content.
Back to the list of procedures
Monitoring Outgoing Messages
You can view the details of the requests (events) sent to the SAP ICH system from Movilitas.Cloud over the SAP ICH channel. The messaging is asynchronous and the status is updated after receiving the response from the SAP ICH system.
Note: You can track the verification messages on the Verifications tab.
Procedure
1. Go to Movilitas.Cloud Console --> My tenants.
2. Select the tenant or click Open tenant next to it.
3. On the Tenant Dashboard, select the Channels tab. The application displays the list of channels assigned to the tenant.
4. To search for an SAP ICH channel, use the search field and the filters:
- Enter the channel name in the search field.
- Select the status.
- Select SAP-ICH as the source.
- Select Business channel as the type.
5. To view the channel information, click on the channel name or the edit icon (Edit channel) next to the channel. The application displays the current channel settings and the log of incoming messages, by default.
Example:
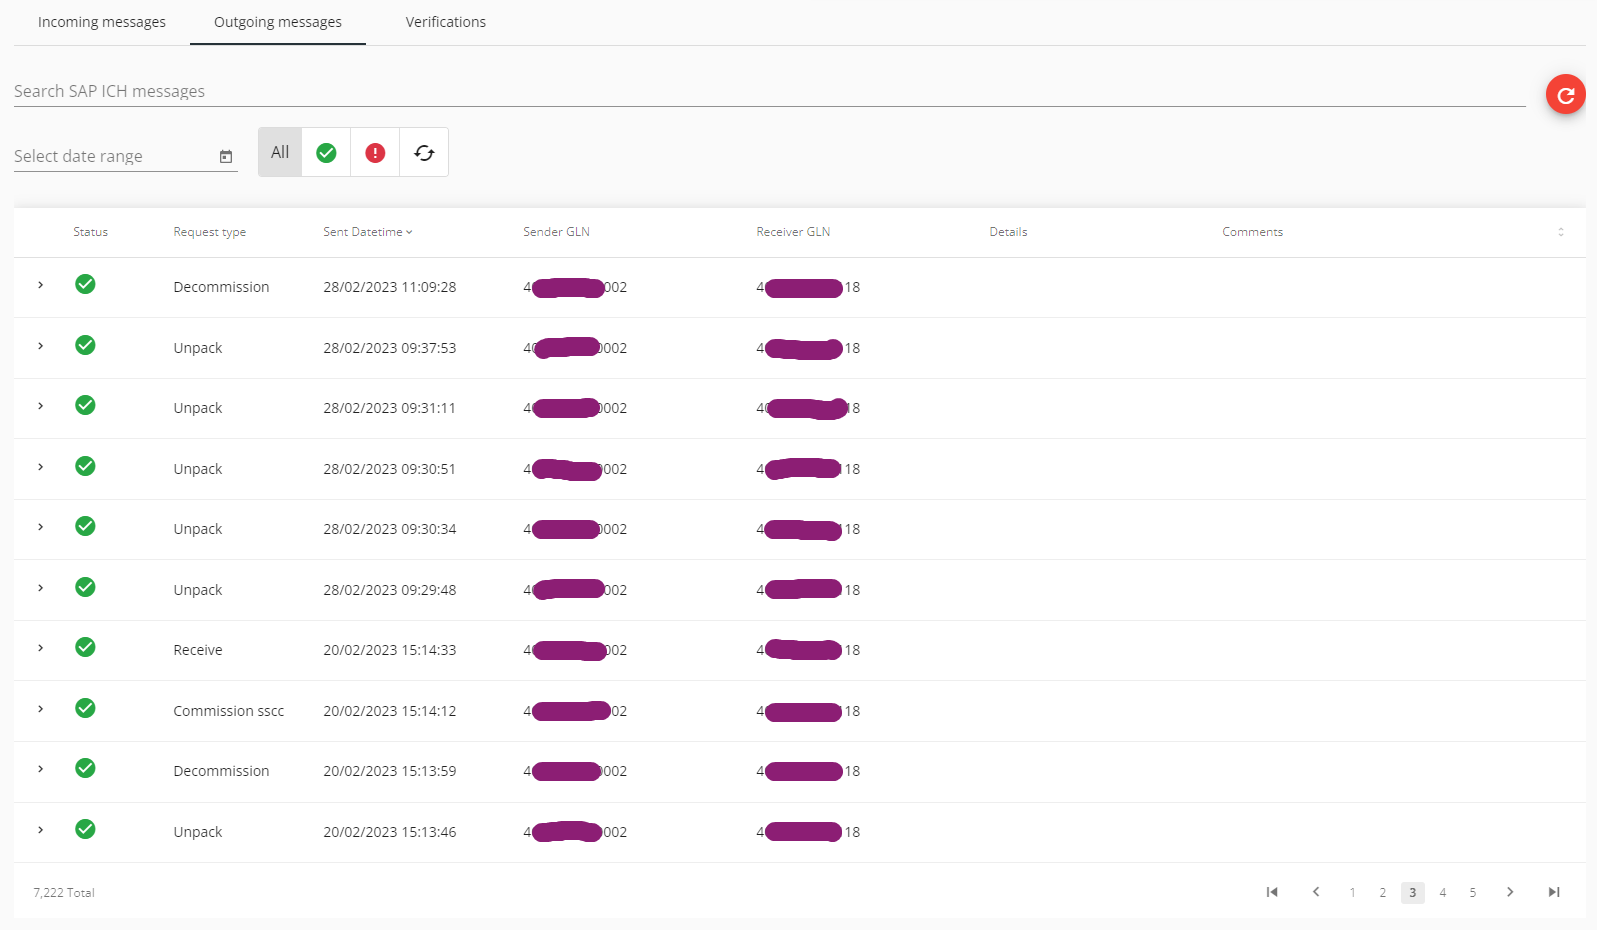
6. Select the Outgoing messages tab. The application displays the log of outgoing messages.
Example:
7. Find the message by using the filters:
- Date range - Select a date range by using the date picker.
- Log status - Select a status to list the messages with that specific status only:
- All - Messages with all statuses are listed. Default setting.
- Green checkmark icon - Finished.
- Red exclamation mark icon - Error.
- Circular arrows icon - Pending.
- Search field - Enter an expression from the XML or the Details column and the list of messages is filtered based on the search criteria. For example:
- Product code - In GTIN, SGTIN, NDC, or Chinese eCode format, depending on the use case.
- Lot (Batch).
- Serial number.
- Instance identifier.
- Delivery ID - "DSCSA shipping" or "Full shipping" messages.
- Purchase order ID - "Ship" message.
IMPORTANT: Large messages are not included in the search results. The application displays a separate note to inform the user about it.
To clear the search criteria, click on the red circular arrow (Refresh) button in the top-right corner of the messages section.
For the messages, the following parameters and functions are displayed:
| Parameter/Function | Description |
|---|---|
| > (Expand) icon | You can view the details of the message after expanding the message:
|
| Status | Status of the message:
|
| Request type | The following request types are displayed on the Outgoing messages tab:
|
| Sent Datetime | The timestamp when the message was sent to the SAP ICH system. |
| Sender GLN | The GLN of the sending entity. |
| Receiver GLN | The GLN of the receiving entity. |
| Details | Details of the outgoing message (when applicable):
|
| Comments | An optional message providing further details. For example:
|
| Resend button | In case of an error, you can resend the message by clicking on the button. |
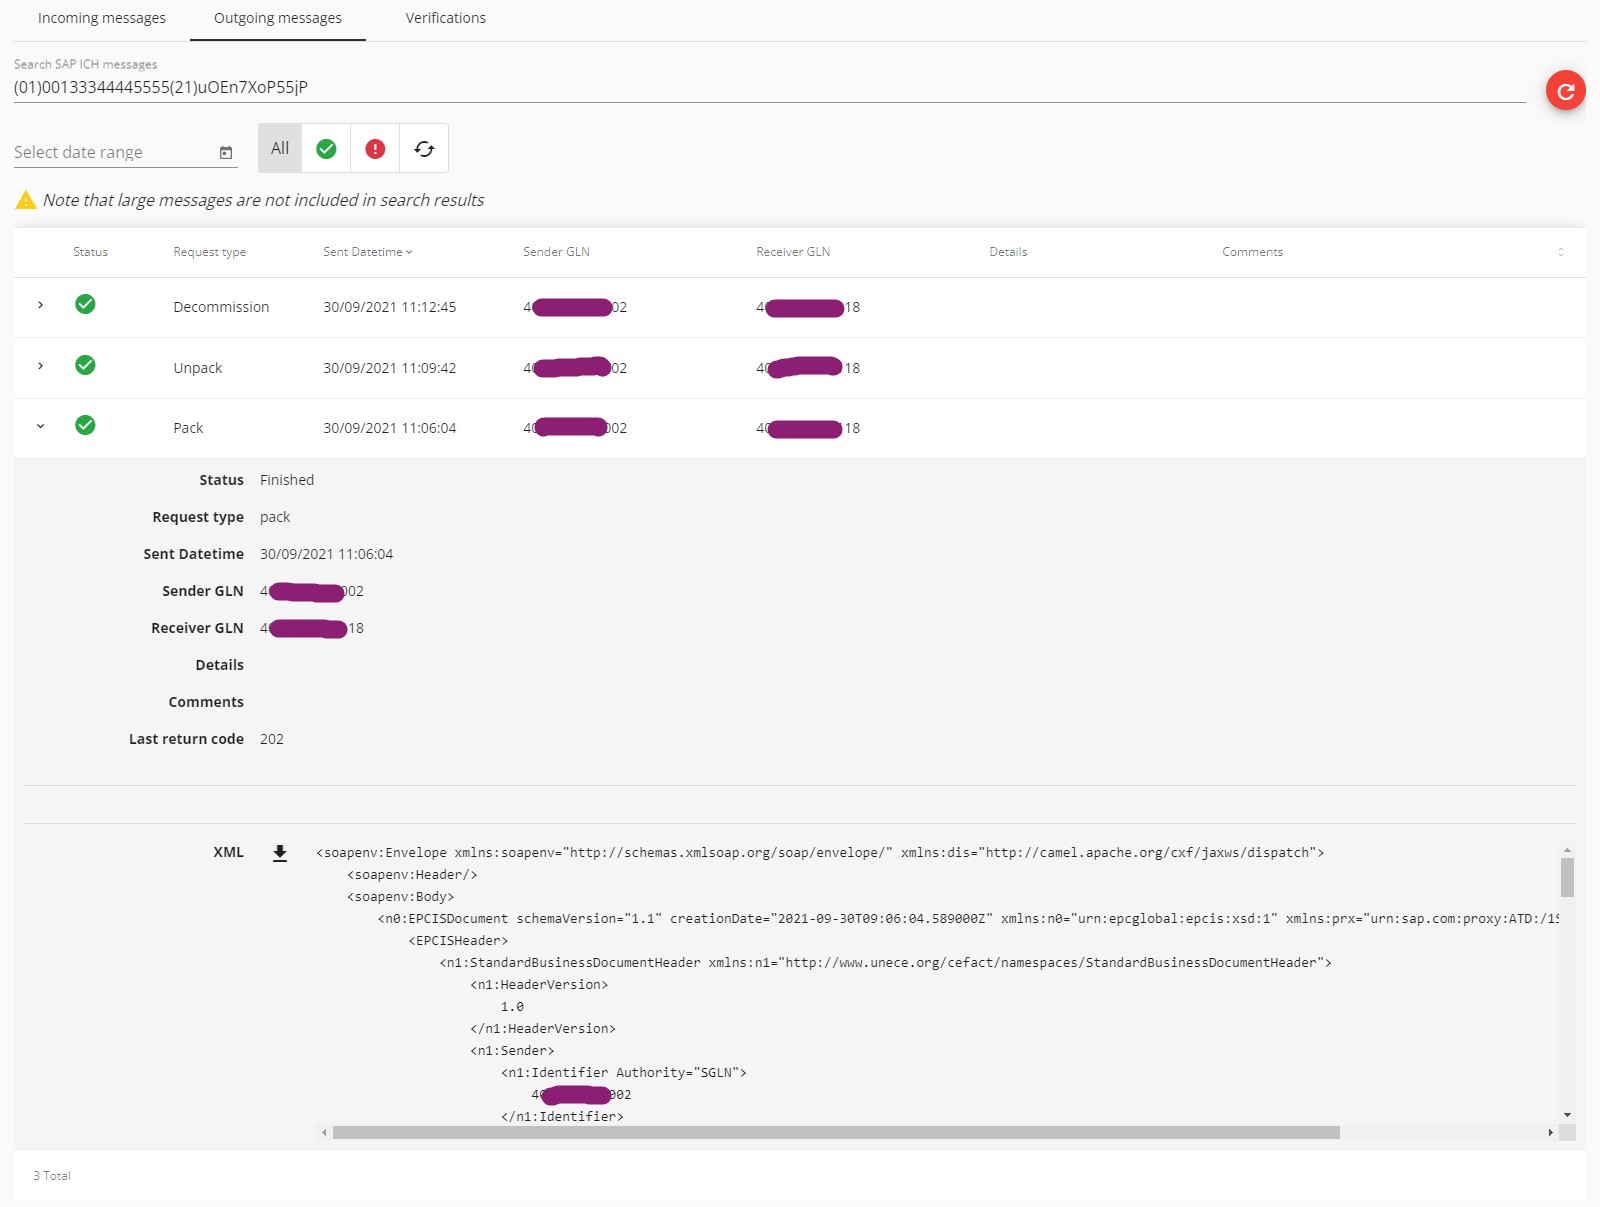
In the following example, we are searching for all the messages that include the following product code and serial number: "(01)00133344445555(21)uOEn7XoP55jP".
- There are three search results, and all of them are successful.
- One of the messages (Pack action) is expanded.
- The system offers to download the file but it also displays the XML content.
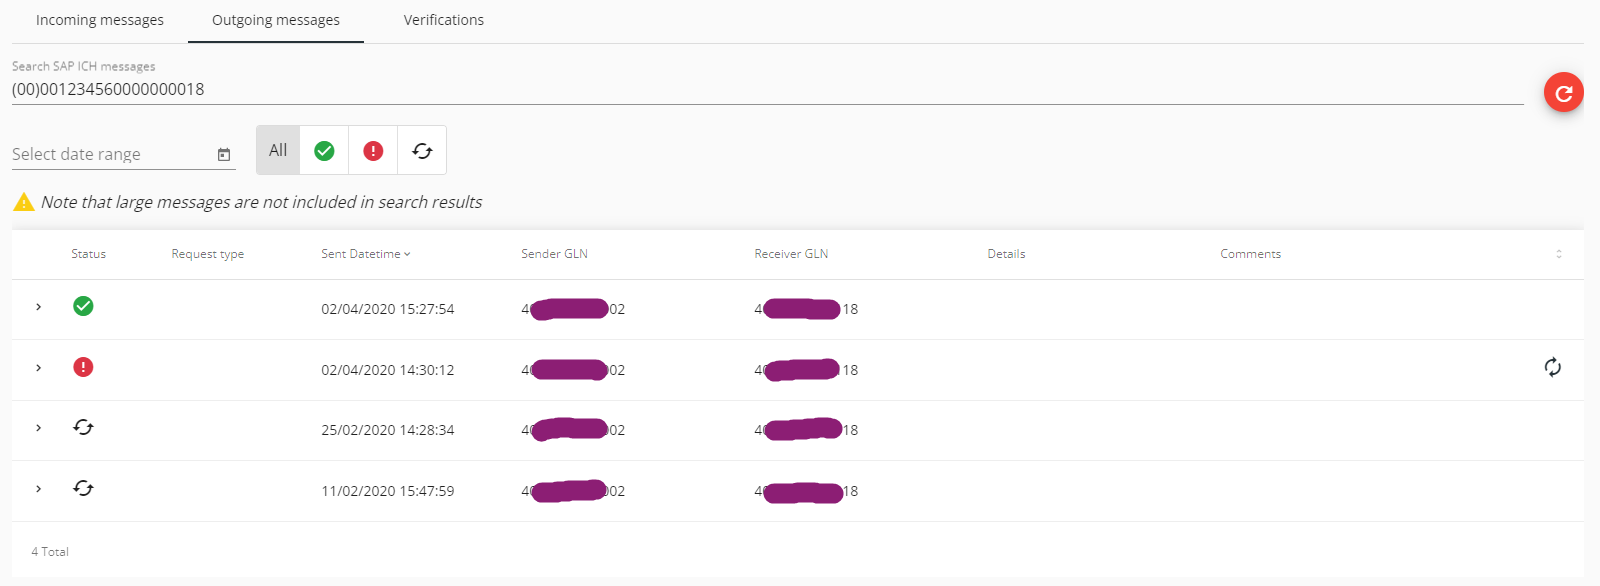
In the following example, we are searching for all the messages that include the following SSCC code: "(00)001234560000000018". There are four search results with different statuses:
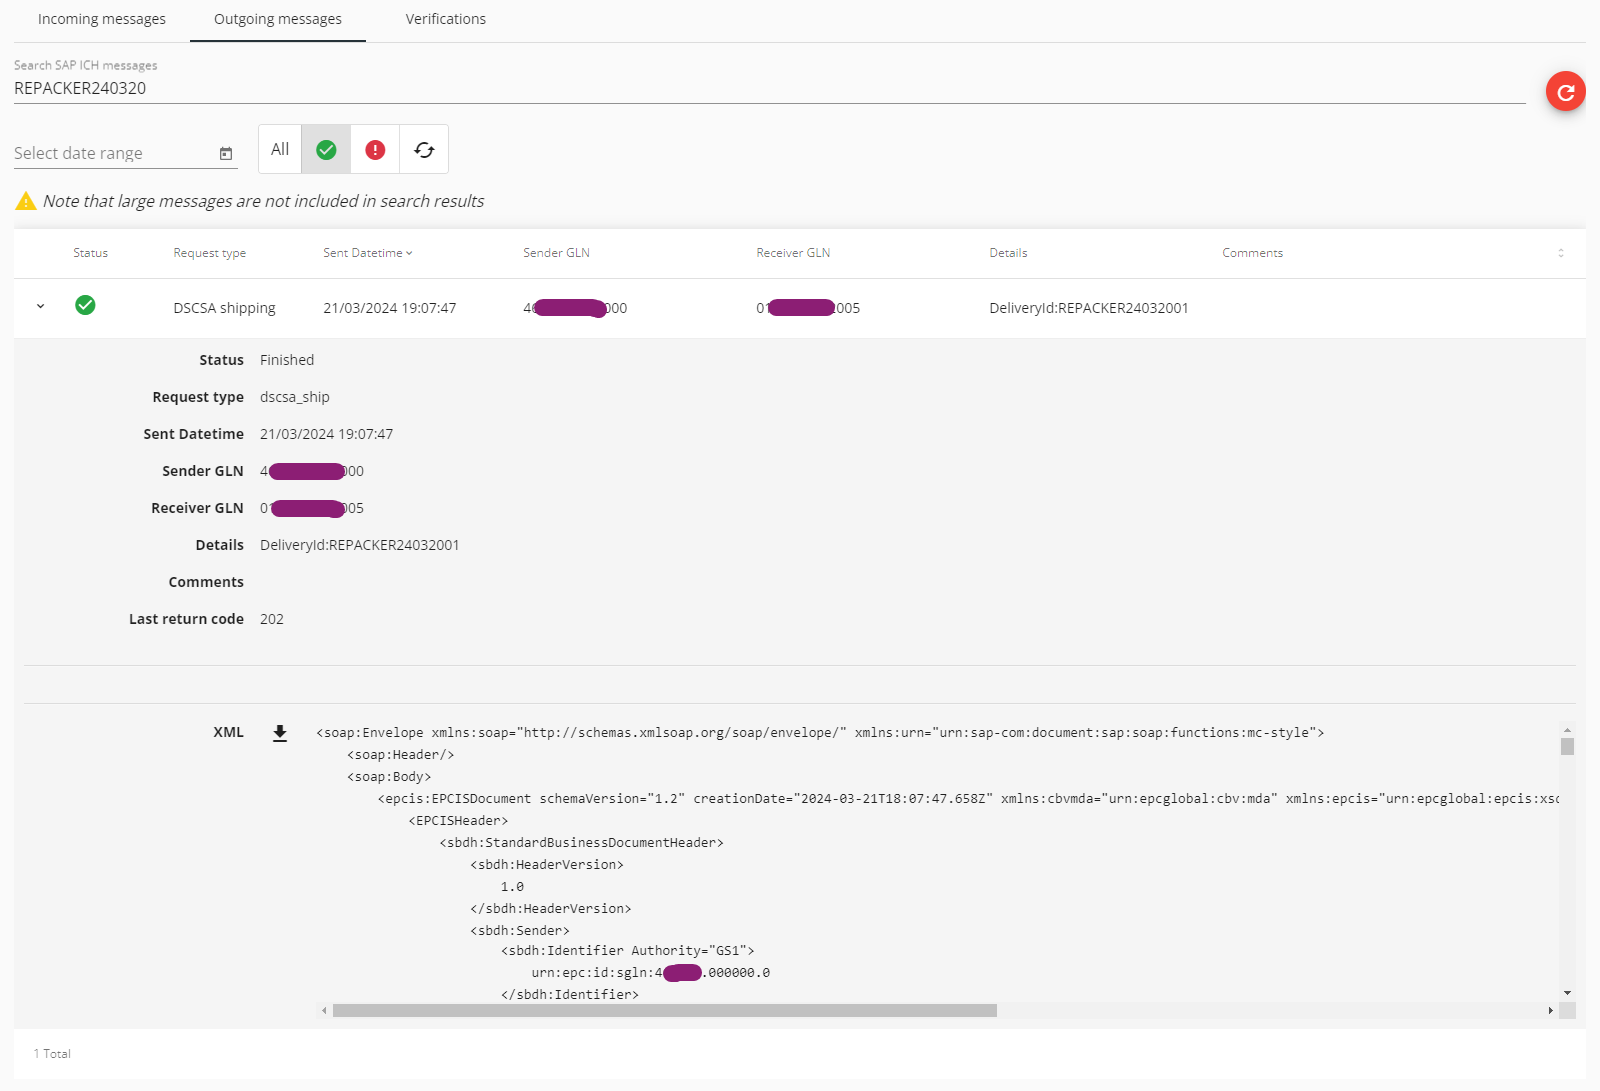
In the following example, only the successful (finished) messages are listed. We are searching for a DSCSA shipping message by using the search expression "REPACKER240320" which relates to the delivery ID:
- There is one search result that is expanded.
- The system offers to download the file but it also displays the XML content.
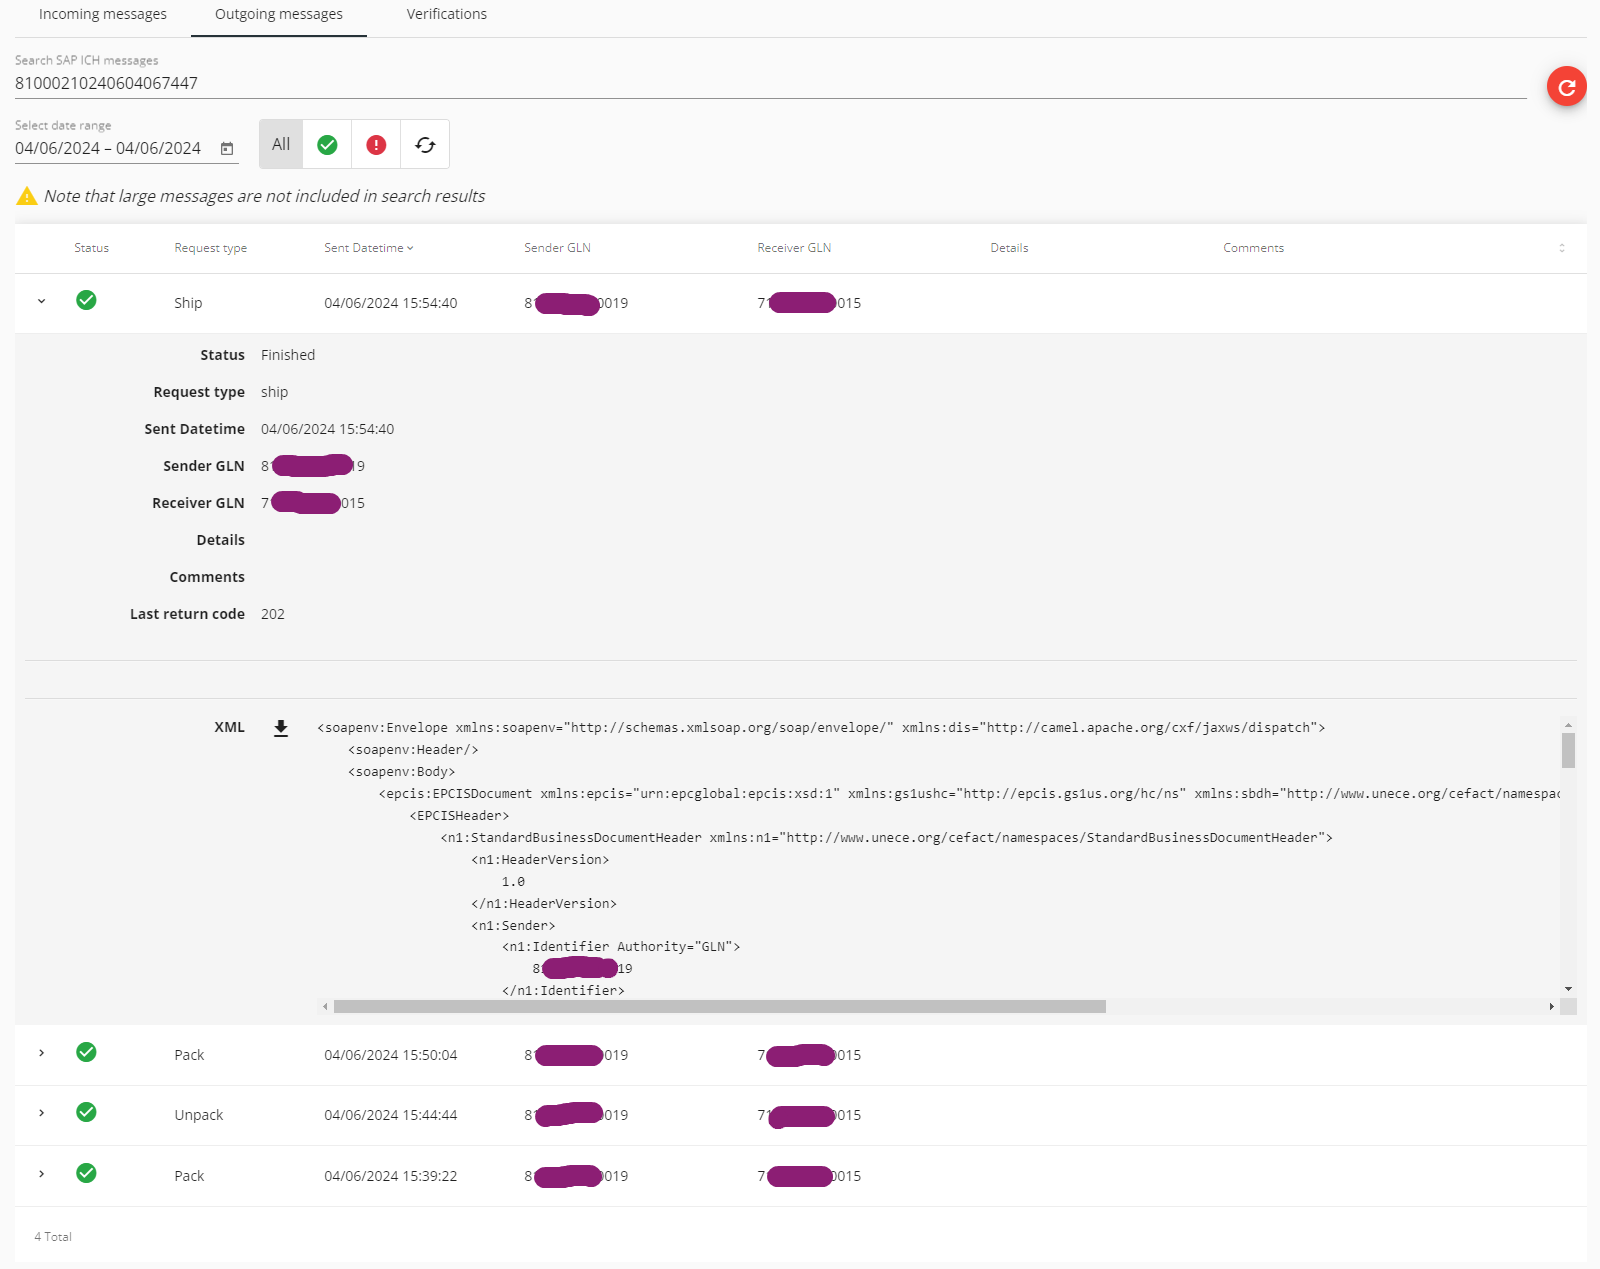
In the following example, we are searching for all the messages that include the Chinese eCode "81000210240604067447" (20-digit number):
- There are four search results, and all of them are successful.
- One of the messages (Ship action) is expanded.
- The system offers to download the file but it also displays the XML content.
Back to the list of procedures
Monitoring Verifications
You can view the details of the verification messages sent to the SAP ICH system. The verification messaging is synchronous and the status is updated after receiving the response from the SAP ICH system.
Procedure
1. Go to Movilitas.Cloud Console --> My tenants.
2. Select the tenant or click Open tenant next to it.
3. On the Tenant Dashboard, select the Channels tab. The application displays the list of channels assigned to the tenant.
4. To search for an SAP ICH channel, use the search field and the filters:
- Enter the channel name in the search field.
- Select the status.
- Select SAP-ICH as the source.
- Select Business channel as the type.
5. To view the channel information, click on the channel name or the edit icon (Edit channel) next to the channel. The application displays the current channel settings and the log of incoming messages, by default.
Example:

6. Select the Verifications tab. The application displays the log of verifications.
Example:

7. Find the message by using the filters:
- Date range - Select a date range by using the date picker.
- Log status - Select a status to list the messages with that specific status only:
- All - Messages with all statuses are listed. Default setting.
- Checkmark icon - Verification successful, the pack is valid.
- Red exclamation mark icon - Verification error, the pack is invalid.
- Search field - Enter an expression from the XML and the list of messages is filtered based on the search criteria. For example:
- Product code.
- Lot (batch).
- Serial number.
IMPORTANT: Large messages are not included in the search results. The application displays a separate note to inform the user about it.
To clear the search criteria, click on the red circular arrow (Refresh) button in the top-right corner of the messages section.
For the messages, the following parameters and functions are displayed:
| Parameter/Function | Description |
|---|---|
| > (Expand) icon | You can view the details of the verification message after expanding the message:
Note: For verifications in the USA market, the messages follow VRS 1.3. The supported context is DSCSA saleable return. The message contains the pack data, the contact email that is the support email on the channel, and the possession flag that is always “true”. |
| Status | Status of the message, The available statuses are:
|
| Status code | HTTP response status code for the verification request. |
| Sent Datetime | The timestamp when the verification message was sent. |
| Verified | The result of the verification from the SAP ICH system. The available values are:
|
| Message | Displays further information when the verification result is false. The message status is Success or Error. |
| Resend button | In case of an error, you can resend the verification request by clicking on the button. |
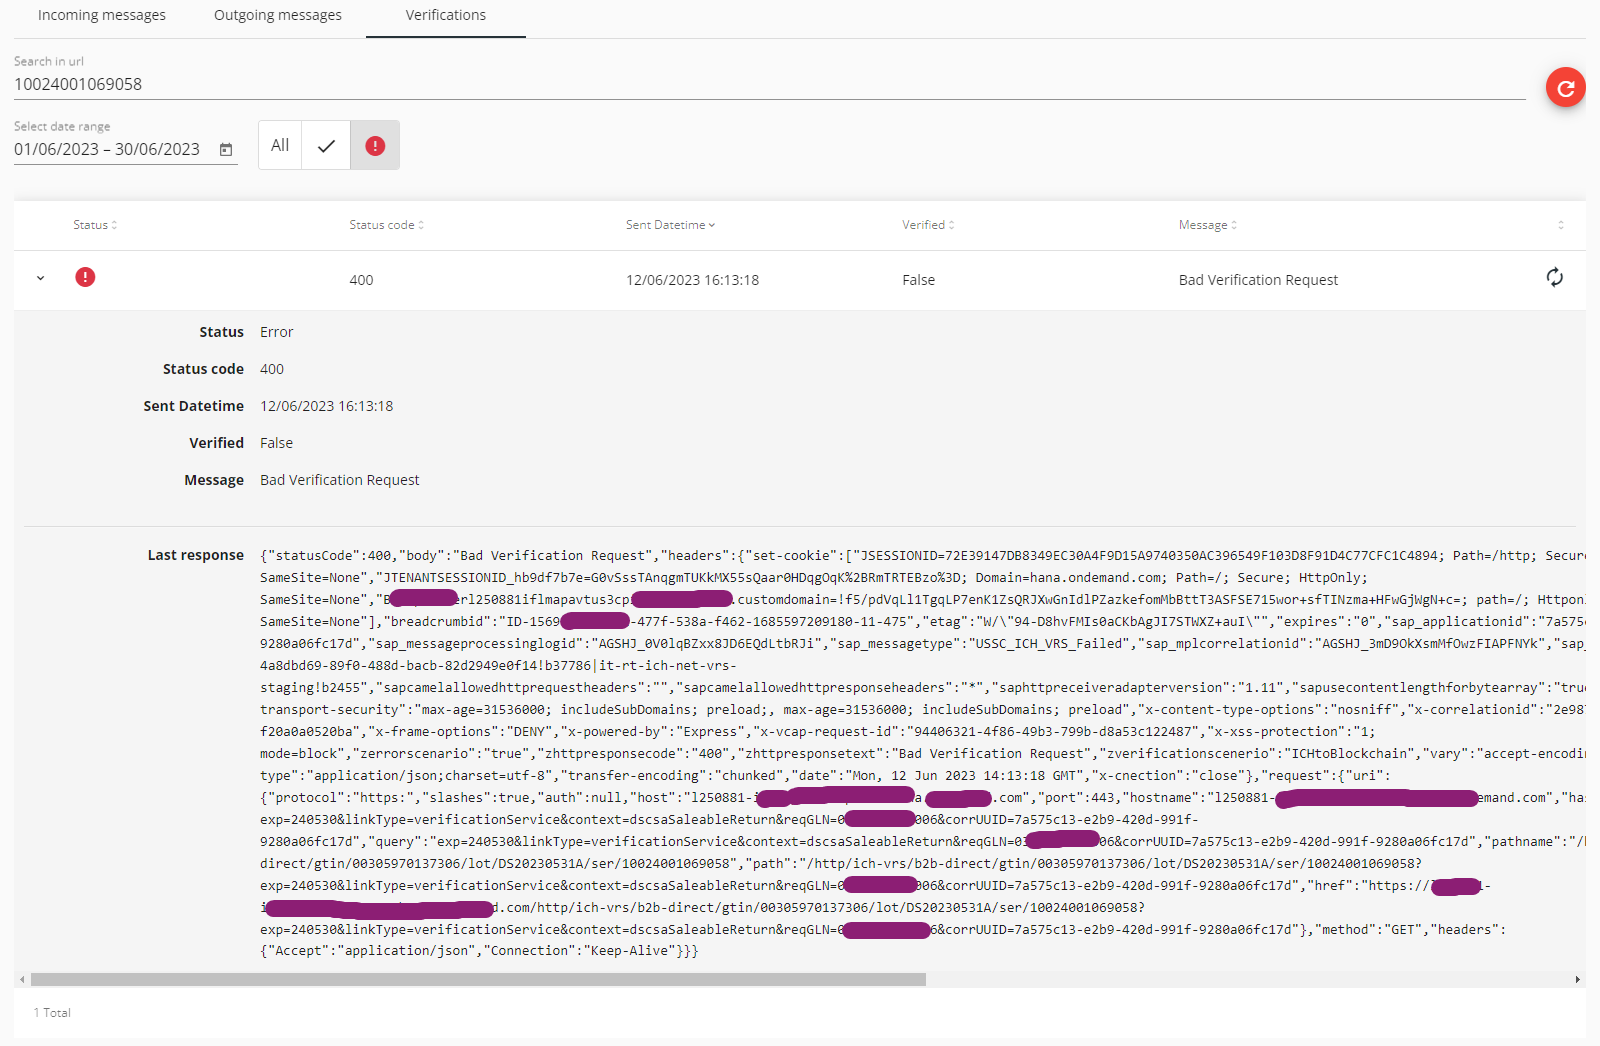
In the following example, messages are filtered by failed status and for the date range June 1, 2023 - June 30, 2023. The search expression is "10024001069058" (serial number). There is one search result:
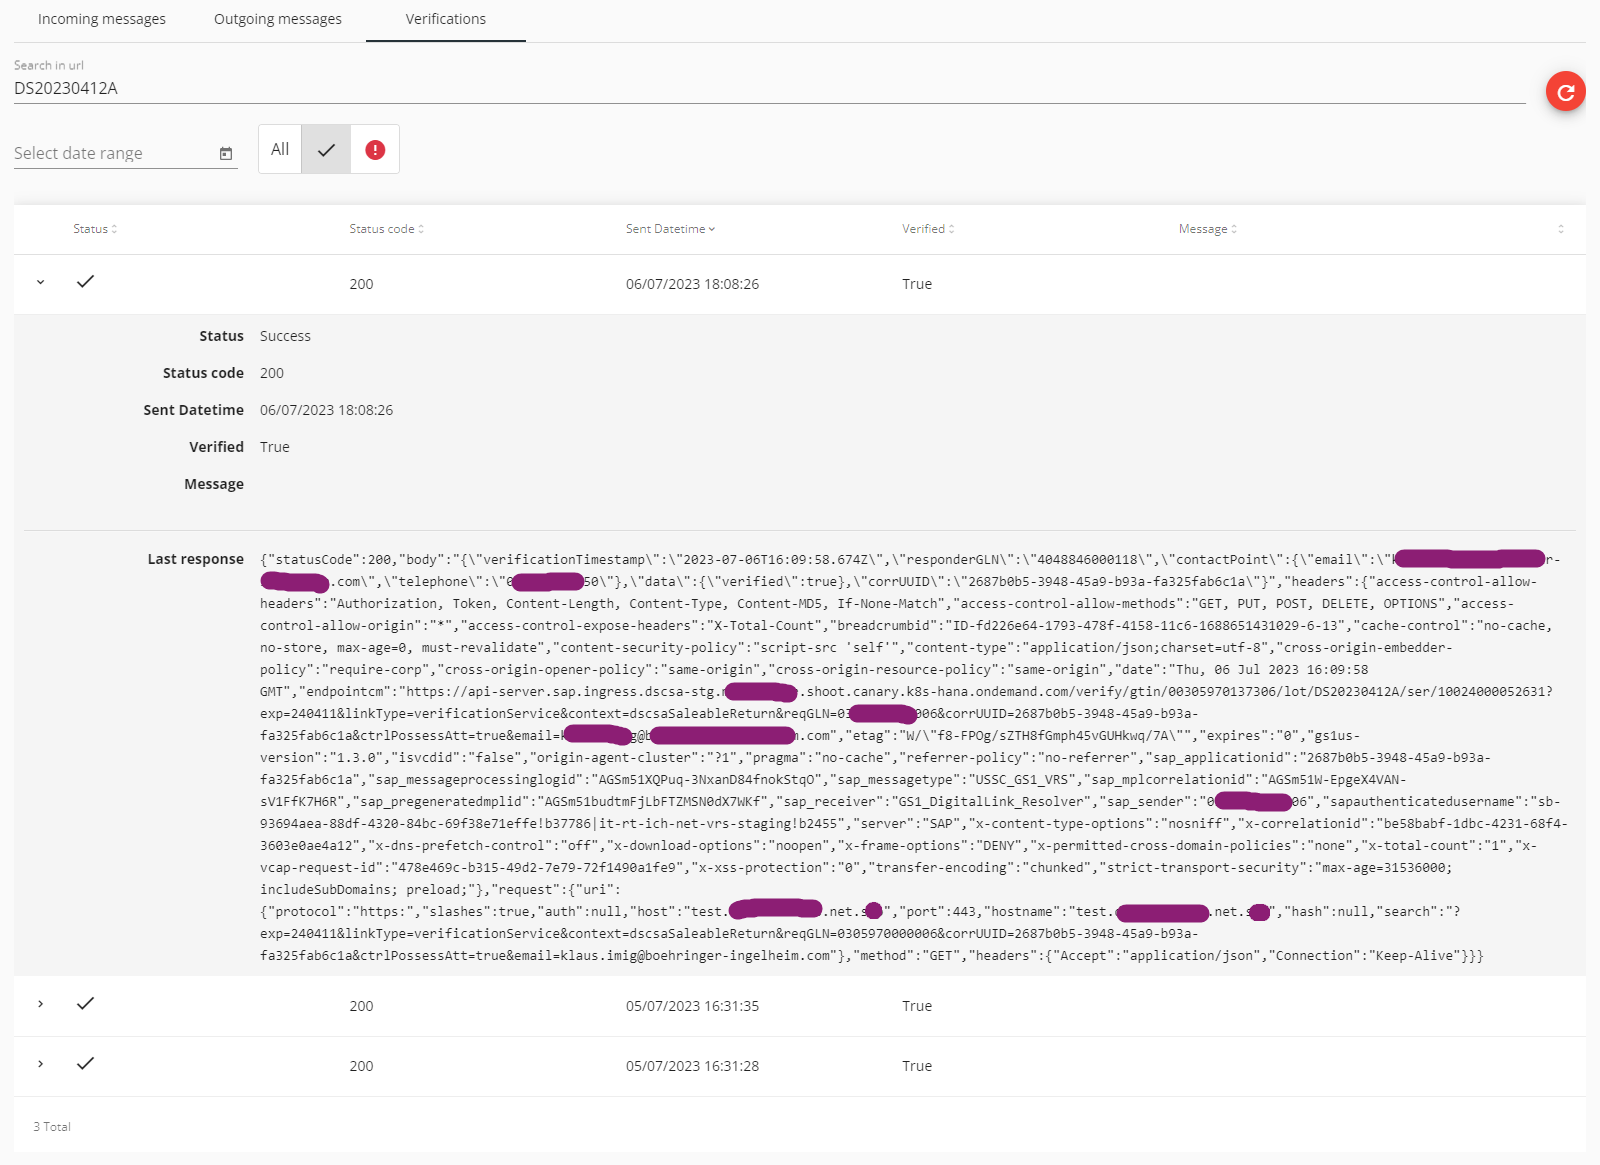
In the following example, all successful verification messages are listed that contain the search expression "DS20230412A" (batch):
Back to the list of procedures