You can view the results of commissioning requests sent to Movilitas.Cloud and take the necessary actions on them under the Serialized Manufacturing application --> Commissioning tab. For each product, select the items and commission (report) them to the applicable market.
The Commissioning page is populated with items from the following sources:
- From an external system over the Manufacturer V2 API by sending Commission Serials and Aggregation API calls.
- From SAP ATTP through an SAP ATTP channel.
- By sending a commissioning request.
- By sending a generic report.
- From TraceLink as a SOM_SHIPMENT_EVENT transaction.
- From a Wipotec-OCS packaging line once the packaging order is finished on the line.
- From Movilitas Mobile application by scanning the items for commissioning.
- By uploading a CSV file that contains the data of produced packs for a registered product.
- By uploading an EPCIS file that contains the data of produced packs for a registered product.
List of Procedures
- Uploading a CSV File
- Uploading an EPCIS File
- Commissioning Items to a Market
- Downloading the CSV File about the Failed Packs (CSV Upload)
- Viewing the Errors after Uploading an EPCIS File
Uploading a CSV File
You can upload a CSV file that contains the data of produced packs for a registered product: serial number, product code, batch, and expiration date. After the upload, these packs are registered in Movilitas.Cloud and are ready for commissioning to the market.
Before You Begin
Make sure that:
- You have registered the product master data under the Products --> Products --> Master data tab.
- You have prepared the CSV file in the correct format.
The CSV file contains the following header and the data per pack:
| SerialNumber | GTIN | Batch | ExpirationDate | ManufacturingDate* |
|---|---|---|---|---|
| <serial number> | <GTIN> | <batch> | <YYMMDD> | <YYMMDD>* |
*Optional and can be omitted.
You can give pack data of multiple product codes in the same CSV file.
Example of a CSV file opened in Notepad++:

Procedure
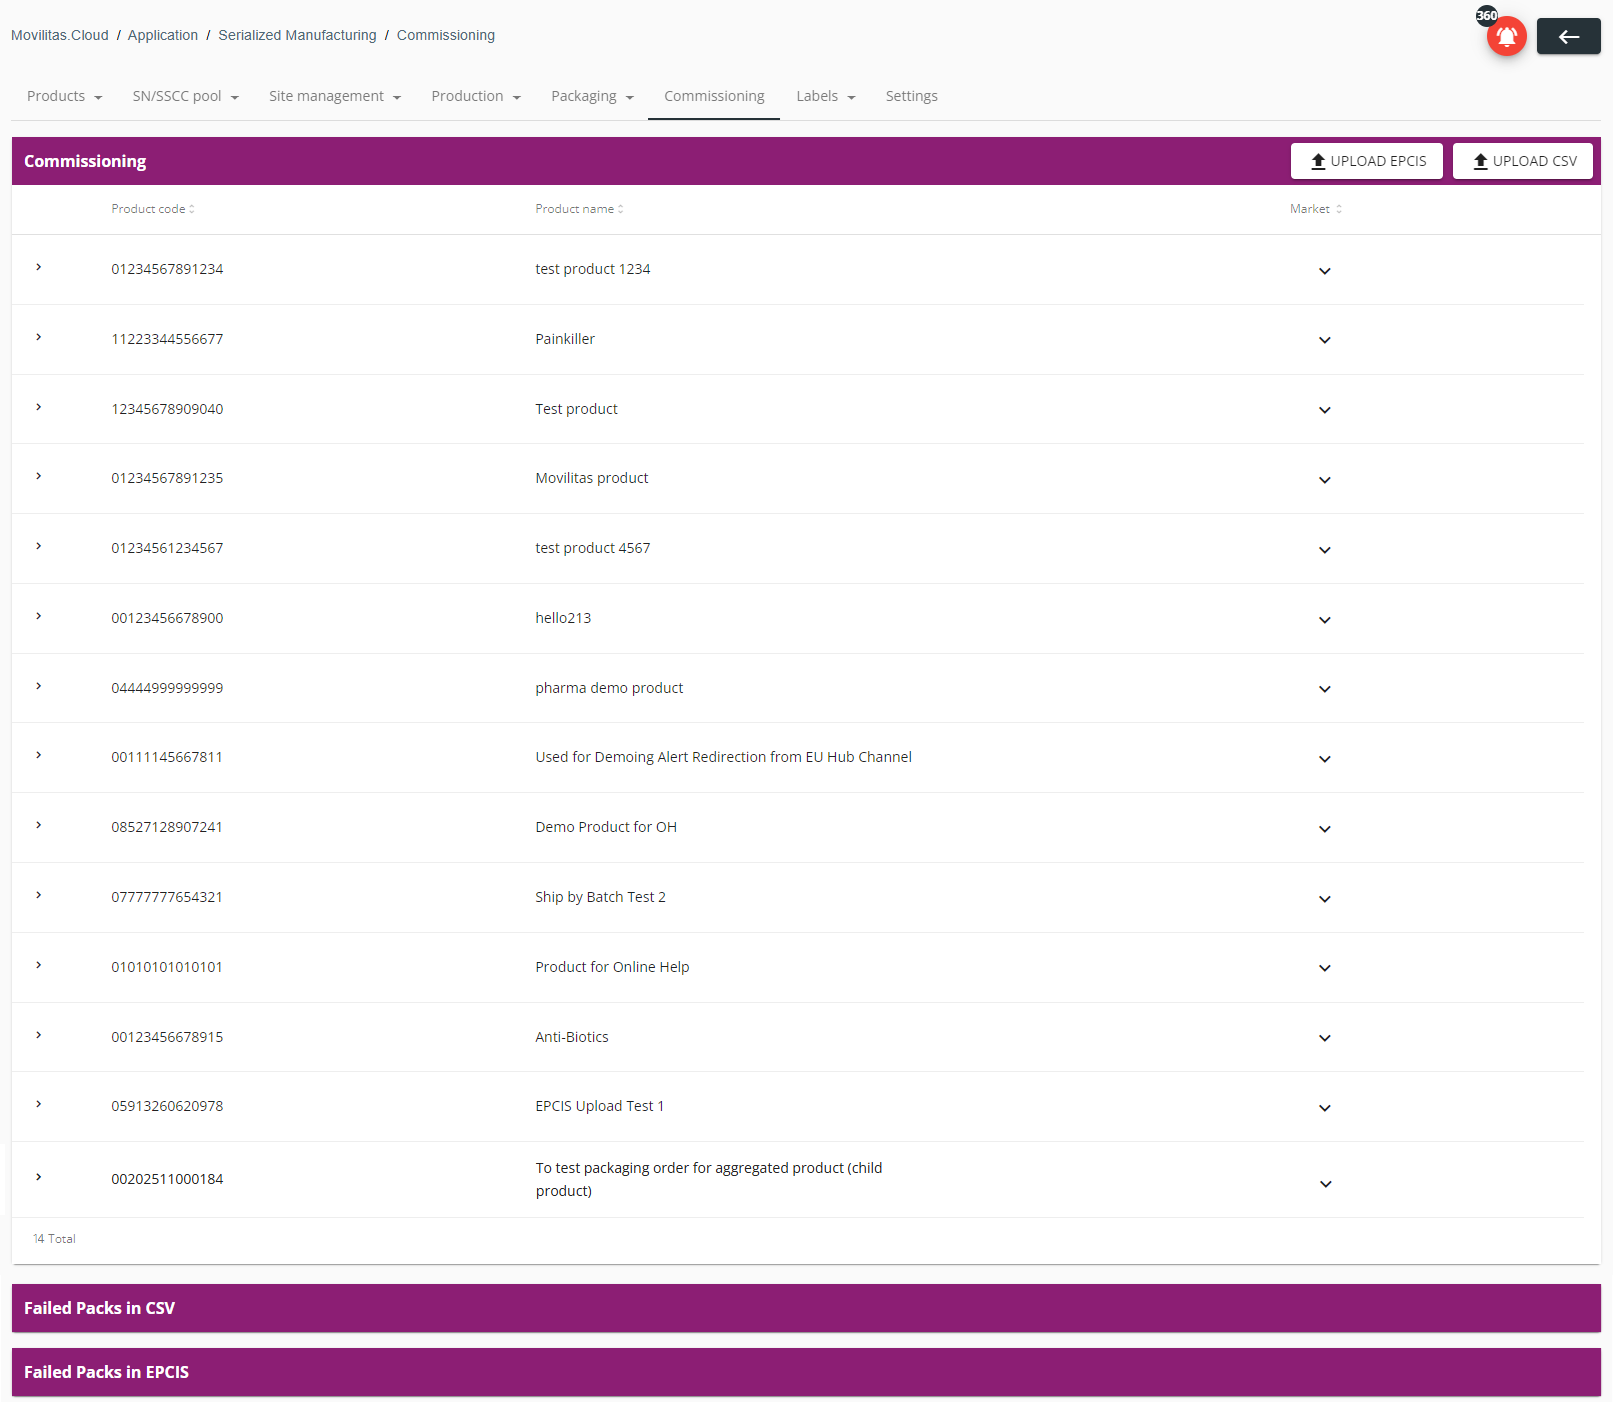
1. Open the Serialized Manufacturing application and go to the Commissioning tab.
The application displays three tables:
- The Commissioning table contains the list of products that have items ready for commissioning to the market.
- The Failed Packs in CSV table contains a list of CSV files that contain the details about the failed packs during CSV uploads.
- The Failed Packs in EPCIS table contains a list of XML files that contain the errors during EPCIS uploads.
In the following example, the Commissioning table has items, while the Failed Packs in CSV and Failed Packs in EPCIS tables are empty:

2. On the top-right corner of the Commissioning panel, click Upload CSV.
The application opens a window that contains the following:
- A description of the CSV file format.
- The Download Template button to get the CSV template file. If you do not have the CSV file ready for uploading, download the template and fill it with your data.
- The Select File button to select a CSV file for uploading.

3. Click Select File and select the CSV file for uploading.
Movilitas.Cloud processes the file line by line and displays the result.
- If the operation is complete, the application displays the number of successfully processed items versus the failed ones in a pop-up window.
- If the file format is not correct, the application displays an error message and you need to correct the format and retry.
The following example illustrates that the operation is complete, and all five records have been successfully processed. There is no error:
![]()
The following example illustrates that the operation is complete, but some of the records have failed. The file contained six records, four have been successfully processed, while two have failed:

Movilitas.Cloud lists the successfully processed items versus the failed ones in separate tables.
- The successfully processed items are listed per product in the Commissioning table.
- The failed items are saved to a CSV file and the file is downloadable in the Failed Packs in CSV table.
Next Steps
Do one of the following:
- Commission the successfully processed items to a market.
- Download the CSV file about the failed packs (if any). If applicable, resolve the issue as per the error message, and retry the upload again.
Back to the list of procedures
Uploading an EPCIS File
You can upload an EPCIS file that contains the data of produced packs for a registered product.
The outcome of the EPCIS upload is one of the following:
- If the shipping event inside the file is not processed upon confirmation or the shipping event is not present in the file, the items are registered in Movilitas.Cloud and are ready for commissioning to the market.
- If the shipping event inside the file is also processed upon confirmation, the items are registered in Movilitas.Cloud, commissioned to the market, and also shipped at once. However, this execution route requires an appropriate configuration in the tenant settings and Serialized Logistics application.
Before You Begin
Make sure that you have registered the product master data under the Products --> Products --> Master data tab.
If you want to process the shipping event inside the EPCIS file, make sure that the configuration is complete. The configured SGLNs have to match the SGLNs in the EPCIS file:
- Source owning party (seller) SGLN in the EPCIS file --> Tenant settings, including company name, address, and SGLN.
- Source location (ship-from) SGLN in the EPCIS file --> Warehouse settings, including address and SGLN, in the Serialized Logistics application.
- Destination owning party (sold-to/buyer) SGLN in the EPCIS file --> Client master data settings, including address and SGLN, in the Serialized Logistics application.
- Destination location (ship-to) SGLN in the EPCIS file --> Client delivery address settings, including address and SGLN, in the Serialized Logistics application.
Procedure
1. Open the Serialized Manufacturing application and go to the Commissioning tab.
The application displays three tables:
- The Commissioning table contains the list of products that have items ready for commissioning to the market.
- The Failed Packs in CSV table contains a list of CSV files that contain the details about the failed packs during CSV uploads.
- The Failed Packs in EPCIS table contains a list of XML files that contain the errors during EPCIS uploads.
In the following example, the Commissioning table has items, while the Failed Packs in CSV and the Failed Packs in EPCIS tables are empty:

2. On the top-right corner of the Commissioning panel, click Upload EPCIS.
The application displays a dialog window and asks for confirmation: Do you also want to process shipping events? (Serialized Logistics application has to be activated and configured correctly).
Example:

3. Decide the route of processing:
- To process only the commissioning and aggregation events, select No.
- To process the shipping event, select Yes.
4. Select the EPCIS file for uploading.
System checks before processing the EPCIS file:
| # | Shipping Event Not Processed | Shipping Event Processed |
|---|---|---|
| 1 | If the XML is not structured as an EPCIS document, the application displays an error message that the EPCIS document is not available. You need to upload an EPCIS document and retry. | If the XML is not structured as an EPCIS document, the application displays an error message that the EPCIS document is not available. You need to upload an EPCIS document and retry. |
| 2 | N/A | Before processing the EPCIS file, the system checks the completeness of the application configuration based on the shipping event. If any of the below errors occur, the file is not processed:
|
If the checks pass, the application processes the file. The application displays how many events have been processed with the number of errors and imported trade items.
The following example illustrates that the operation is complete, and all 20 trade items have been successfully processed. There is no error:

The following example illustrates that the operation is complete but there are 20 errors. None of the trade items have been imported:

System actions:
| Shipping Event Not Processed | Shipping Event Processed |
|---|---|
| If the EPCIS file is processed successfully, the application lists the trade items in the Commissioning table under the related product. If the EPCIS file is processed with errors, the application saves the errors into an XML file. You can copy the file content to your clipboard in the Failed Packs in EPCIS table. | If the EPCIS file is processed successfully:
|
Next Steps
In case you have chosen not to process the shipping event:
- Commission the successfully processed items to a market.
- Copy the XML file content about the failed packs (if any). If applicable, resolve the issue as per the error message, and retry the upload again.
In case you have chosen to process the shipping event:
- (European Union) Track the commissioning requests sent to the EU Hub, SAP ATTP, or Arvato CSDB (as applicable) and verify the response (if applicable). For more information, see the EU Hub channel, SAP ATTP channel, or Arvato CSDB channel (as applicable).
- (Indonesia) Track the commissioning requests sent to BPOM and verify the response. For more information, see the BPOM channel.
- (Kazakhstan, Kyrgyzstan, Russia, the United Arab Emirates, and Uzbekistan) Track the commissioning requests sent to TraceLink and verify the response. For more information, see the TraceLink Partner channel.
- (Russia) Track the commissioning requests sent to SAP ATTP and verify the response. For more information, see the SAP ATTP channel.
- (United Kingdom) Track the commissioning requests (EPCIS uploads) sent to Novumgen. For more information, see the Novumgen channel.
- (Uzbekistan) Track the aggregation reports sent to Code OMS and verify that they are successfully processed. For more information, see the Code OMS channel.
- (USA) Verify that the DSCSA EPCIS file is successfully sent through the channel associated with the client (AS2, LSPediA, TraceLink Partner, or SFTP). In partnership, ask your client to confirm the receipt of the file.
- Verify the outbound external transfer in the Serialized Logistics application. For the USA market, you can download the DSCSA EPCIS file or resend it to the client. For more information, see Managing Outbound Transfers.
Back to the list of procedures
Commissioning Items to a Market
After the items are commissioned to Movilitas.Cloud, you can commission the items to a market.
To comply with the requirements of the specific market, the request might contain additional information besides the pack or container data:
- When commissioning the packs to the EU Hub, the application determines the manufacturer based on the CMO-serial assignments and includes the manufacturer details next to the pack details in the request sent to the EU Hub. If the manufacturer cannot be determined based on the existing configuration, the application asks the user to manually determine the manufacturer from the list of MAHs and CMOs registered in the system.
- When commissioning the packs to the EU Hub as a repacker, the application includes the original product details in the request sent to the EU Hub:
- The original product code scheme is always GTIN.
- The non-serialized origin product code is taken from the product master data settings that you have to specify in advance.
- The original batch value is the one given with the packs to be commissioned.
- When commissioning the items to Novumgen (UK), the application automatically links the first available manufacturing site to the commissioning request. As a prerequisite, the manufacturing site is registered in the application.
Before You Begin
To commission and report to the market, make sure the respective connection has been established to the external system:
| Market | Channel |
|---|---|
| AF (Africa) | TRVST channel |
| CHN (China) | SAP ICH channel or TraceLink Partner channel |
| EU (European Union) | EU Hub channel, SAP ATTP channel, or Arvato CSDB channel |
| IDN (Indonesia) | BPOM channel |
| KAZ (Kazakhstan) | TraceLink Partner channel |
| KGZ (Kyrgyzstan) | TraceLink Partner channel |
| RUS (Russia) | TraceLink Partner channel or SAP ATTP channel |
| UAE (United Arab Emirates) | TraceLink Partner channel |
| UK (United Kingdom) | Novumgen channel |
| USA (United States of America)* | SAP ATTP channel* |
| UZB (Uzbekistan) | Code OMS channel OR TraceLink Partner channel (depending on your business use case) |
*Associating an SAP ATTP channel with the USA market profile is optional and is driven by the tenant’s use case. If a channel is not associated with the USA market profile, the commissioning action is a status change for the items from Active to Commissioned status in Movilitas.Cloud without any communication to an external system.
Procedure
1. Open the Serialized Manufacturing application and go to the Commissioning tab.
The application displays three tables:
- The Commissioning table contains the list of products that have items ready for commissioning to the market.
- The Failed Packs in CSV table contains a list of CSV files that contain the details about the failed packs during CSV uploads.
- The Failed Packs in EPCIS table contains a list of XML files that contain the errors during EPCIS uploads.
Example:
2. In the Commissioning table, find the product for which you want to commission items.
The application lists only the product (GTIN and name) at the lowest level in the commissioning list. The hierarchy is visible after expanding the product, and then the batch.
3. In the Market column, click the drop-down and select the market if you have multiple markets (AF, CHN, EU, IDN, KAZ, KGZ, RUS, UAE, UK, USA, or UZB).
4. Expand the product by clicking > next to the product code on the left. The application displays the batch and the expiration date.
A product code can have multiple batch/expiration date pairs. In this case, the items waiting for commissioning are organized per batch/expiration date.
In the following example, there are three batches for the product "01010101010101". The selected market is IDN (Indonesia):

5. Expand the row displaying the batch and the expiration date. The application displays the containers and serials waiting for commissioning.
You can view the parent at the top level (container or trade item).
- If the parent at the top level is a trade item (SGTIN), you can expand the hierarchy to the lowest level.
- If the parent at the top level is a container( SSCC) that contains child containers (SSCCs), you can further expand the hierarchy to the lowest level of containers (SSCCs) where the included number of serials (trade items) is indicated.
The following example illustrates a container (SSCC) and two stand-alone trade items (SGTINs) of the previous product, "01010101010101" with batch "BATCH010101":

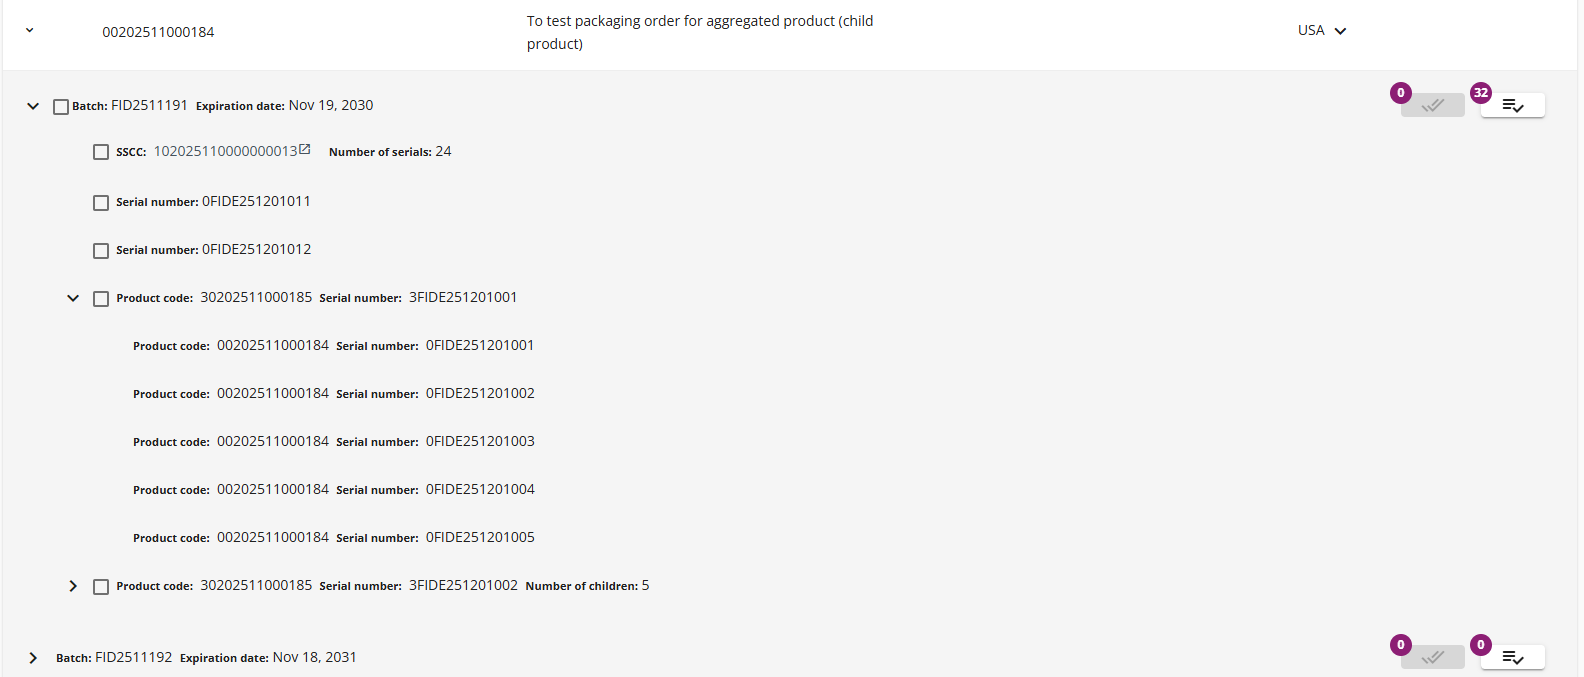
The following example illustrates a container (SSCC), two stand-alone trade items (SGTINs) and two aggregated trade items (SGTINs) for the product "00202511000184" with batch "FID2511191". The selected market is the USA. By default, the parents at the top level are visible. One of the aggregated trade items is expanded to show the child trade items that have the product code "00202511000184":
The following example illustrates two containers (SSCC) for the product "00202511000184" with batch "FID2511192". One of the containers has child containers (SSCCs). The selected market is the USA. By default, the parents at the top level are visible. The second container is expanded to show the child containers with the total included number of serials.

Note: For readability reasons, the application displays only the first 100 containers and the first 100 trade items in the list. If more than 100 items are waiting for commissioning, the application displays a message at the end of the list indicating the number of items not shown in the list. The application also displays the number of selected items on the commission buttons.
6. (Optional) Click on the SSCC of a container and the application displays the SSCC History page in a separate browser tab.
Before commissioning, you can check the history in the SSCC pool, the container history, and the SSCC hierarchy.
7. Select the items and commission them to the market.
OPTION 1: If you want to commission specific items from the list, select the checkbox next to the item and click Commission selected.
Example:

OPTION 2: If you want to select all the displayed items in the list, select the checkbox next to the batch on the left and click Commission selected.
Note: After commissioning, the list of items will be refreshed, and the next 100 items are displayed waiting for commissioning.
Example:

OPTION 3: If you want to commission the entire batch, including the items not displayed in the list, select Commission entire batch button on the right and confirm the action.
In the following example, we are going to commission all the items for BATCH030303 of product "01010101010101" (entire batch):

EU Market-specific Action
In the normal case, the application automatically sends the manufacturer information while commissioning to the EU Hub. If the application cannot determine the manufacturer because of multiple options, the application prompts you to specify the manufacturer. The application displays a window containing a drop-down and offers the list of MAHs and CMOs registered in the system:

ACTION: Select the manufacturer from the list and click Send.
As a result, the items are commissioned to the EU Hub along with the manufacturer data.
ERROR: Commissioning to the EU Hub is only possible when all the required pack data are provided: product code, batch, expiration date, serial number, and the manufacturer data. If the data is incomplete, that is, the address of the manufacturer is incomplete, the application displays an appropriate error message and does not allow uploading the data to avoid unnecessary errors raised in the EU Hub. Make sure you fully provide the MAH address on the EU Hub channel and, when a CMO performs the manufacturing, you fully provide the CMO address in the Serialized Manufacturing application as per the delegated regulation.
Next Steps
- (China) Track the commissioning requests sent to SAP ICH or TraceLink. For more information, see the SAP ICH channel or TraceLink Partner channel (as applicable).
- (European Union) Track the commissioning requests sent to the EU Hub, SAP ATTP, or Arvato CSDB (as applicable) and verify the response (if applicable). For more information, see the EU Hub channel, SAP ATTP channel, or Arvato CSDB channel (as applicable).
- (Indonesia) Track the commissioning requests sent to BPOM and verify the response. For more information, see the BPOM channel.
- (Kazakhstan, Kyrgyzstan, Russia, the United Arab Emirates, and Uzbekistan) Track the commissioning requests sent to TraceLink. For more information, see the TraceLink Partner channel.
- (Russia) Track the commissioning requests sent to SAP ATTP and verify the response. For more information, see the SAP ATTP channel.
- (United Kingdom) Track the commissioning requests (EPCIS uploads) sent to Novumgen. For more information, see the Novumgen channel.
- (United States of America) If the commissioning is reported to SAP ATTP, track the commissioning requests to SAP ATTP and verify the response. For more information, see the SAP ATTP channel.
- (Uzbekistan) Track the aggregation reports sent to Code OMS and verify that they are successfully processed. For more information, see the Code OMS channel.
- Based on the business processes of your company, after successful commissioning, you can ship the items. For more information, see the Serialized Logistics application.
Back to the list of procedures
Downloading the CSV File about the Failed Packs (CSV Upload)
When uploading a CSV file that contains the data of the produced packs, failed items can occur because the given data are not consistent across the full uploaded data set. For example, the same batch is used with multiple expiration dates.
Movilitas.Cloud detects the records that are not correct and saves them to a downloadable CSV file.
Note: This function is strictly connected to the use case when you have uploaded the data of produced packs as a CSV file before commissioning to the market. If you apply another use case, ignore this description.
Procedure
1. Open the Serialized Manufacturing application and go to the Commissioning tab.
The application displays three tables:
- The Commissioning table contains the list of products that have items ready for commissioning to the market.
- The Failed Packs in CSV table contains a list of CSV files that contain the details about the failed packs during CSV uploads.
- The Failed Packs in EPCIS table contains a list of XML files that contain the errors during EPCIS uploads.
In the following example, the Commissioning table has items and the Failed Packs in CSV table also contains three CSV files:
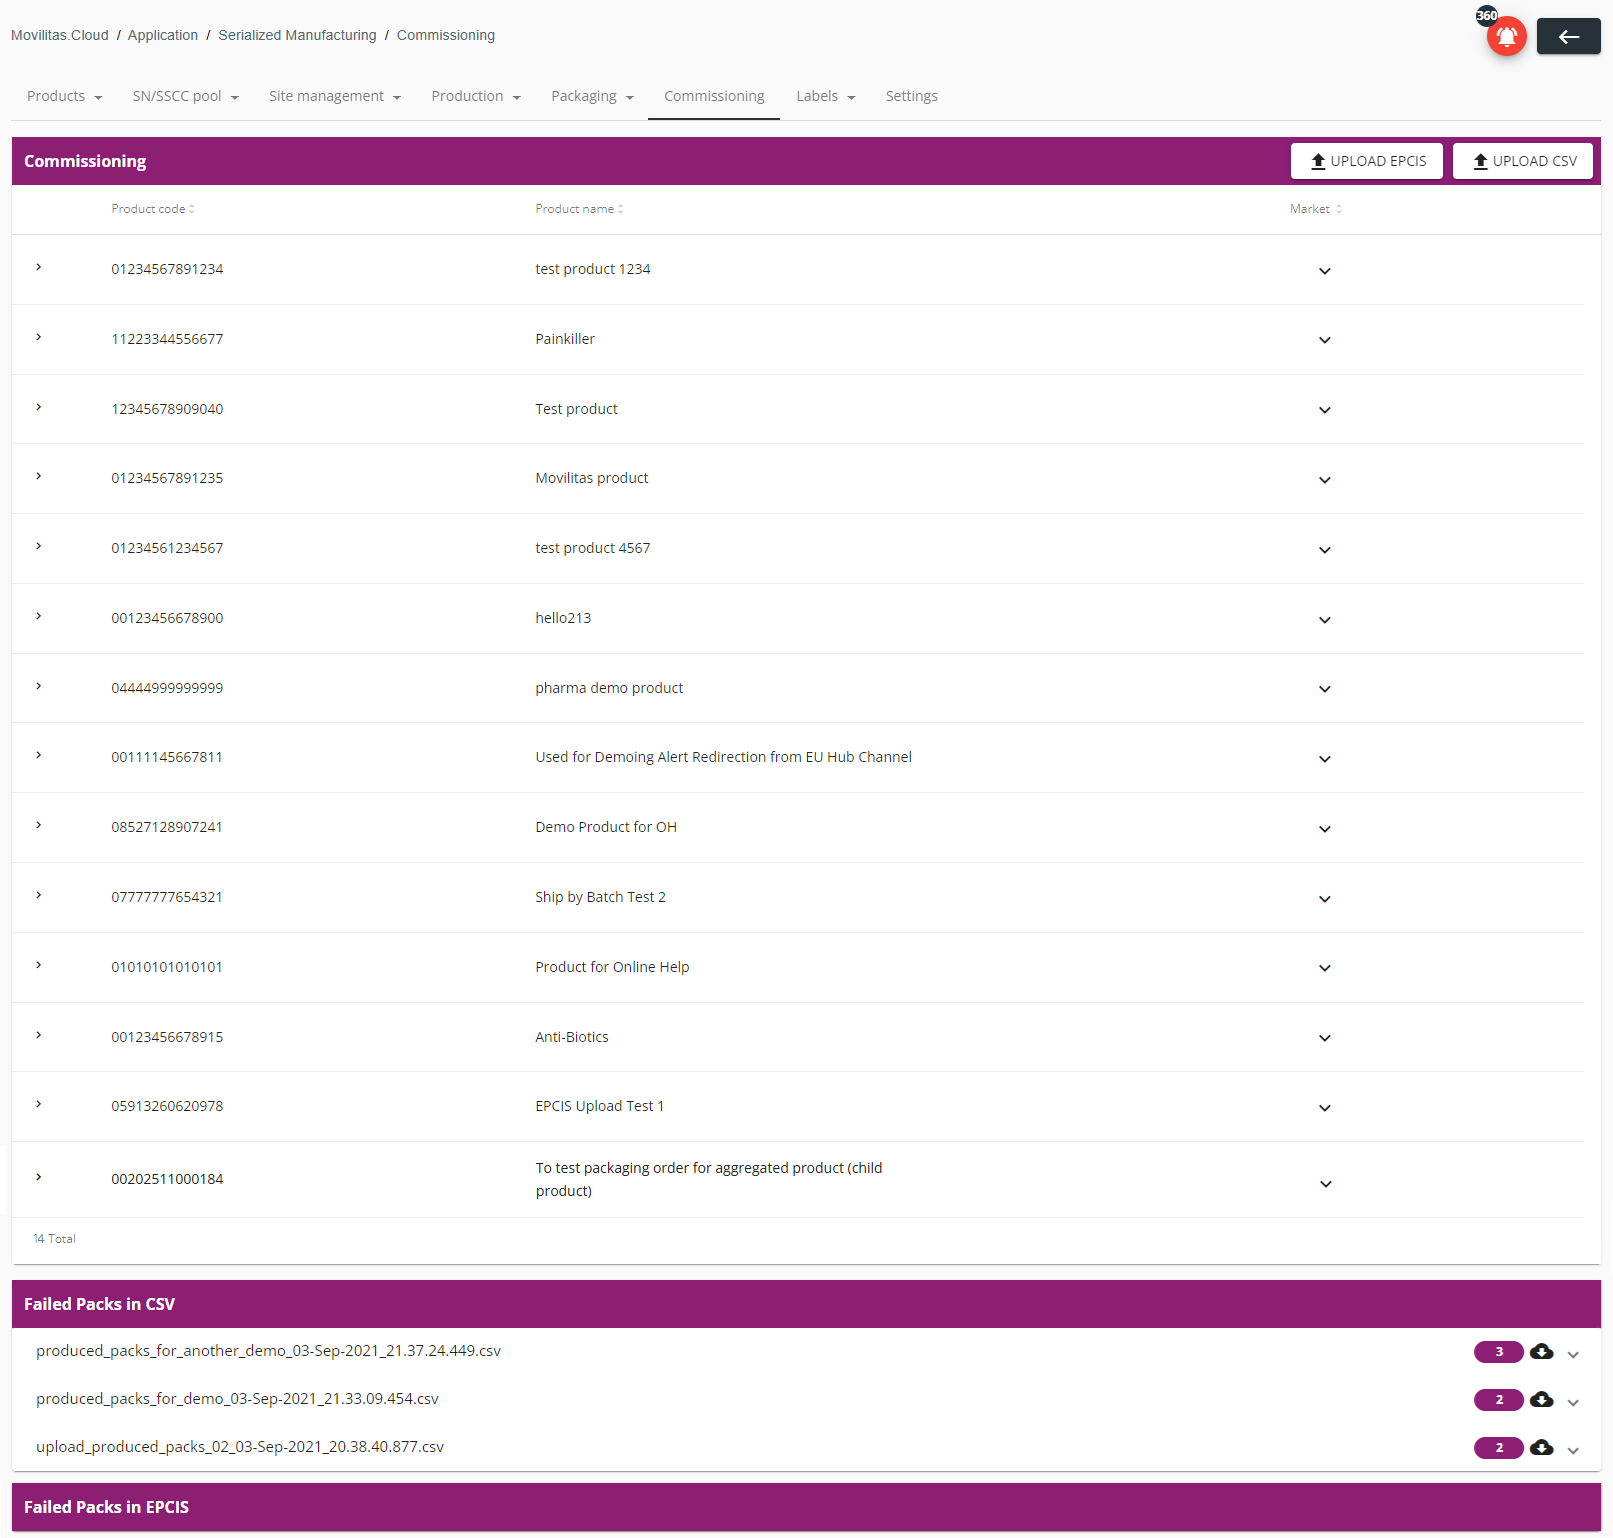
2. Go to the Failed Packs in CSV table and find the relevant CSV file. The file name is derived from the CSV file used during the upload and contains the date and timestamp.
On the right side of the filename, you can see the number of items included in the file, a download icon, and an expand icon.
Example:

3. Expand the entry of the CSV file by clicking on the drop-down arrow on the right. The application displays the details.
In the following example, we are expanding the file "produced_packs_for_demo_03-Sep-2021_21.33.09.454.csv". The CSV file contains two records:
- The first item has an incorrect expiration date. For the given batch number, the system stores a different date.
- The second item has a product code that is not registered in Movilitas.Cloud.

4. Download the CSV file by clicking on the download icon on the right.
Next Steps
If applicable, resolve the issues based on the error message, and retry the upload.
Back to the list of procedures
Viewing the Errors after Uploading an EPCIS File
When uploading an EPCIS file that contains the data of the produced packs, an error can occur due to a mismatch between the configuration in Movilitas.Cloud and the EPCIS file content. For example, the product is unknown or the expiration date of the batch in the file is not the one that is stored in Movilitas.Cloud for that batch.
Movilitas.Cloud detects the errors and collects them in a separate XML file.
Note: This function is strictly connected to the use case when you have uploaded the data of produced packs as an EPCIS file before commissioning to the market. If you apply another use case, ignore this description.
Procedure
1. Open the Serialized Manufacturing application and go to the Commissioning tab.
The application displays three tables:
- The Commissioning table contains the list of products that have items ready for commissioning to the market.
- The Failed Packs in CSV table contains a list of CSV files that contain the details about the failed packs during CSV uploads.
- The Failed Packs in EPCIS table contains a list of XML files that contain the errors during EPCIS uploads.
In the following example, the Commissioning table has items, the Failed Packs in CSV table contains three CSV files, and the Failed Packs in EPCIS table contains three XML files:

2. Go to the Failed Packs in EPCIS table and find the relevant XML file. The file name is derived from the EPCIS file used during the upload and contains the date and timestamp.
On the right side of the filename, you can see an expand icon.
Example:

3. Expand the entry of the XML file by clicking on the drop-down arrow on the right. The application displays the details.
In the following example, we are expanding the file "99844051_5913260000008-EPCIS-1-2-COM-AGG-5398398000005-20230621_083802Z-551_12-Sep-2023_18.28.24.309.xml". The product code in the uploaded EPCIS file is invalid, that is, the product is not registered in the Serialized Manufacturing application:

4. (Optional) Copy the file content for further investigation.
Next Steps
If applicable, resolve the issues based on the error message, and retry the upload.
Back to the list of procedures