After selecting the Packaging --> Packaging orders tab in the Serialized Manufacturing application, you can manage packaging orders. You can perform the following:
| Area | Description |
|---|---|
| List of packaging orders | You can release a packaging order to the packaging line. You can resume a suspended order on the packaging line. You can delete a packaging order. |
| Packaging order settings | You can specify the order details. You can associate a packaging line with the packaging order. |
| Packaging order history | You can track the progress of the packaging order execution here. The order status is updated in one of the following ways (depending on the setup and business use case):
|
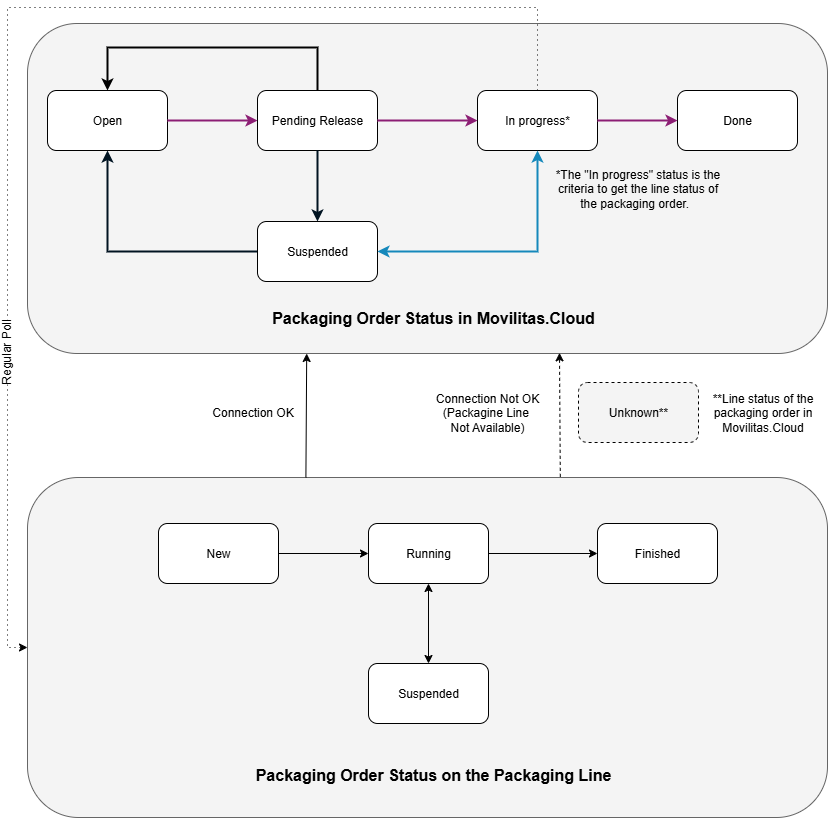
Status Flow - Connecting to a Wipotec-OCS Packaging Line
The following figure illustrates the case when the packaging order is executed on a Wipotec-OCS packaging line. There are two status flows:
- Packaging order status in Movilitas.Cloud.
- Packaging order status on the packaging line.
Once the packaging order goes into In progress status in Movilitas.Cloud, the application regularly polls the order status on the packaging line.
Status Flow - Packaging Line Integrated over API with Serial Assignment
The following figure illustrates the case when the packaging line (or its middleware) is integrated with Movilitas.Cloud over API. The serial numbers are assigned to the order from Movilitas.Cloud.

Status Flow - Packaging Line Integrated over API without Serial Assignment
The following figure illustrates the case when the packaging line (or its middleware) is integrated with Movilitas.Cloud over API. No serial number assignment from Movilitas.Cloud (bypass). The packaging line (or its middleware) assigns the serials to the order outside Movilitas.Cloud.

Status Flow - Connecting to a Keyence Printer
The following figure illustrates the case when the packaging order is executed on a Keyence printer.

List of Procedures
- Creating a Packaging Order
- Searching for a Packaging Order and Viewing Its Settings and History
- Updating a Packaging Order
- Releasing a Packaging Order to the Packaging Line
- Resuming a Suspended Packaging Order
- Deleting a Packaging Order
Creating a Packaging Order
Procedure
1. In the Serialized Manufacturing application, select Packaging --> Packaging orders tab. The application displays the list of packaging orders and the Create packaging order form.
Note: When viewing the details of a packaging order, you can open the Create packaging order form by clicking Create.

2. Fill in the form as described below. The required fields are marked with an asterisk (*) in the form.
| Field | Action |
|---|---|
| Order ID | Enter order ID. The allowed character length is 1-255 characters. |
| Order description | Enter order description. The allowed character length is 1-255 characters. |
| Select product | Select a product code. The application displays a searchable drop-down with a prefiltered list of products. You can search for any product registered in the application as per the selected product code schema by entering the product code in the search field. If you want to use Wipotec-OCS packaging line and the product you specify here is aggregated, specify the aggregation level structure in the article mapping of the Wipotec-OCS V2 shopfloor channel where you are sending this production order. For more information on the aggregation level structure in the article mapping of the Wipotec-OCS, see Configuring a Wipotec-OCS V2 Channel and Specifying Aggregation Levels. |
| Product code schema | Select the product code schema. The application supports the following schemas:
|
| Quantity | Give the number of serials used for production in this order. The maximum allowed value is 10000. |
| Extra percentage (%) | Provide the extra percentage on top of the quantity. This field ensures that there are enough serial numbers after tests on the packaging line, or in case any error happens during production. The valid range is 0-100. For example, if you request 1000 serial numbers and you set "10" as the extra percentage, 100 additional serial numbers will be created. |
| Batch | Select a batch for the product code. The application displays a searchable drop-down with a list of batches released for that product code. You can search for any batch released for the product by entering the batch number (ID) in the search field. You can also leave the field blank, for example, because an external system generates the batch over API. You can empty the field by clicking on the X icon. |
| Expiry date | The application automatically fills in the expiration date based on the data registered in the system for that batch. It is not possible to manually change the expiration date. You can also leave the field blank, for example, because an external system generates the batch over API. By removing the selected batch, the Expiry date field also becomes empty. |
| Packaging line | Select the packaging line where you want to send the packaging order. |
| Planned production date | Select the planned production date by using the datepicker. You can select the actual date or a future date. When you want to send requests to an Order Management Station (OMS) in Kazakhstan or Uzbekistan, this field is required. |
| Serialized | By selecting this checkbox you ensure that a unique serial number is added to each pack while executing the order. Otherwise, you can execute packaging for non-serialized items. |
3. Click Save.
The order is ready for execution. You can execute the order in one of the following ways:
- Through Manufacturer V2 API.
- By releasing the order to the packaging line as described in Releasing a Packaging Order to the Packaging Line. A Wipotec-OCS V2 shopfloor channel is associated with the packaging line to connect to a Wipotec-OCS machine.
When the packaging order is created and released to the packaging line, the serial numbers are marked as Assigned in the serial number pool and are associated with the order.
Back to the list of procedures
Searching for a Packaging Order and Viewing Its Settings and History
Procedure
1. In the Serialized Manufacturing application, select Packaging --> Packaging orders tab. The application displays the list of packaging orders with their status in Movilitas.Cloud (Status column) and, if applicable, on the packaging line (Line status column).
2. Enter the packaging order ID in the search field and/or select the order status under Status.
- The list of the packaging orders is filtered based on the search criteria.
- You can reset the filter by clicking the Reset filters icon.
3. Select the packaging order to view its settings and history.
- To view the order settings, click Packaging order settings.
- To view the actions and status changes of the order with date and time, click Packaging order history.
In the example below, we selected Done status only and we are searching for "Order131". Then, we are viewing the Packaging order settings tab:

In the example below, we are viewing the Packaging order history tab for the previously selected "Order131". The application displays the status transitions that were sent through the Manufacturer V2 API:

In the example below, we are searching for "AGGEDMC001". Then, we are viewing the Packaging order settings tab. The packaging order is in Open status, and it contains an EDMC product code:

In the example below, we are searching for "CUSTOM001". Then, we are viewing the Packaging order settings tab. The packaging order is in Open status, and it contains a custom product code:

Back to the list of procedures
Updating a Packaging Order
You can update orders in Open status only.
Procedure
1. In the Serialized Manufacturing application, select Packaging → Packaging orders tab. The application displays the list of packaging orders with their status in Movilitas.Cloud (Status column) and, if applicable, on the packaging line (Line status column).
2. Find and select the packaging order you want to modify.
Example 1 shows a packaging order that contains a GTIN product code:

Example 2 shows a packaging order that contains a GTIN product code. The batch is not selected yet:

Example 3 shows a packaging order that contains an EDMC product code:

Example 4 shows a packaging order that contains a custom product code. The packaging line is not selected yet:

3. In the Update packaging order form, modify the fields as needed. You can edit orders in Open status only.
Note: The application displays the order status as a read-only field.
| Field | Action |
|---|---|
| Order ID | Enter order ID. The allowed character length is 1-255 characters. |
| Order description | Enter order description. The allowed character length is 1-255 characters. |
| Select product | Select a product code. The application displays a searchable drop-down with a prefiltered list of products. You can search for any product registered in the application as per the selected product code schema by entering the product code in the search field. If you want to use Wipotec-OCS packaging line and the product you specify here is aggregated, specify the aggregation level structure in the article mapping of the Wipotec-OCS V2 shopfloor channel where you are sending this production order. For more information on the aggregation level structure in the article mapping of the Wipotec-OCS, see Configuring a Wipotec-OCS V2 Channel and Specifying Aggregation Levels. |
| Product code schema | Select the product code schema. The application supports the following schemas:
|
| Quantity | Give the number of serials used for production in this order. The maximum allowed value is 10000. |
| Extra percentage (%) | Provide the extra percentage on top of the quantity. This field ensures that there are enough serial numbers after tests on the packaging line, or in case any error happens during production. The valid range is 0-100. For example, if you request 1000 serial numbers and you set "10" as the extra percentage, 100 additional serial numbers will be created. |
| Batch | Select a batch for the product code. The application displays a searchable drop-down with a list of batches released for that product code. You can search for any batch released for the product by entering the batch number (ID) in the search field. You can also leave the field blank, for example, because an external system generates the batch over API. You can empty the field by clicking on the X icon. |
| Expiry date | The application automatically fills in the expiration date based on the data registered in the system for that batch. It is not possible to manually change the expiration date. You can also leave the field blank, for example, because an external system generates the batch over API. By removing the selected batch, the Expiry date field also becomes empty. |
| Packaging line | Select the packaging line where you want to send the packaging order. |
| Planned production date | Select the planned production date by using the datepicker. The application displays the currently set date (if any). You can keep this date or you can select a new date. The new date can be the actual date or a future date. When you want to send requests to an Order Management Station (OMS) in Kazakhstan or Uzbekistan, this field is required. |
| Serialized | By selecting this checkbox you ensure that a unique serial number is added to each pack while executing the order. Otherwise, you can execute packaging for non-serialized items. |
4. Click Save.
Back to the list of procedures
Releasing a Packaging Order to the Packaging Line
You want to release a packaging order to the packaging line through the Wipotec-OCS V2 channel associated with the packaging line.
Before You Begin
Ensure the following:
- You have enough serial numbers available in the pool.
- The packaging line is available.
Procedure
1. In the Serialized Manufacturing application, select Packaging --> Packaging orders tab. The application displays the list of packaging orders with their status in Movilitas.Cloud (Status column) and, if applicable, on the packaging line (Line status column).
2. Find the packaging order in the list you want to release to the packaging line.
Example:

3. Click the release icon (Release packaging order) and confirm the action.
The application collects the required data and sends the data to the packaging line through the Wipotec OCS V2 channel associated with that packaging line. The following data is sent to the line:
- Order details.
- Serial numbers, including the extra percentage.
- If there is an aggregated (child) product below the product of the packaging order, serial numbers are also assigned to the child level. The application calculates the amount of serial numbers at the child level based on the packaging order settings and the amount to be included within a parent item.
- SSCCs at each applicable aggregation level in the amount calculated by the application.
- If the market associated with the product requires crypto elements, the crypto code and crypto key for each serial number are sent to the line.
Movilitas.Cloud regularly polls the packaging line for status updates. If the order status on the packaging line is Finished, the trade items and containers are created in Movilitas.Cloud and the order status in Movilitas.Cloud goes to Done. Depending on the market settings behind the product, the items can be automatically commissioned through the channel associated with the market.
Back to the list of procedures
Resuming a Suspended Packaging Order
The packaging order is suspended if the order cannot be executed or completed for any reason. For example:
- The application runs out of serials or SSCCs during execution.
- The packaging line is not available through the Wipotec-OCS V2 channel.
- The packaging line (or its middleware) cancels the order over API due to an issue.
The user can resume the order after the issue has been resolved. For example:
- There are enough serials again to complete the order, either by manually requesting serials or by automatic replenishment.
- There are enough SSCCs again to complete the order by manually requesting SSCCs.
- The packaging line is available again.
Before You Begin
Ensure the following:
- You have enough serial numbers and SSCCs available in the pool.
- The packaging line is available.
Procedure
1. In the Serialized Manufacturing application, select Packaging --> Packaging orders tab. The application displays the list of packaging orders with their status in Movilitas.Cloud (Status column) and, if applicable, on the packaging line (Line status column).
2. Find the packaging order in the list you want to resume.
Example:

3. Click the play icon (Resume order) and confirm the action.
The effect of resuming a packaging order depends on what the order’s last status was before the order was suspended:
- If the previous status is Pending Release, the order status goes back to Open.
- If the previous status is In Progress, the order status goes back to In Progress.
- The application continues executing the order. The order is successfully executed and completed when the order status in Movilitas.Cloud goes to Done.
Back to the list of procedures
Deleting a Packaging Order
Procedure
1. In the Serialized Manufacturing application, select Packaging --> Packaging orders tab. The application displays the list of packaging orders with their status in Movilitas.Cloud (Status column) and, if applicable, on the packaging line (Line status column).
2. Find the packaging order in the list you want to delete.
Example:

3. Click the delete icon and confirm the deletion by clicking Yes.
Back to the list of procedures