
In the Genealogy application, you - as the manufacturer - can register manufacturing processes:
- You can add clinical study-product mappings to a process. In this context, the process is a clinical supply chain.
- You can add process steps to your process to build up a process sequence (workflow).
To add a clinical study-product mapping, the Serialized Manufacturing and Clinical Studies applications must be activated and configured.
To create a process sequence, the process steps must be registered in the Genealogy application in advance. You can use the same process step in multiple processes.
List of Procedures
- Creating a Process
- Managing Clinical Study-Product Mappings
- Searching for and Viewing a Process
- Updating the Master Data of a Process
- Managing the Process Sequence
- Deleting a Process
Creating a Process
As a manufacturer, you need to register all the manufacturing processes.
Before You Begin
Make sure that the process steps are registered in the Genealogy application under the Site management --> Process Steps tab.
Procedure
1. In the Genealogy application, select the Site management --> Processes tab. The application displays the list of processes and the Create process panel. The Master data tab is automatically selected on the panel.
Note: When viewing the details of a process, you can open the Create process panel by clicking Create.
Example:
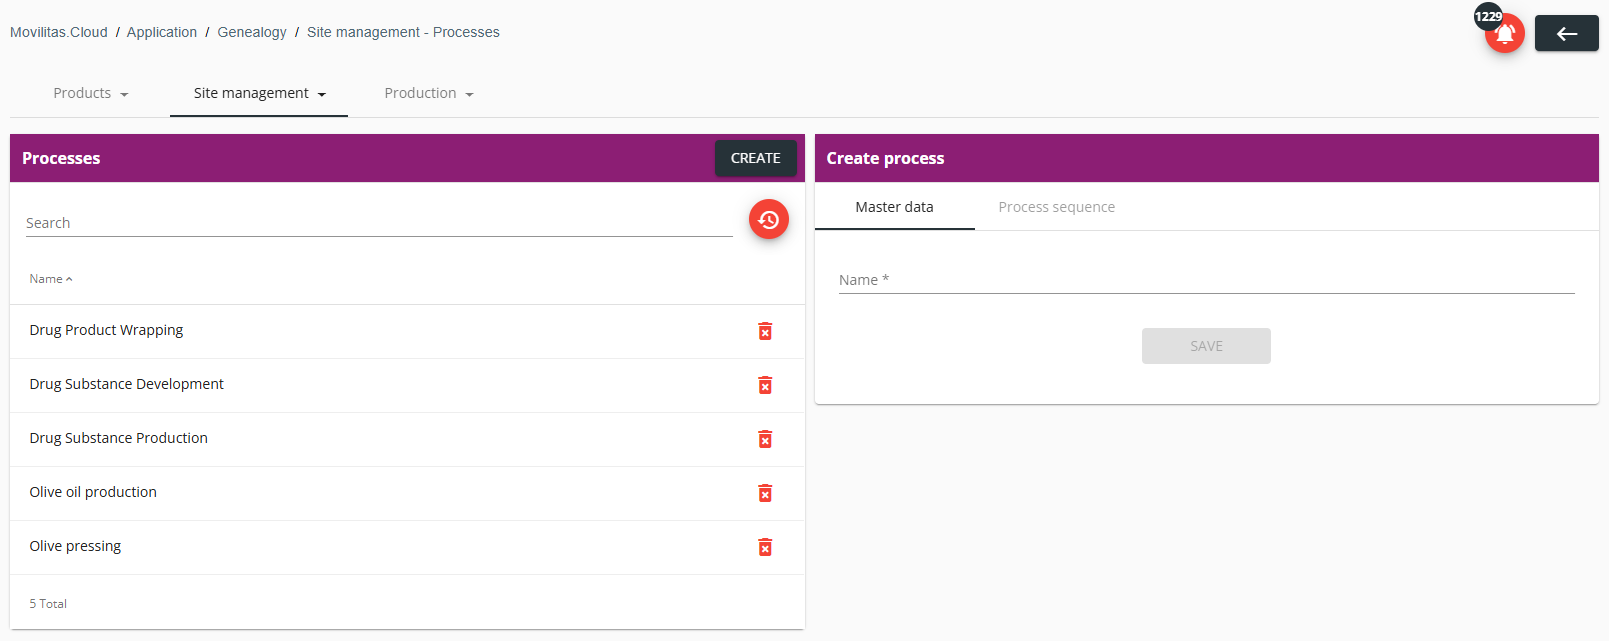
2. Fill in the form as described below. The required fields are marked with an asterisk (*) in the form.
| Field | Description |
|---|---|
| Name | Enter the name of the process. |
3. Click Save. The process is created and added to the list.
Next Steps
Add clinical study-product mappings to the process. For more information, see Managing Clinical Study-Product Mappings.
Manage the process sequence. For more information, see Managing the Process Sequence.
Back to the list of procedures
Managing Clinical Study-Product Mappings
As a manufacturer, you can add clinical study-product mappings to a process and remove clinical study-product mappings from a process. The clinical study comes from the Clinical Studies application. The product comes from the Serialized Manufacturing application. The process is a clinical supply chain.
Before You Begin
Make sure that the Serialized Manufacturing and Clinical Studies applications are activated and configured.
Procedure
1. In the Genealogy application, select the Site management --> Processes tab. The application displays the list of processes.
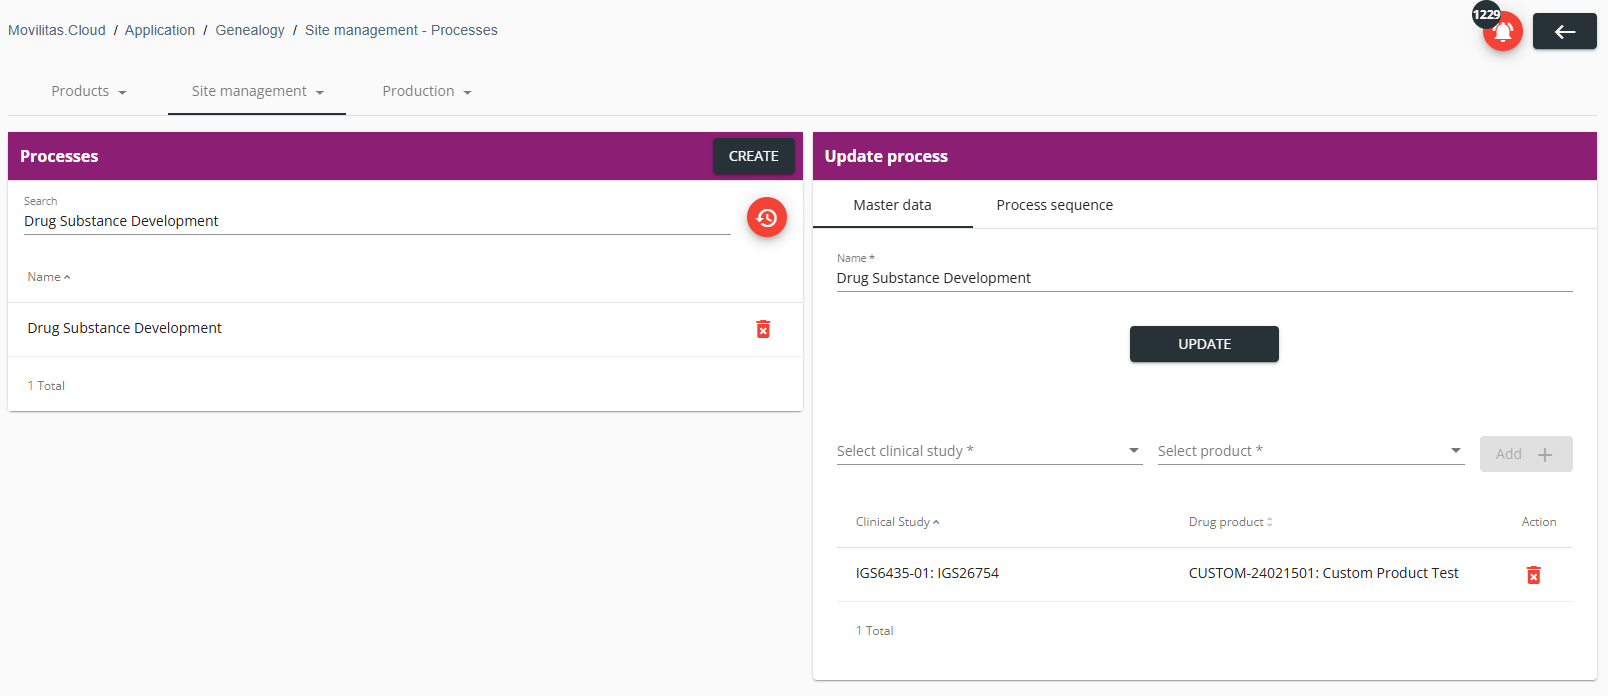
2. Find and select the process in the list. The application displays the master data of the process and a mapping section on the Update process panel.
The following example illustrates a process with one clinical study-product mapping:
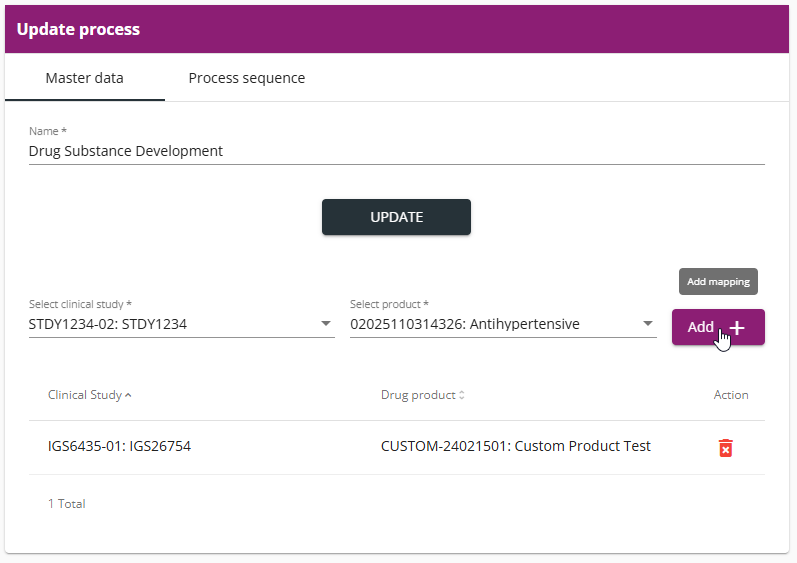
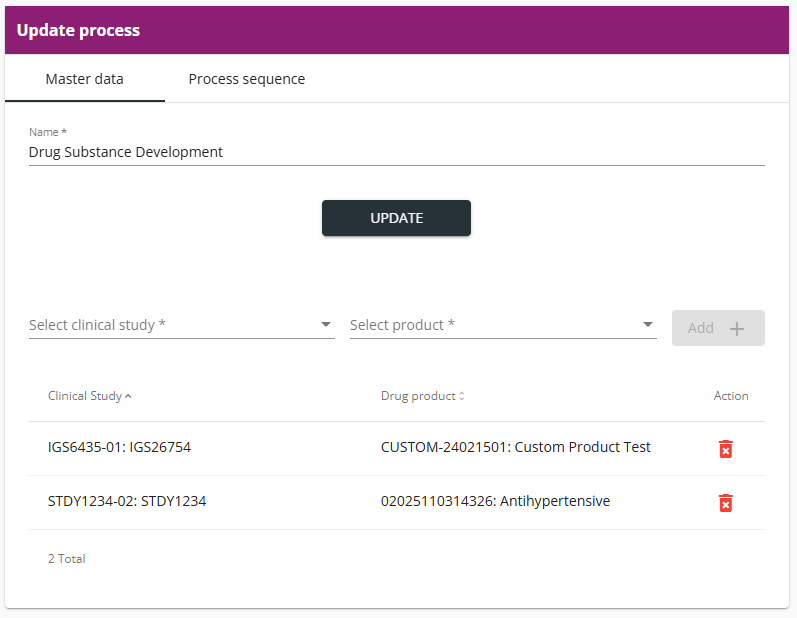
3. To add a clinical study-product mapping to the process, do as follows:
- Select a clinical study in the Select clinical study drop-down.
- Find and select a product in the Select product drop-down.
- Click Add +.
Example:
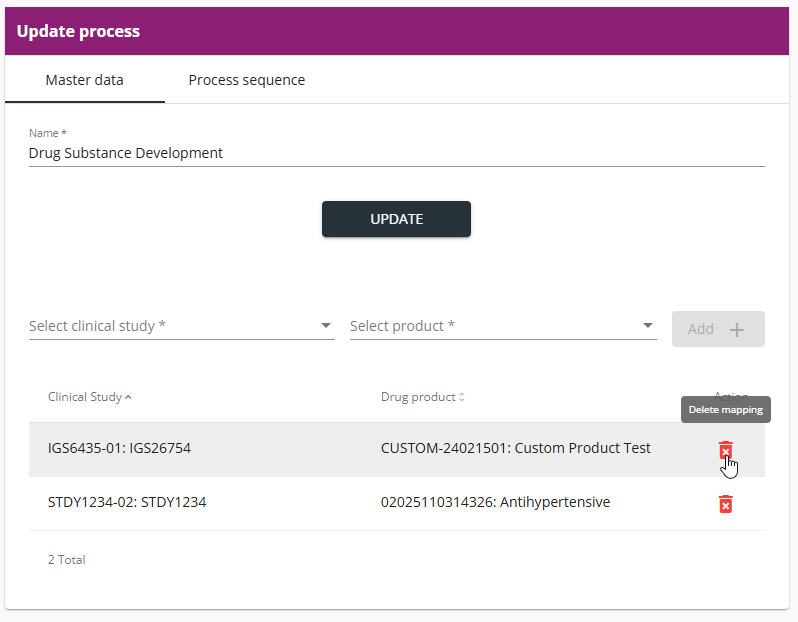
4. To remove a clinical study-product mapping from the process, do as follows:
- Find the mapping in the list.
- Click the delete icon and confirm the deletion by clicking Yes.
Example:
Back to the list of procedures
Searching for and Viewing a Process
Procedure
1. In the Genealogy application, select the Site management --> Processes tab. The application displays the list of processes.
2. Enter the name of the process in the search field.
- The list of processes is filtered based on the search criteria.
- You can reset the filter by clicking Reset filters.
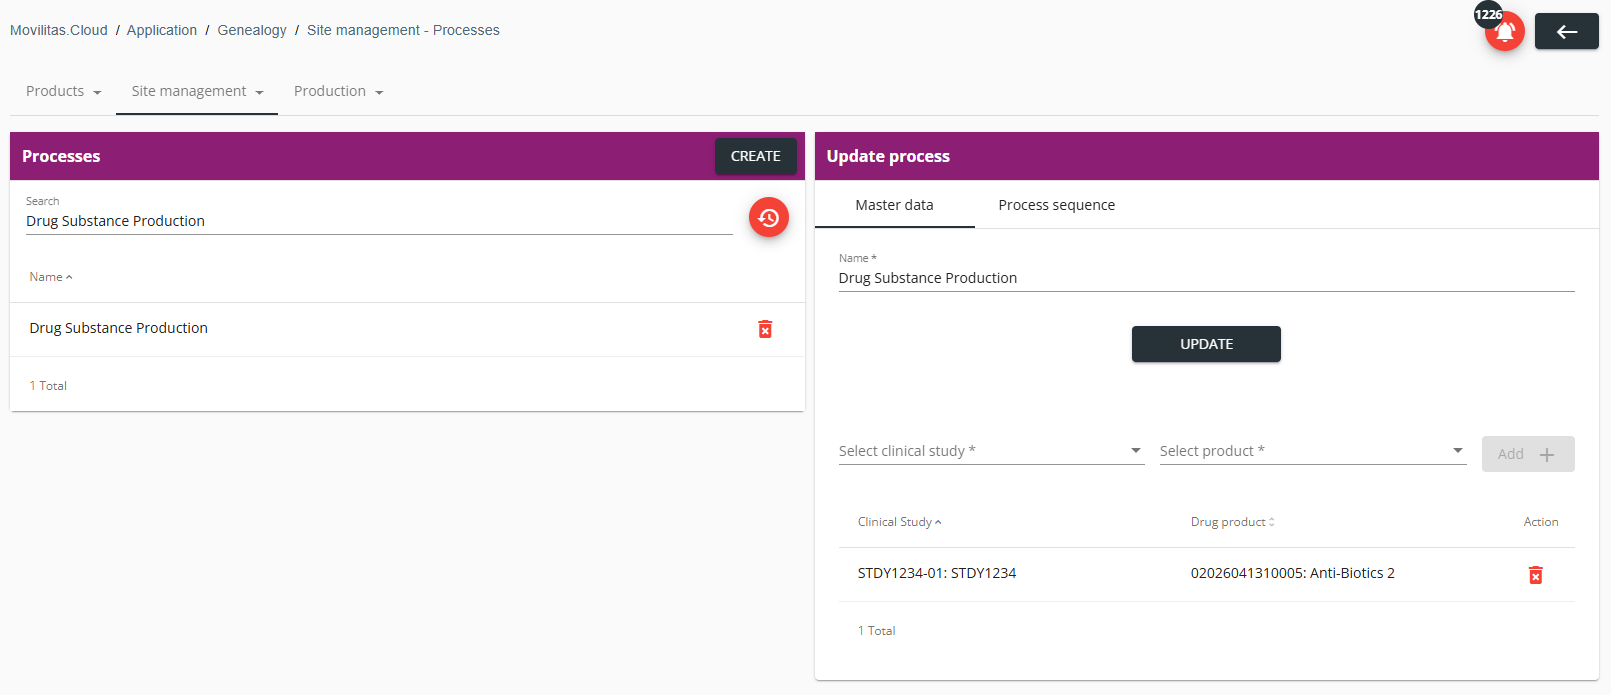
3. Select the process to view its details on the Update process panel.
- Master data.
- Clinical study-product mappings (if any) - For more information, see Managing Clinical Study-Product Mappings.
- Process sequence - For more information, see Managing the Process Sequence.
Example:
Back to the list of procedures
Updating the Master Data of a Process
Procedure
1. In the Genealogy application, select the Site management --> Processes tab. The application displays the list of processes.
2. Find and select the process in the list you want to update. The application displays the master data of the process on the Update process panel.
3. Stay on the Master data tab and modify the master data.
| Field | Description |
|---|---|
| Name | Enter the name of the process. |
4. Click Update.
Back to the list of procedures
Managing the Process Sequence
You can manage the sequence of a selected process:
- You can add a process step to the selected process.
- You can edit a process step of the selected process.
- You can view the production orders of a manufacturing process step.
- You can view the packaging orders of a packaging process step.
- You can delete a process step from the selected process.
Procedure
1. In the Genealogy application, select the Site management --> Processes tab. The application displays the list of processes.
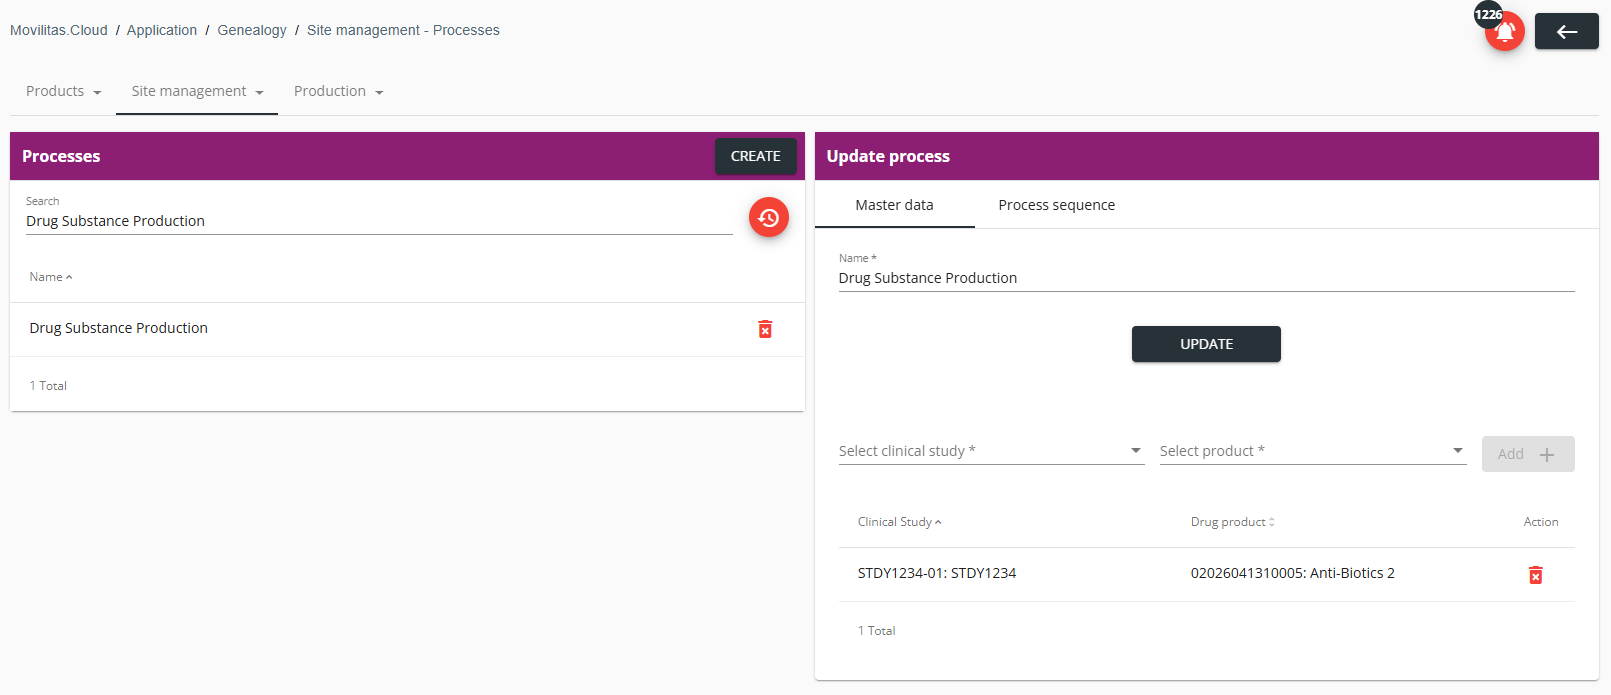
2. Find and select the process in the list. The application displays the master data of the process on the Update process panel.
Example:
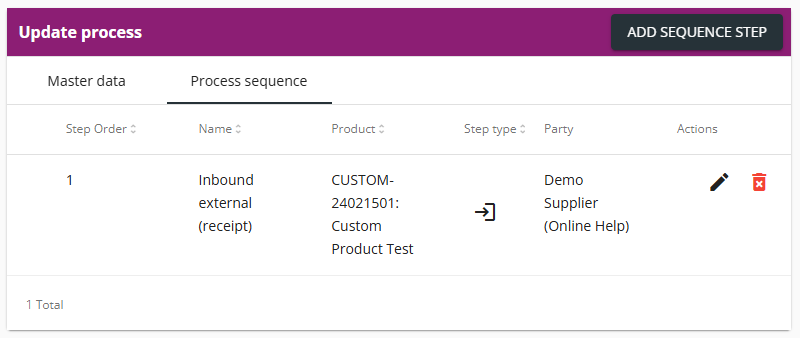
3. Select the Process sequence tab on the Update process panel. The application displays the sequence of process steps for the selected process.
The following example illustrates a process sequence that contains only one step, with step type "Inbound logistics" (entry icon):
4. (Optional) Add a new process step to the sequence as follows:
- Click Add Sequence Step in the top-right corner of the Update process panel. The application displays the Add sequence step pop-up.
- Select the process step in the Select process step drop-down.
- Enter the name or the description of the process step in the search field to find the process step.
- The application offers the process steps that are registered in the Genealogy application.
- Depending on the step type, the form dynamically changes in terms of the fields.
- Enter the step order in the sequence in the Step Order field.
- Follow one of the following routes, depending on the role of the involved party and step type:
Inbound Logistics
| # | Inbound External Logistics (Entry icon) | Inbound Internal Logistics (Entry icon) |
|---|---|---|
| 4d.1 | Select the supplier in the Supplier drop-down and the product in the Received product drop-down. The application offers the suppliers associated with the process step. | Search for and select the source warehouse in the Source warehouse drop-down and the destination warehouse in the Destination warehouse drop-down. The application offers the source and destination warehouses associated with the process step. |
| 4d.2 | Select the product in the Received product drop-down. The application offers the products that are registered in the Serialized Manufacturing and/or Serialized Logistics applications. Example: 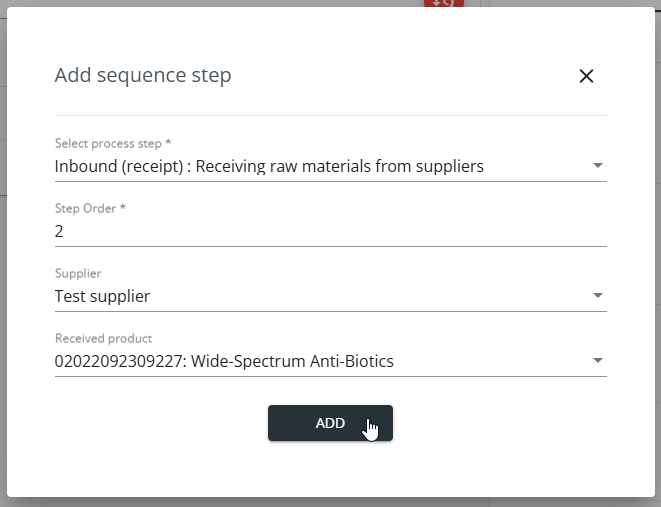 | Select the product in the Received product drop-down. The application offers the products that are registered in the Serialized Manufacturing and/or Serialized Logistics applications. Example: 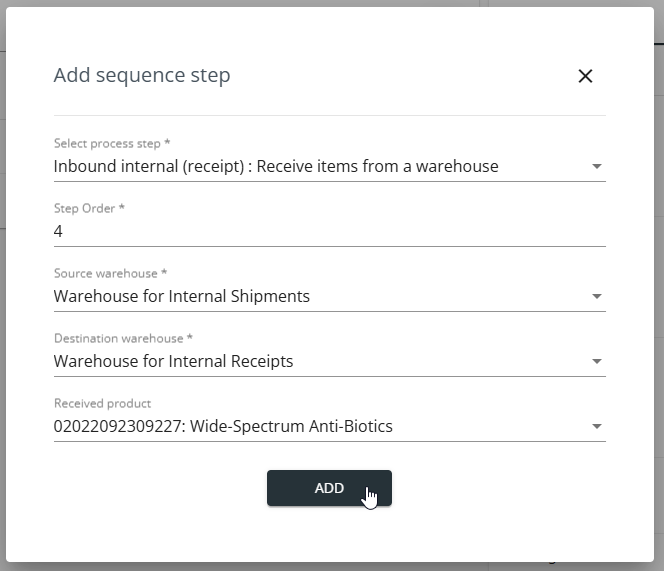 |
| 4d.3 | Click Add. | Click Add. |
Manufacturing and Packaging
| # | Manufacturing (Factory icon) | Packaging (Box icon) |
|---|---|---|
4d.1 | If a CMO performs the manufacturing, select the CMO associated with the process step in the CMO drop-down, then find and select the product in the Produced product drop-down. If your tenant performs the manufacturing, leave the CMO drop-down empty (if the field is visible), then find and select the product in the Produced product drop-down. The application offers the products that are registered as produced products for the process step and the products that have a BoM defined in the Serialized Manufacturing application. The following example illustrates the case when a CMO performs the manufacturing step: 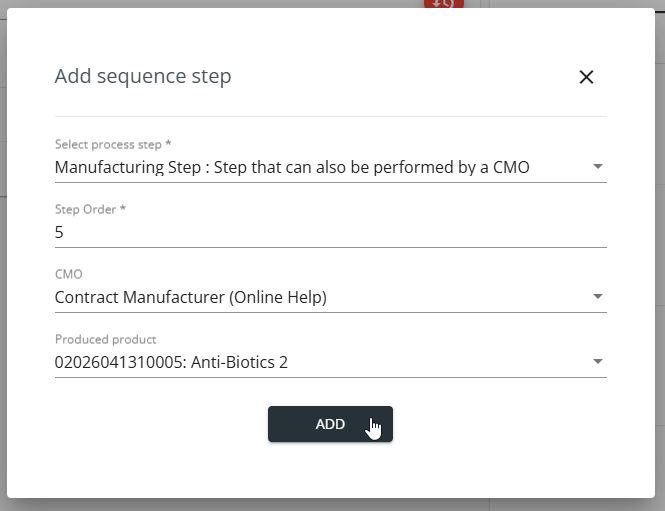 | If a CMO performs the packaging, select the CMO associated with the process step in the CMO drop-down, then find and select the product in the Produced product drop-down. If your tenant performs the packaging, leave the CMO drop-down empty (if the field is visible), then find and select the product in the Produced product drop-down. The application offers the products that are registered as produced products for the process step and the products that have a BoM defined in the Serialized Manufacturing application. The following example illustrates the case when a CMO performs the packaging step: 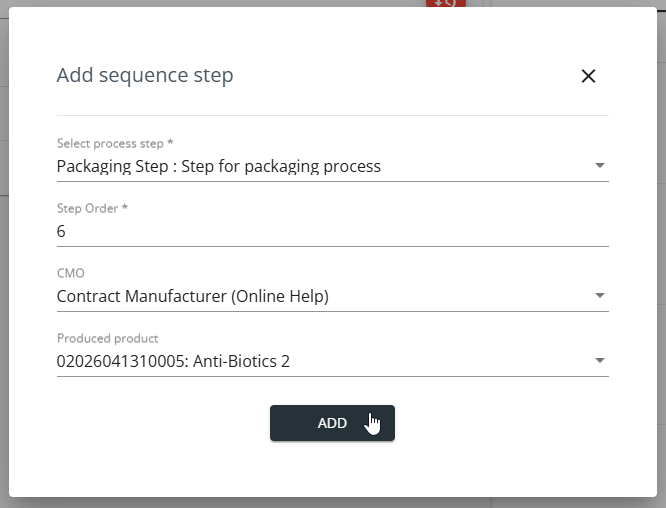 |
| 4d.2 | Click Add. | Click Add. |
Outbound Logistics
| # | Outbound External Logistics (Exit icon) | Outbound Internal Logistics (Exit icon) |
|---|---|---|
4d.1 | Select the client in the Client drop-down. The application offers the clients associated with the process step. | Search for and select the source warehouse in the Source warehouse drop-down and the destination warehouse in the Destination warehouse drop-down. The application offers the source and destination warehouses associated with the process step. |
| 4d.2 | Select the product in the Shipped product drop-down. The application offers the products that are registered in the Serialized Manufacturing and/or Serialized Logistics applications. Example: 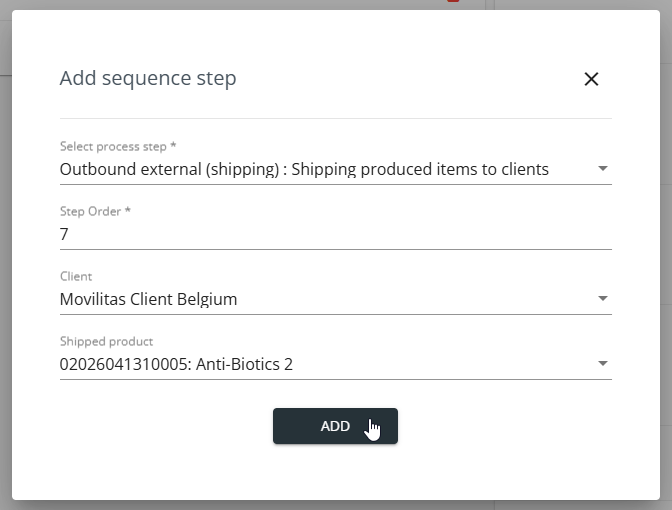 | Select the product in the Shipped product drop-down. The application offers the products that are registered in the Serialized Manufacturing and/or Serialized Logistics applications. Example: 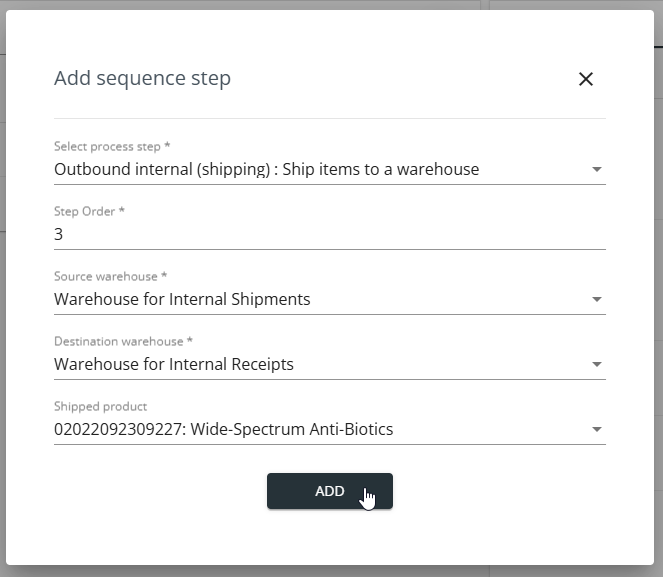 |
| 4d.3 | Click Add. | Click Add. |
5. (Optional) To edit a process step, click the edit icon.
To find the process step, check the displayed information. The step type helps you identify the steps. For each step type, a separate icon with hovering text is used:
- Entry icon - Inbound External Logistics.
- Entry icon - Inbound Internal Logistics.
- Factory icon - Manufacturing.
- Box icon - Packaging.
- Exit icon - Outbound External Logistics.
- Exit icon - Outbound Internal Logistics.
Example:
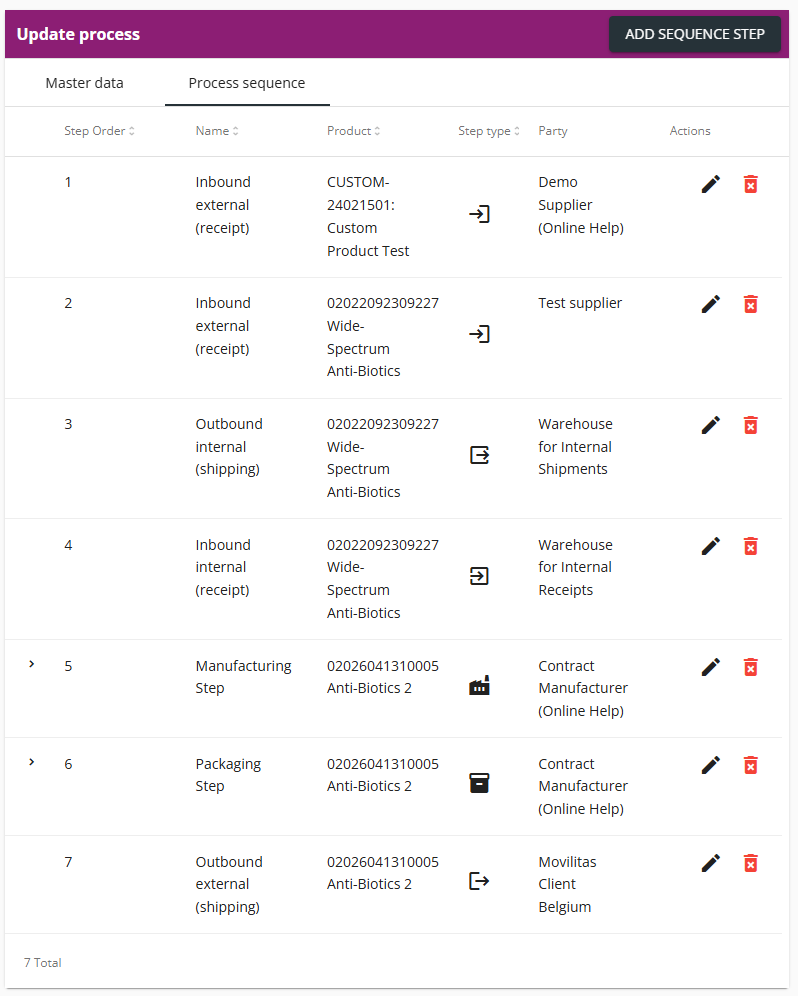
The application displays the Update sequence step pop-up. Depending on the role of the involved party and step type, you can modify different fields, as follows:
Inbound Logistics
| # | Inbound External Logistics (Entry icon) | Inbound Internal Logistics (Entry icon) |
|---|---|---|
| 5.1 | (Optional) Select another process step in the Select process step drop-down. | (Optional) Select another process step in the Select process step drop-down. |
| 5.2 | (Optional) Specify another step order in the sequence in the Step Order field. | (Optional) Specify another step order in the sequence in the Step Order field. |
| 5.3 | (Optional) Select another supplier in the Supplier drop-down. | (Optional) Select another source warehouse in the Source warehouse drop-down and/or another destination warehouse in the Destination warehouse drop-down. |
| 5.4 | (Optional) Select another product in the Received product drop-down. | (Optional) Select another product in the Received product drop-down. |
| 5.5 | Click Save. In the following example, the supplier is changed: 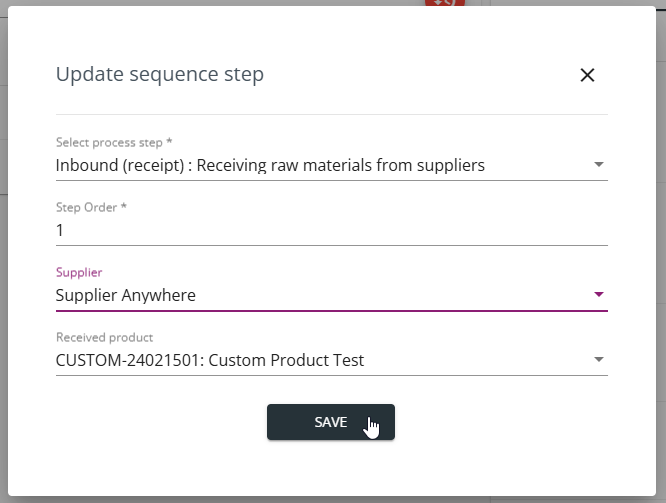 | Click Save. In the following example, the destination warehouse is changed: 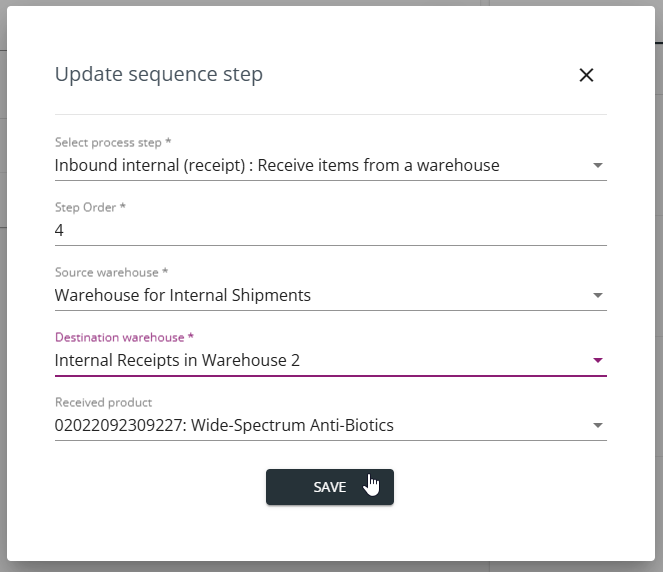 |
Manufacturing and Packaging
| # | Manufacturing (Factory icon) | Packaging (Box icon) |
|---|---|---|
| 5.1 | (Optional) Select another process step in the Select process step drop-down. | (Optional) Select another process step in the Select process step drop-down. |
| 5.2 | (Optional) Specify another step order in the sequence in the Step Order field. | (Optional) Specify another step order in the sequence in the Step Order field. |
| 5.3 | Update the fields specific to the step:
| Update the fields specific to the step:
|
| 5.4 | Click Save. In the following example, the CMO is changed: 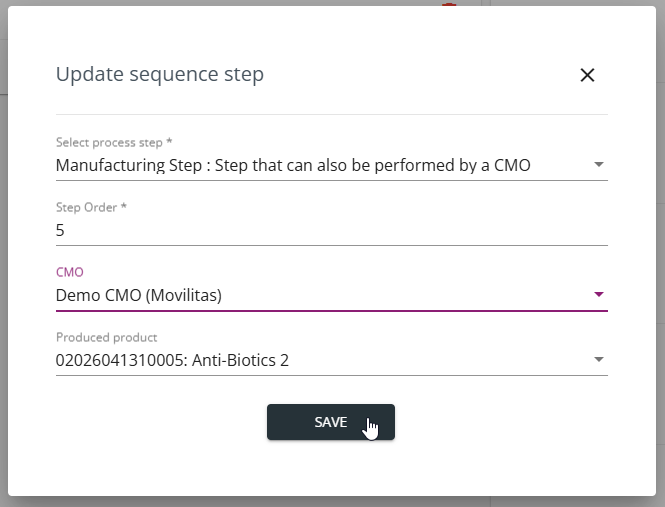 | Click Save. In the following example, the CMO is changed: 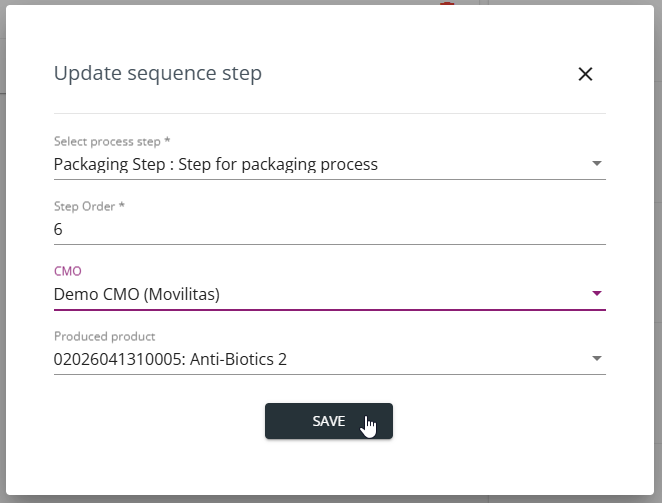 |
Outbound Logistics
| # | Outbound External Logistics (Exit icon) | Outbound Internal Logistics (Exit icon) |
|---|---|---|
| 5.1 | (Optional) Select another process step in the Select process step drop-down. | (Optional) Select another process step in the Select process step drop-down. |
| 5.2 | (Optional) Specify another step order in the sequence in the Step Order field. | (Optional) Specify another step order in the sequence in the Step Order field. |
| 5.3 | (Optional) Select another client in the Client drop-down. | (Optional) Select another source warehouse in the Source warehouse drop-down and/or another destination warehouse in the Destination warehouse drop-down. |
| 5.4 | (Optional) Select another product in the Shipped product drop-down. | (Optional) Select another product in the Shipped product drop-down. |
| 5.5 | Click Save. In the following example, the client is changed: 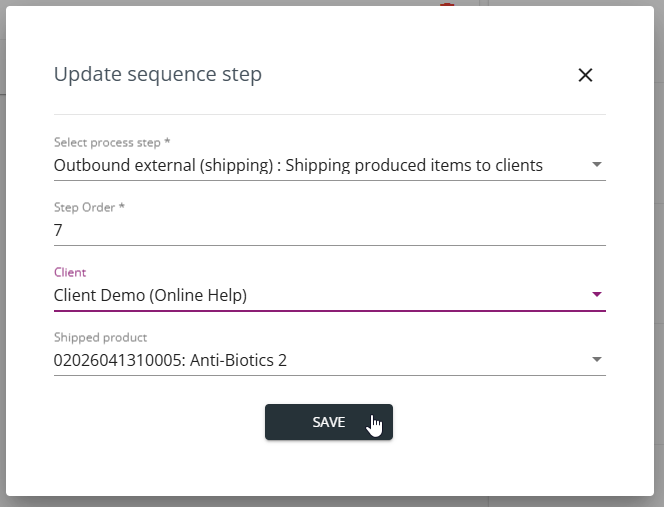 | Click Save. In the following example, the destination warehouse is changed: 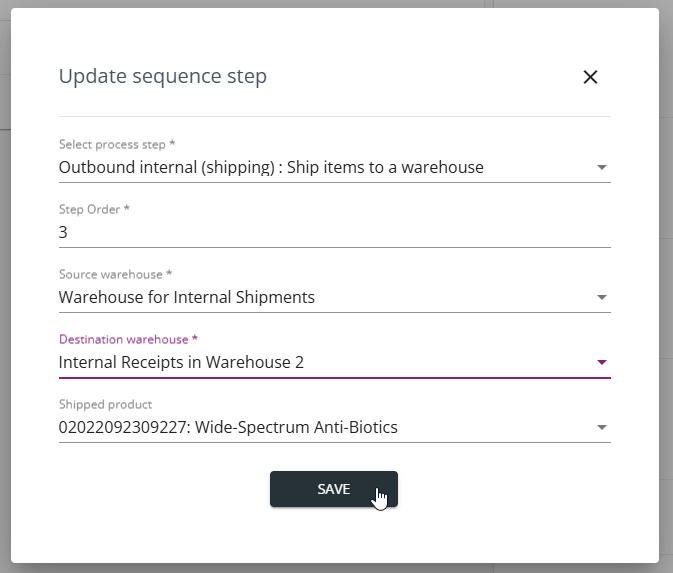 |
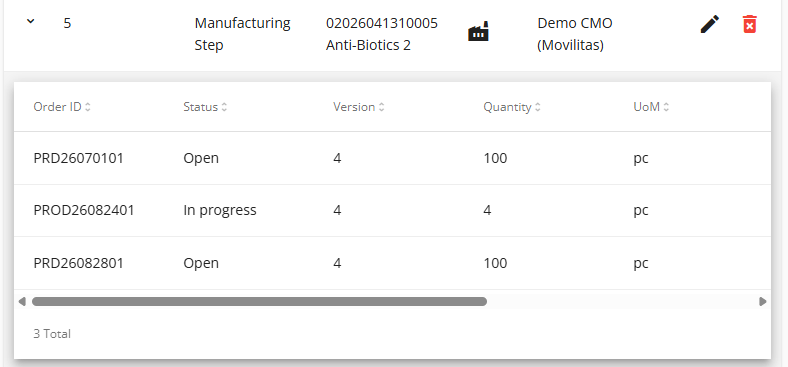
6. (Optional) To view the production orders of a manufacturing step that are registered in the Serialized Manufacturing application, expand the step.
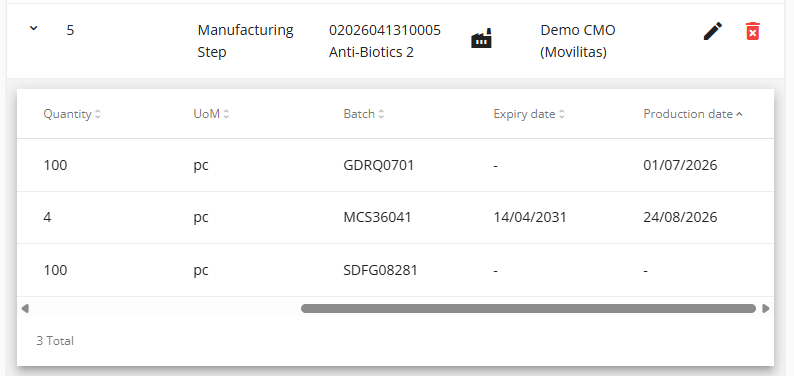
The application displays the production orders of the produced product with the details of each order:
- Order ID
- Production order status
- Product version
- Quantity
- Unit of Measurement (UoM)
- Batch
- Expiration date
- Production date:
- Planned production date for orders in Open status.
- Actual start production date for orders in In progress status.
All data comes from the Serialized Manufacturing application.
Example:
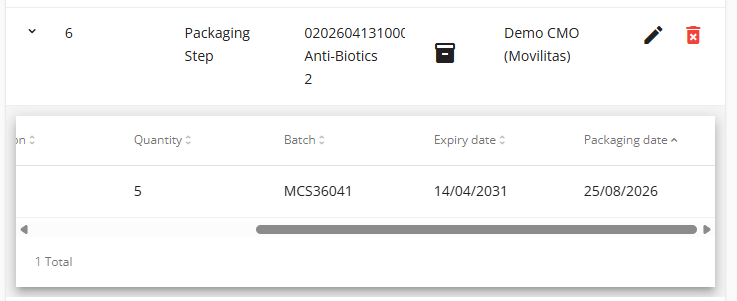
7. (Optional) To view the packaging orders of a packaging step that are registered in the Serialized Manufacturing application, expand the step.
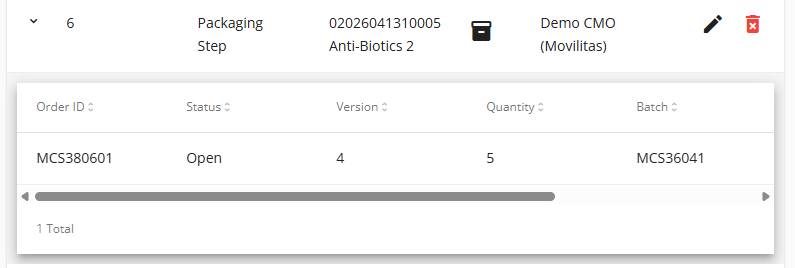
The application displays the packaging orders of the produced product with the details of each order:
- Order ID
- Packaging order status
- Product version
- Quantity
- Batch
- Expiration date
- Packaging date
- Planned packaging date for orders in Open status.
- Actual start packaging date for orders in In progress status.
All data comes from the Serialized Manufacturing application.
Example:
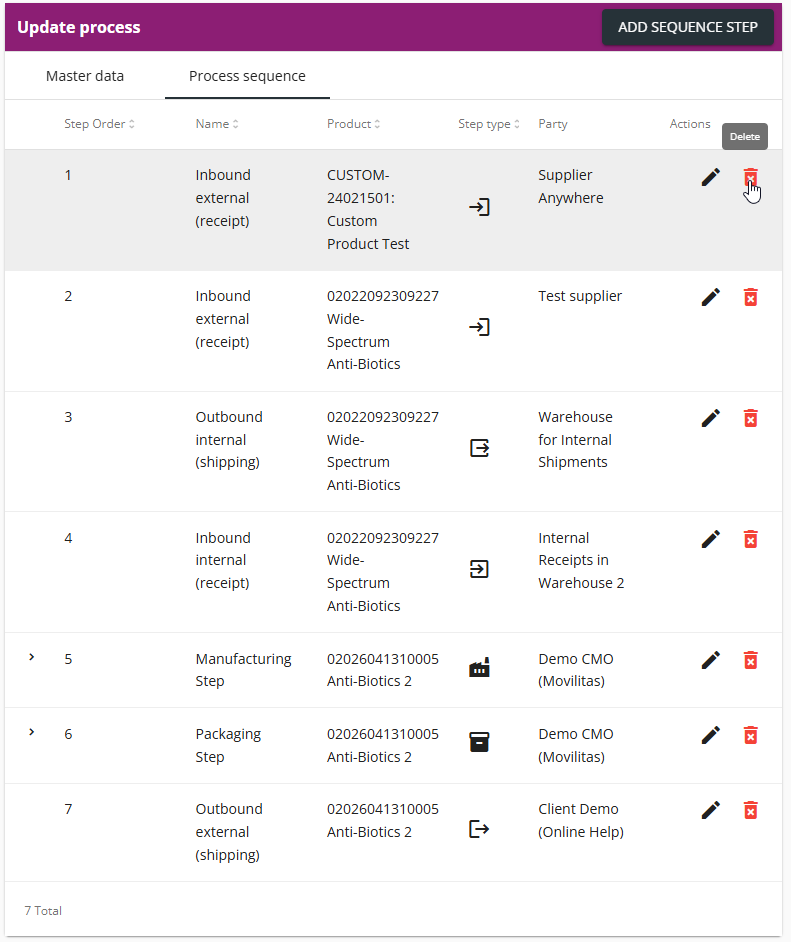
8. (Optional) To delete a process step from the sequence, click the delete icon and confirm the deletion by clicking Yes in the pop-up.
Example:
Back to the list of procedures
Deleting a Process
Procedure
1. In the Genealogy application, select Site management --> Processes tab. The application displays the list of processes.
2. Find the process in the list you want to delete.
Example:
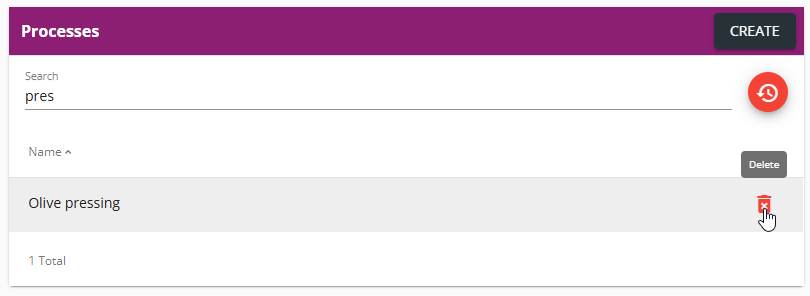
3. Click the delete icon and confirm the deletion by clicking Yes.
Back to the list of procedures
