
After selecting the Production --> Production orders tab in the Serialized Manufacturing application, you can manage production orders. You can perform the following:
| Area | Description |
|---|---|
| List of production orders | You can search for a production order. You can delete a production order. |
| Master data | You can specify the master data of the production order. |
| Ingredients | You can assign batches to each ingredient of the product that will be produced. You can unassign batches from each ingredient of the product that will be produced. |
| Starting a production order | Once the production order is ready for execution, you can start the order. |
| Finishing a production order | If the production is completed for an order, you can finish the production order. |
List of Procedures
- Creating a Production Order
- Searching for a Production Order and Viewing Its Master Data and Ingredients
- Updating a Production Order
- Starting a Production Order
- Finishing a Production Order
- Deleting a Production Order
Creating a Production Order
Procedure
1. In the Serialized Manufacturing application, select Production --> Production orders tab. The application displays the list of production orders and the Create production order form.
Note: When viewing the details of a production order, you can open the Create production order form by clicking Create.
Example:
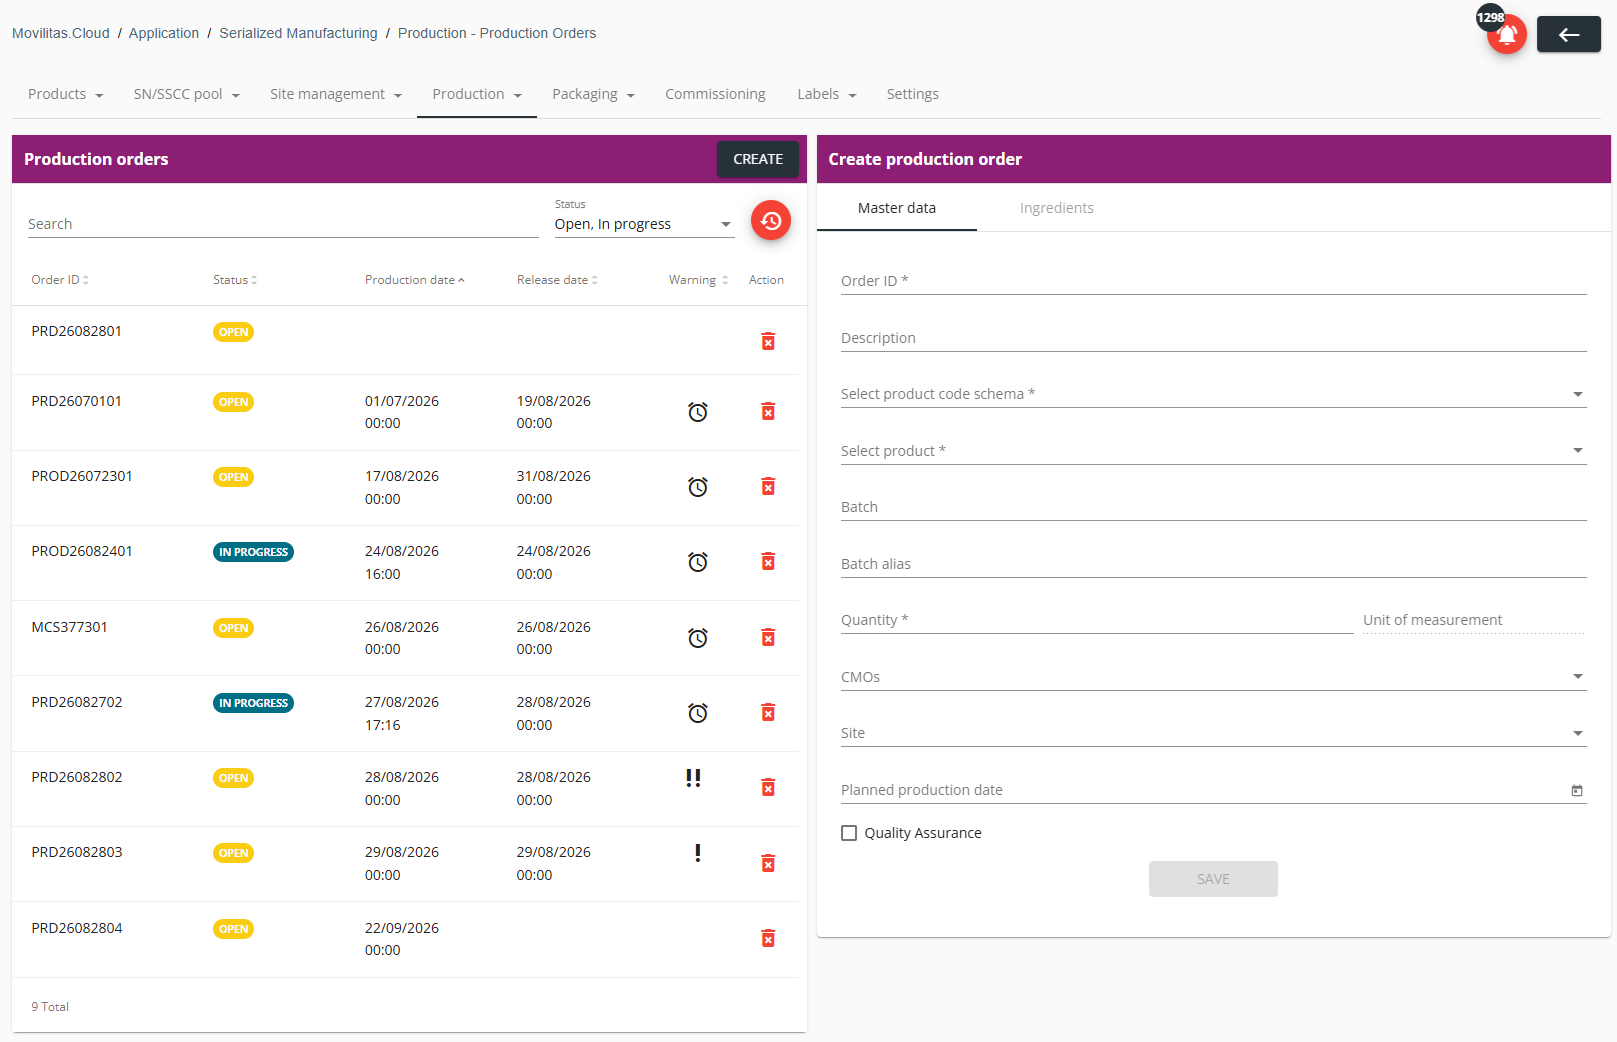
2. Fill in the form as described below. The required fields are marked with an asterisk (*) in the form.
| Field | Action |
|---|---|
| Order ID | Enter the unique order ID. |
| Description | Enter the order description. |
| Select product code schema | Select the product code schema. The application supports the following schemas:
|
| Select product | Select a product code. The application displays a searchable drop-down. You can search for any product registered in the application as per the selected product code schema by entering the product code or product name in the search field. |
| Batch | Enter the batch. |
| Batch alias | Enter the batch alias. The alias can be an internal identifier of the batch used by your company. |
| Quantity | Enter the amount you want to produce for the product in this order. |
| Unit of measurement | If the bill of material (BoM) is specified for the product under the Products --> Products --> BoM tab, the application automatically populates the field, and no user action is required. If the field is not automatically populated, specify the BoM for the product under the Products --> Products --> BoM tab, and then update the production order by reselecting the product code. |
| CMOs | If a CMO executes the production order, find and select the CMO. The application offers the CMOs registered under the Site management --> CMOs tab. If a CMO is selected, it is not possible to select a site, and the selected site (if any) is cleared. |
| Site | If a manufacturing site of your company (tenant) executes the production order, find and select the site. The application offers the sites registered under the Site management --> Sites tab. If a site is selected, it is not possible to select a CMO, and the selected CMO (if any) is cleared. |
| Planned production date | Specify the planned production date by using the datepicker. |
| Confirm production date | If the planned production date is confirmed, select the checkbox. Once the checkbox is selected, the planned production date cannot be changed to indicate that the date is confirmed. To make the planned production date changeable, clear the checkbox. |
| Quality Assurance | Select the checkbox to specify the planned release date. |
| Planned release date | If the Quality Assurance checkbox is selected, specify the planned release date by using the datepicker. The planned release date cannot be earlier than the planned production date. |
3. Click Save.
Next Steps
Assign inventory items (batches) to the ingredients of the production order and specify the amount per inventory item (batch). For more information, see Updating a Production Order.
Back to the list of procedures
Searching for a Production Order and Viewing Its Master Data and Ingredients
Procedure
1. In the Serialized Manufacturing application, select Production --> Production orders tab. The application displays the list of production orders with their status.
- By default, production orders in Done status are not listed.
- Production orders without a production date are listed first, then the production orders with the earliest production date.
- The production date reflects the planned production date for orders in Open status.
- The production date reflects the actual production date for orders in In progress status.
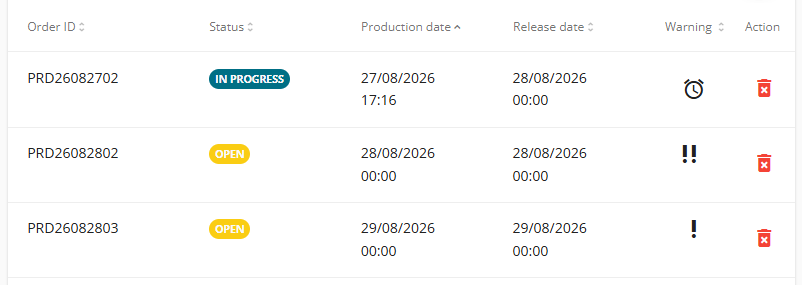
The application highlights the production orders where the production date is due or overdue. These production orders need special attention:
- One exclamation mark in the Warning column means the production date is the next day.
- Two exclamation marks in the Warning column mean the production date is the current day.
- An alarm clock icon in the Warning column means the production date is overdue.
Example:
2. Enter the production order ID in the search field and/or select the order status under Status.
- The list of the production orders is filtered based on the search criteria.
- You can reset the filter by clicking the Reset filters icon.
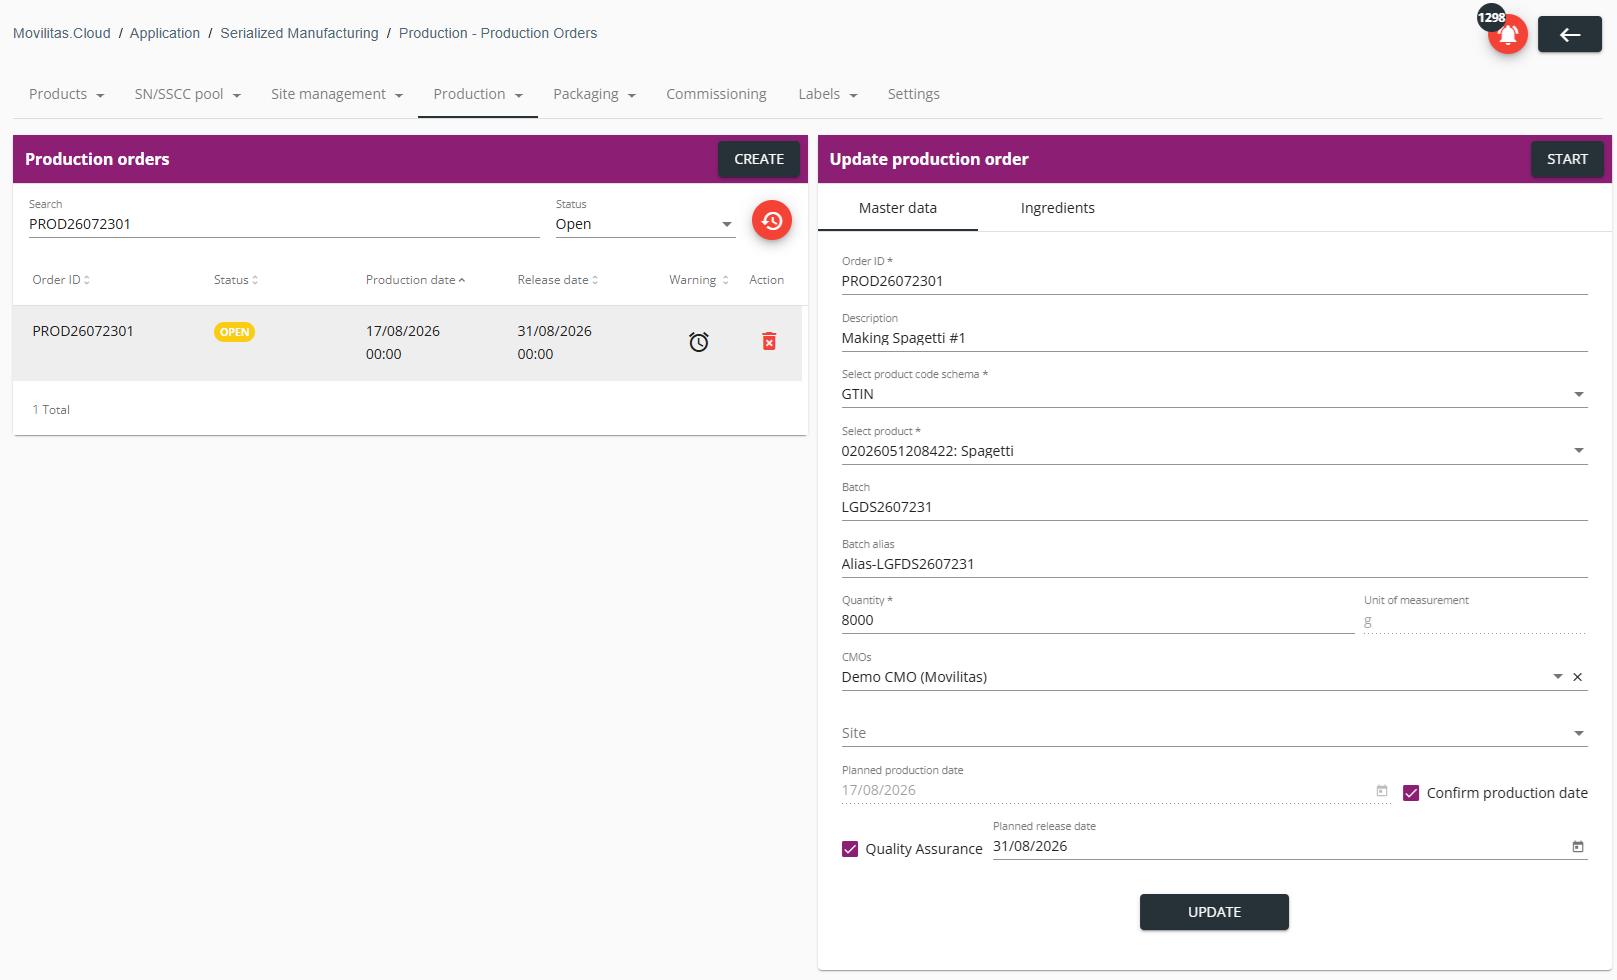
3. Select the production order to view its master data.
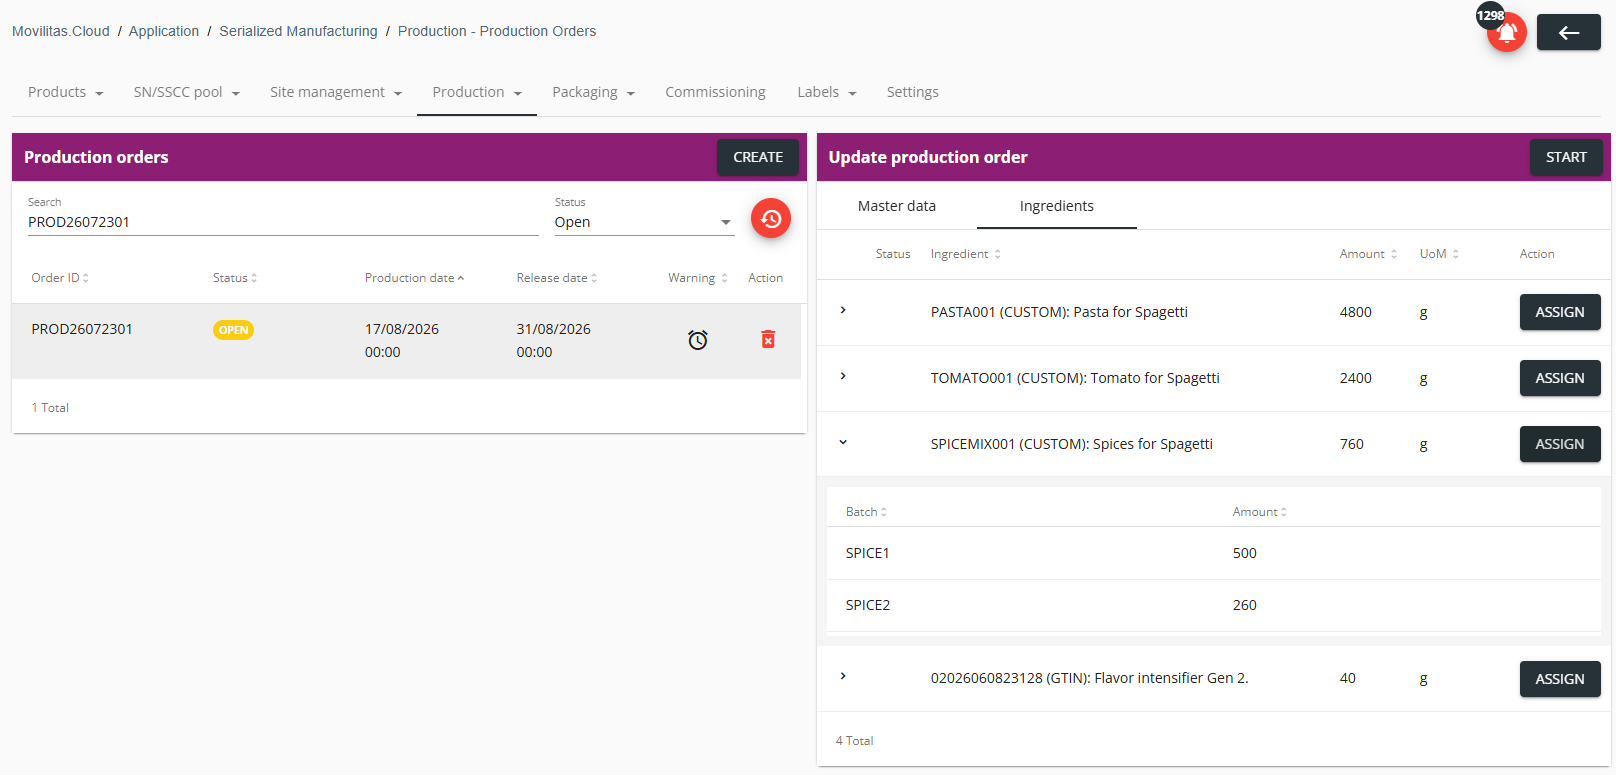
In the example below, the orders are filtered by Open status. We are searching for "PROD26072301". The production date is overdue because there is an alarm clock icon in the Warning column:
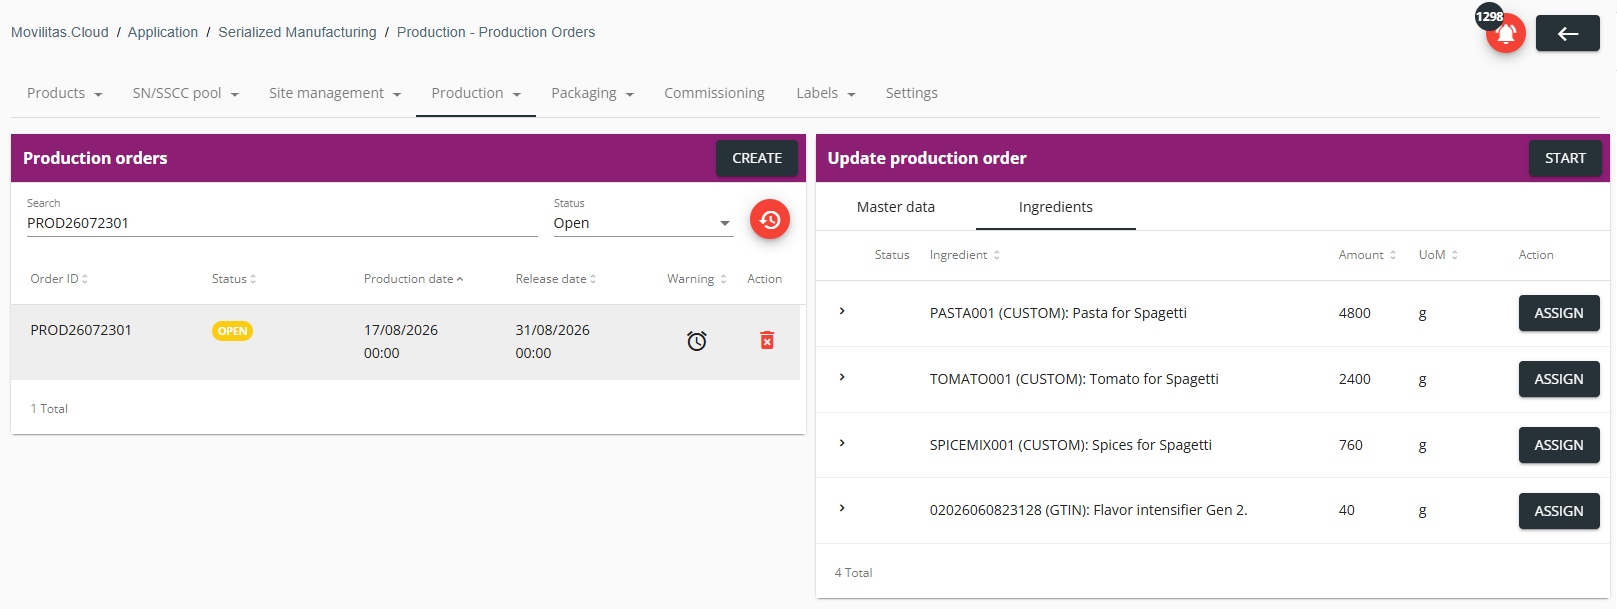
4. Select the Ingredients tab to view the ingredients and the assigned batches per ingredient.
Expand an ingredient to view the assigned batches.
Example:
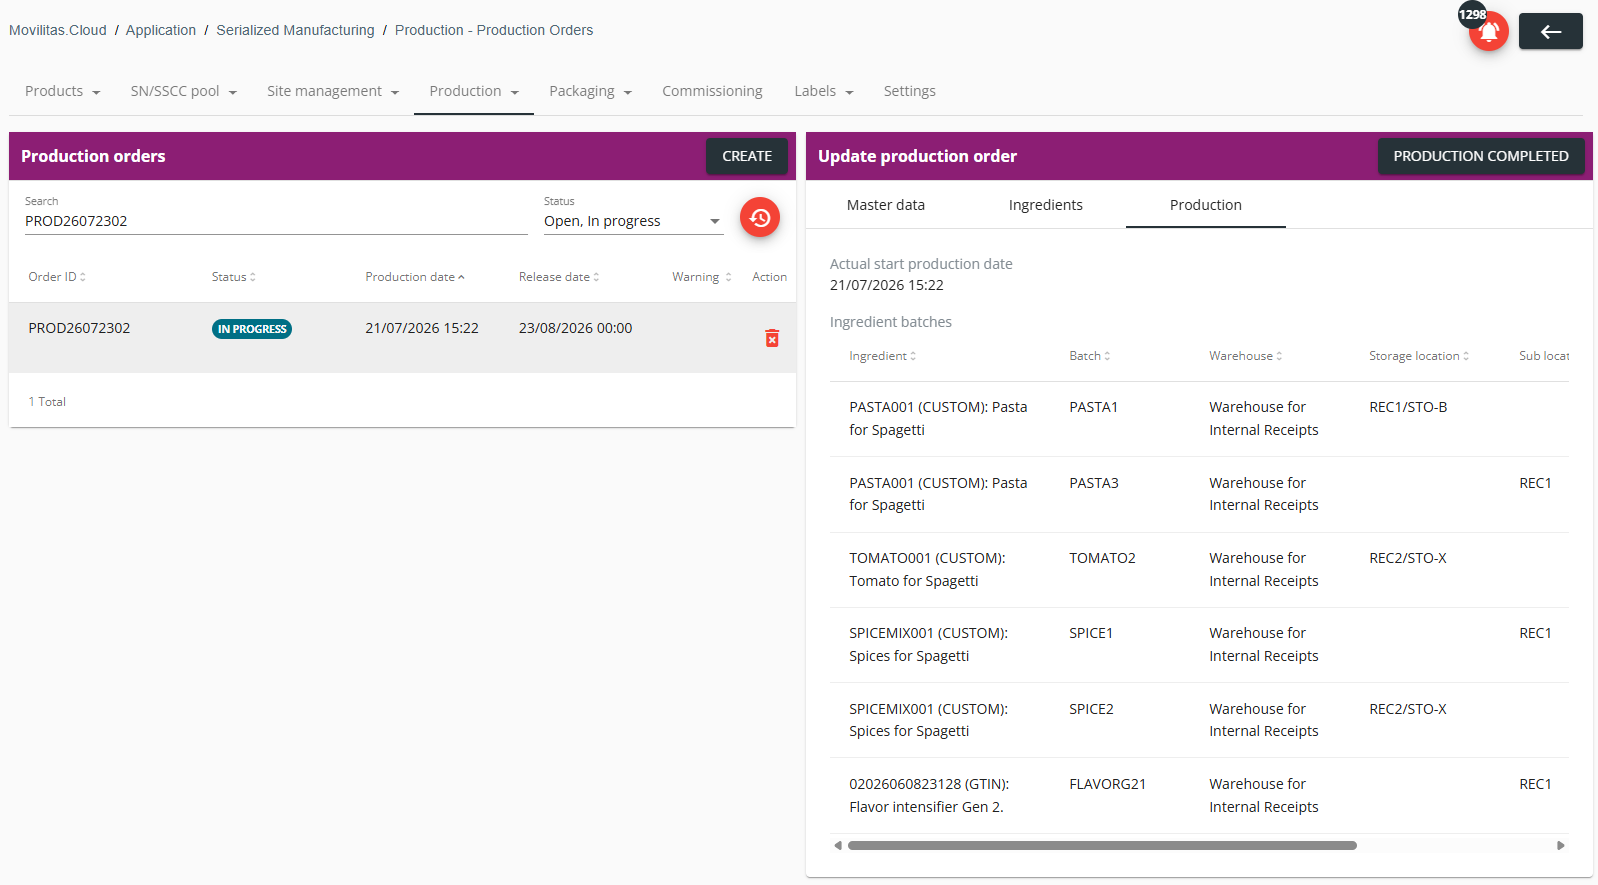
5. For an order in In progress or Done status, select the Production tab to view the production details.
In the example below, the Production tab is displayed for order "PRD26072302" in In Progress status:
Back to the list of procedures
Updating a Production Order
You can update a production order until it is finished. The following table summarizes what parameters you can update on the order depending on the status:
| Status | Editable Parameters of the Production Order |
|---|---|
| Open | All |
| In progress | Only batch and batch alias. |
| Done | Nothing |
Procedure
1. In the Serialized Manufacturing application, select Production → Production orders tab. The application displays the list of production orders with their status.
2. Find and select the production order you want to modify.
3. On the Update production order panel under the Master data tab, modify the fields as needed.
| Field | Action |
|---|---|
| Order ID | Enter the unique order ID. |
| Description | Enter the order description. |
| Select product code schema | Select the product code schema. The application supports the following schemas:
|
| Select product | Select a product code. The application displays a searchable drop-down. You can search for any product registered in the application as per the selected product code schema by entering the product code or product name in the search field. |
| Batch | Enter the batch. |
| Batch alias | Enter the batch alias. The alias can be an internal identifier of the batch used by your company. |
| Quantity | Enter the amount you want to produce for the product in this order. |
| Unit of measurement | If the bill of material (BoM) is specified for the product under the Products --> Products --> BoM tab, the application automatically populates the field, and no user action is required. If the field is not automatically populated, specify the BoM for the product under the Products --> Products --> BoM tab, and then update the production order by reselecting the product code. |
| CMOs | If a CMO executes the production order, find and select the CMO. The application offers the CMOs registered under the Site management --> CMOs tab. If a CMO is selected, it is not possible to select a site, and the selected site (if any) is cleared. |
| Site | If a manufacturing site of your company (tenant) executes the production order, find and select the site. The application offers the sites registered under the Site management --> Sites tab. If a site is selected, it is not possible to select a CMO, and the selected CMO (if any) is cleared. |
| Planned production date | Specify the planned production date by using the datepicker. |
| Confirm production date | If the planned production date is confirmed, select the checkbox. Once the checkbox is selected, the planned production date cannot be changed to indicate that the date is confirmed. To make the planned production date changeable, clear the checkbox. |
| Quality Assurance | Select the checkbox to specify the planned release date. |
| Planned release date | If the Quality Assurance checkbox is selected, specify the planned release date by using the datepicker. The planned release date cannot be earlier than the planned production date. |
4. Click Update.
5. On the Update production order panel, select the Ingredients tab.
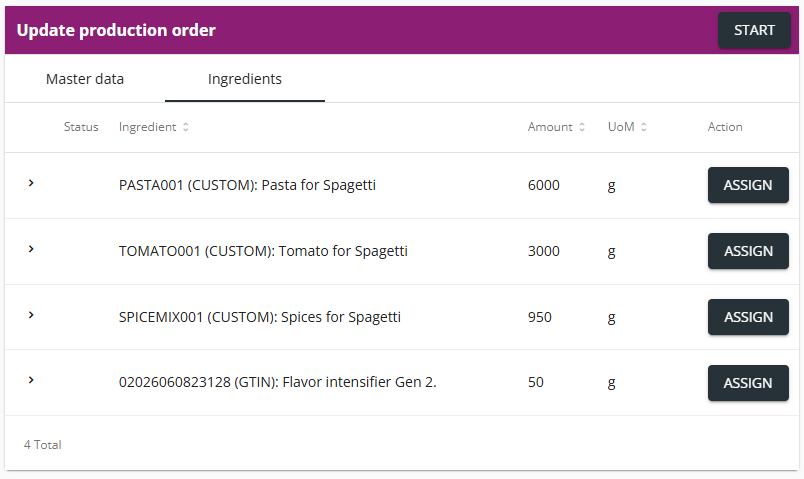
The application displays the ingredients of the production order with the amount, unit of measurement (UoM), and Assign button per ingredient.
Once a production order is created, the application copies the ingredients from the BoM setting of the product and calculates the quantity per ingredient based on the batch size (quantity) of the product.
Example:
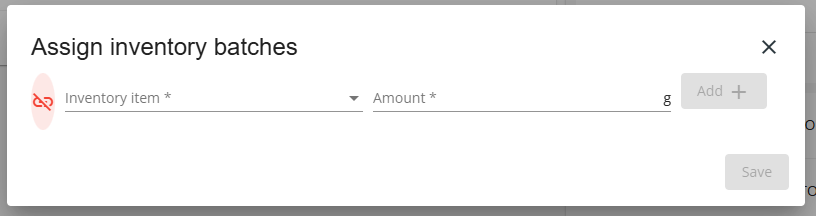
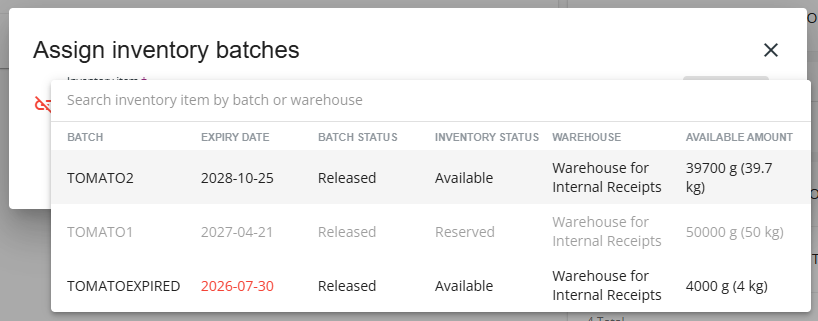
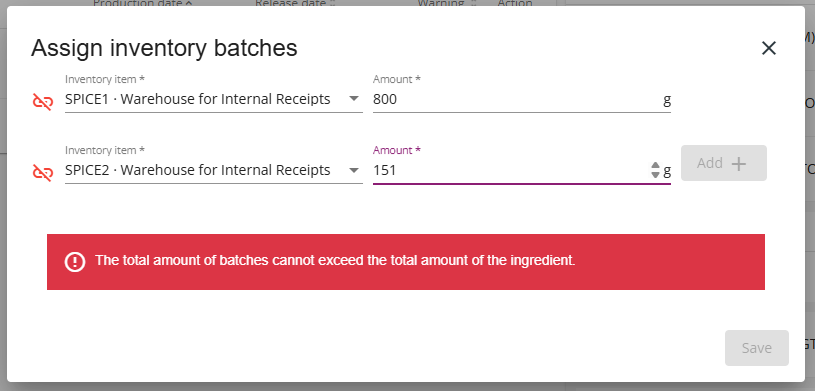
You can assign multiple inventory items (batches) per ingredient with an amount. The total amount specified for the inventory items (batches) cannot exceed the total amount specified for the ingredient. The inventory items come from the registered inventory of the warehouses in the Serialized Logistics application.
You can unassign an inventory item (batch) from an ingredient.
Choose an operation:
| # | Assigning Inventory Items (Batches) to an Ingredient | Unassigning an Inventory Item (Batch) from an Ingredient |
|---|---|---|
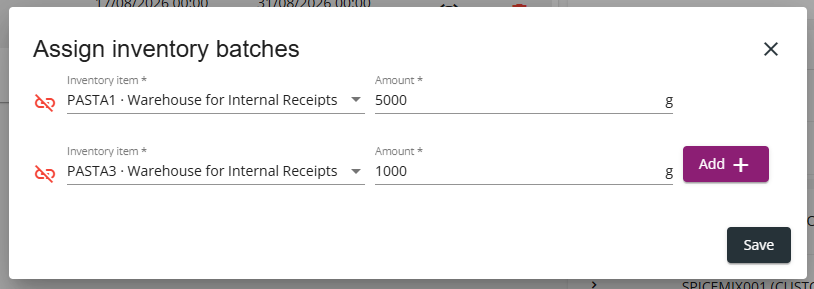
| 4.1 | To assign one or more inventory items (batches) to an ingredient, click Assign next to the ingredient. The application displays the Assign inventory batches pop-up. Example:
| Click Assign next to the ingredient for which you want to unassign an inventory item (batch). The application displays the Assign inventory batches pop-up. Example:
|
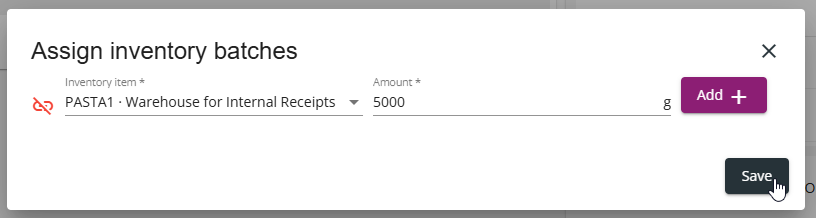
| 4.2 | Assign one or more inventory items (batches) to the ingredient:
Example:
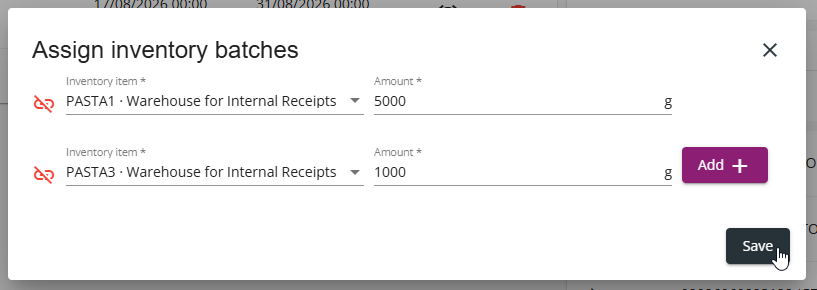
Example of two assigned inventory items (batches) before saving:
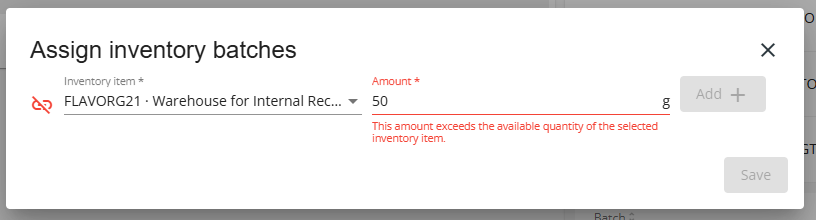
The application does not allow entering an amount that exceeds the amount for the ingredient. Example:
If the available amount for the inventory item is less than what you want to assign to meet the ingredient total amount, the application highlights the amount in red. Example:
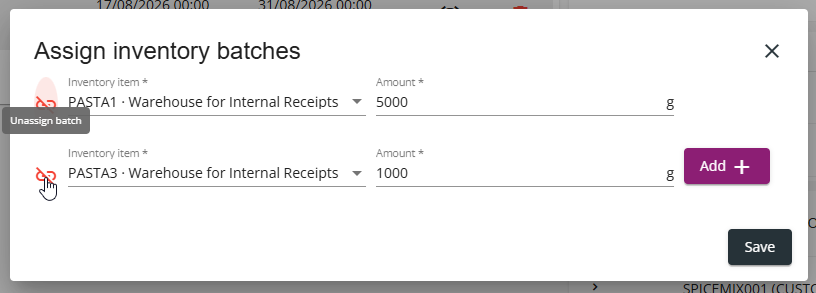
| Click the unassign icon (Unassign batch) next to the inventory item (batch) you want to unassign from the ingredient. Example:
|
| 4.3 | Click Save. | Click Save. |
Back to the list of procedures
Starting a Production Order
Once the production order is ready for execution, you can start the order.
Procedure
1. In the Serialized Manufacturing application, select Production → Production orders tab. The application displays the list of production orders with their status.
2. Find and select the production order you want to start.
Example:
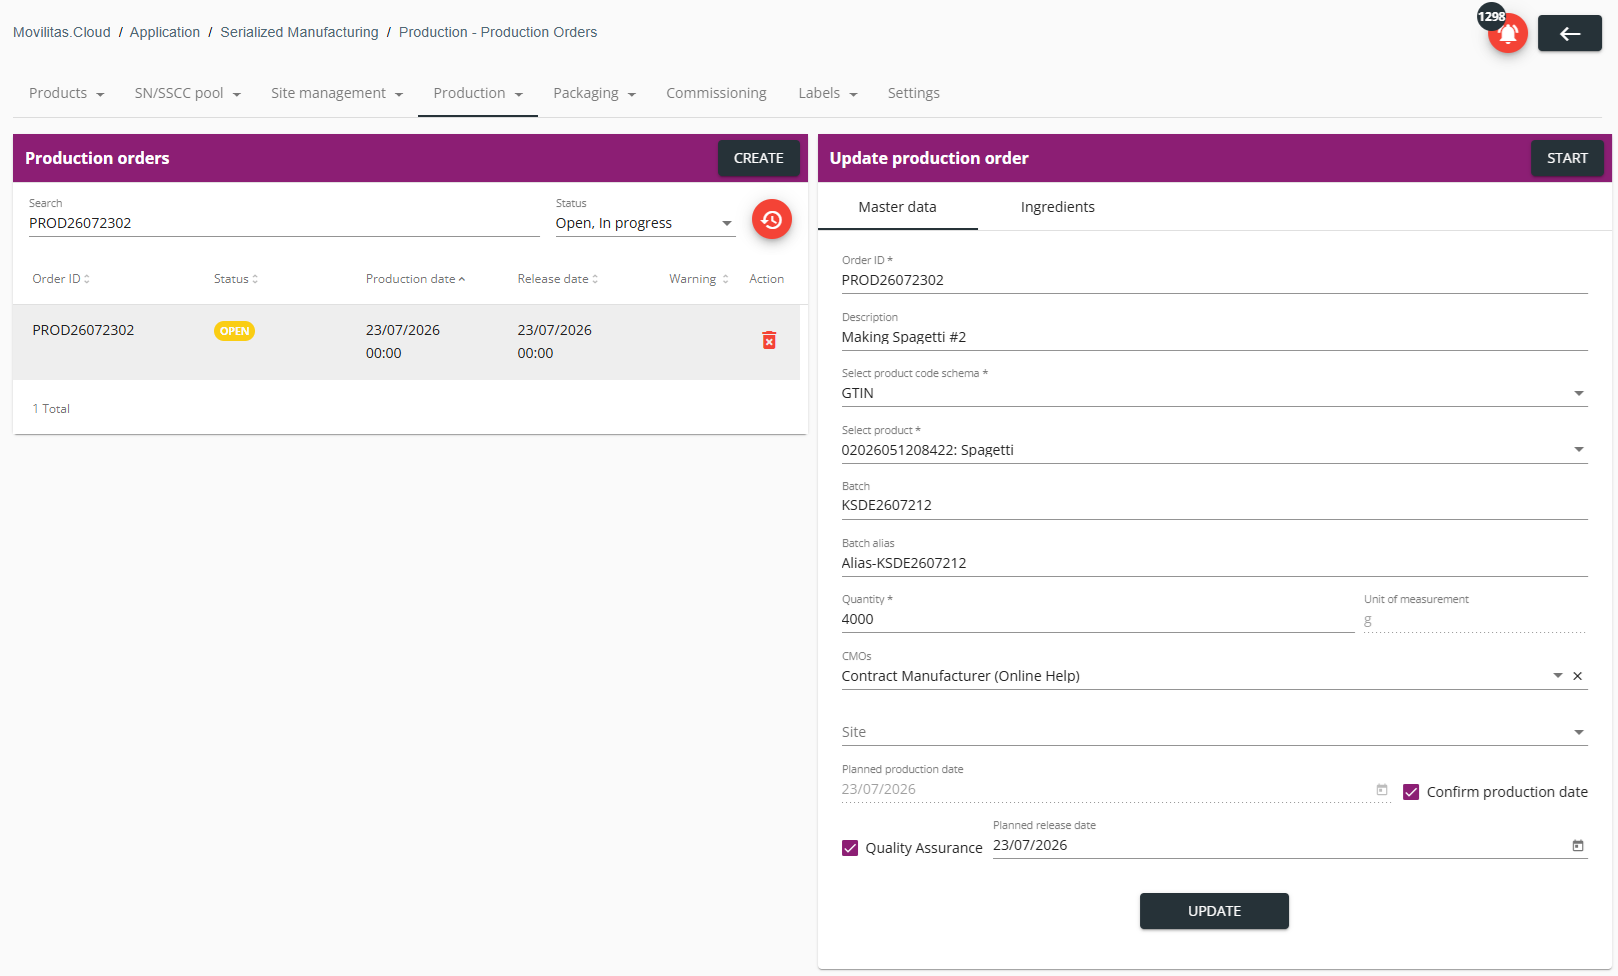
3. In the top right corner of the Update production order panel, click Start.
Example:

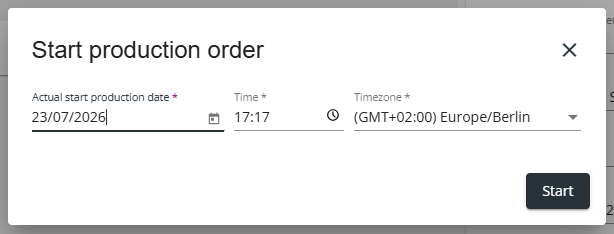
The application displays the Start production order pop-up with the following fields:
- Actual start production date (datepicker).
- Time (interactive clock).
- Timezone (drop-down with predefined values).
By default, the application offers the current date, the current time of the user's computer, and the timezone of the user's browser.
Example:
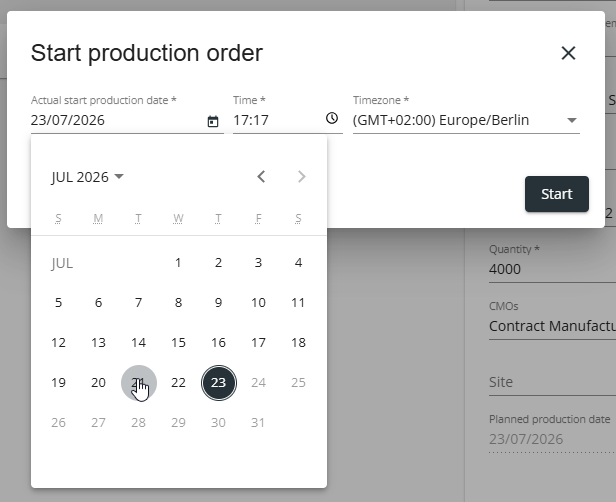
4. Specify the actual start production date by using the datepicker.
The actual start production date cannot be in the future.
Example:
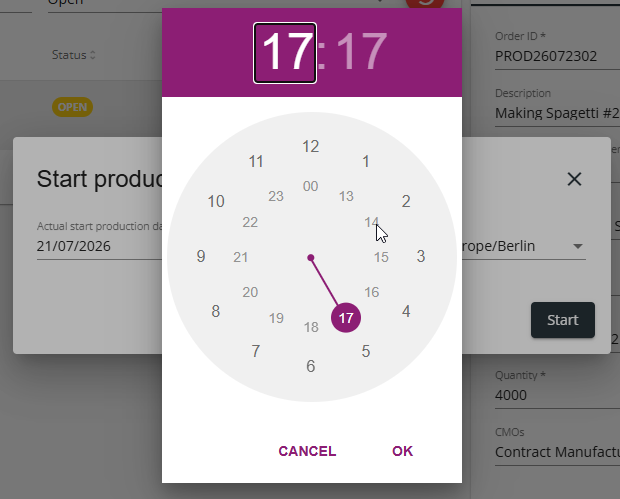
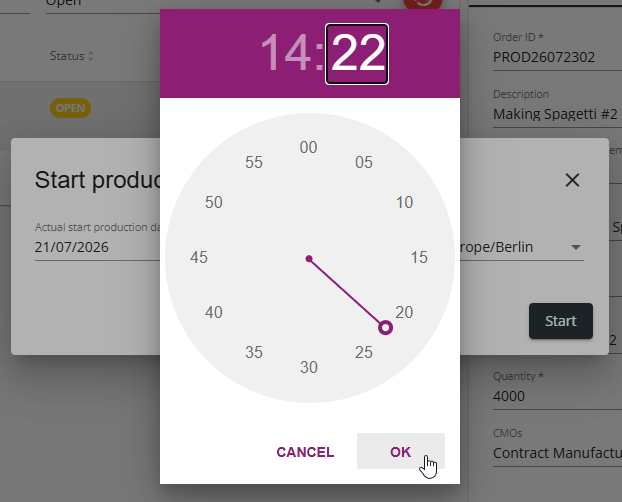
5. Specify the time by using the interactive clock (HH:MM) and click OK.
The actual start production date and time cannot be in the future.
Example:
6. Select the timezone.
Example:
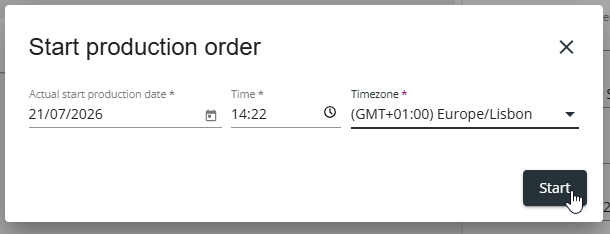
7. Click Start.
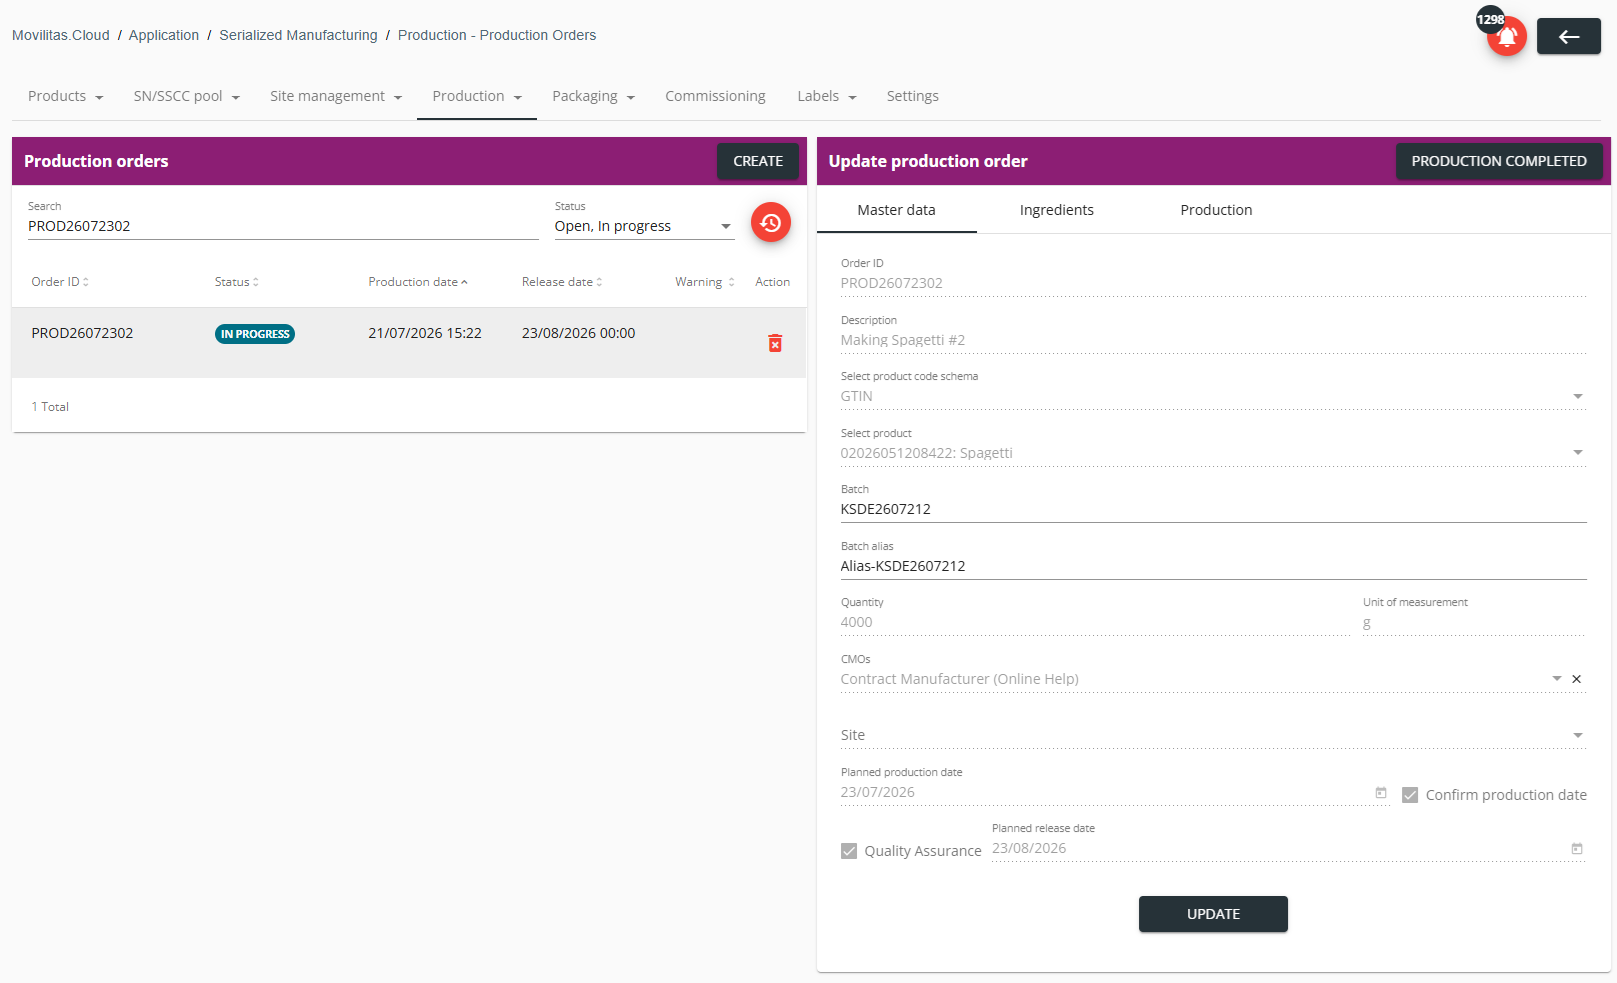
The production order goes to In progress status. Only the batch and batch alias can be changed on the order. The planned production date changes to the actual production date on the panel that lists the order.
Example:
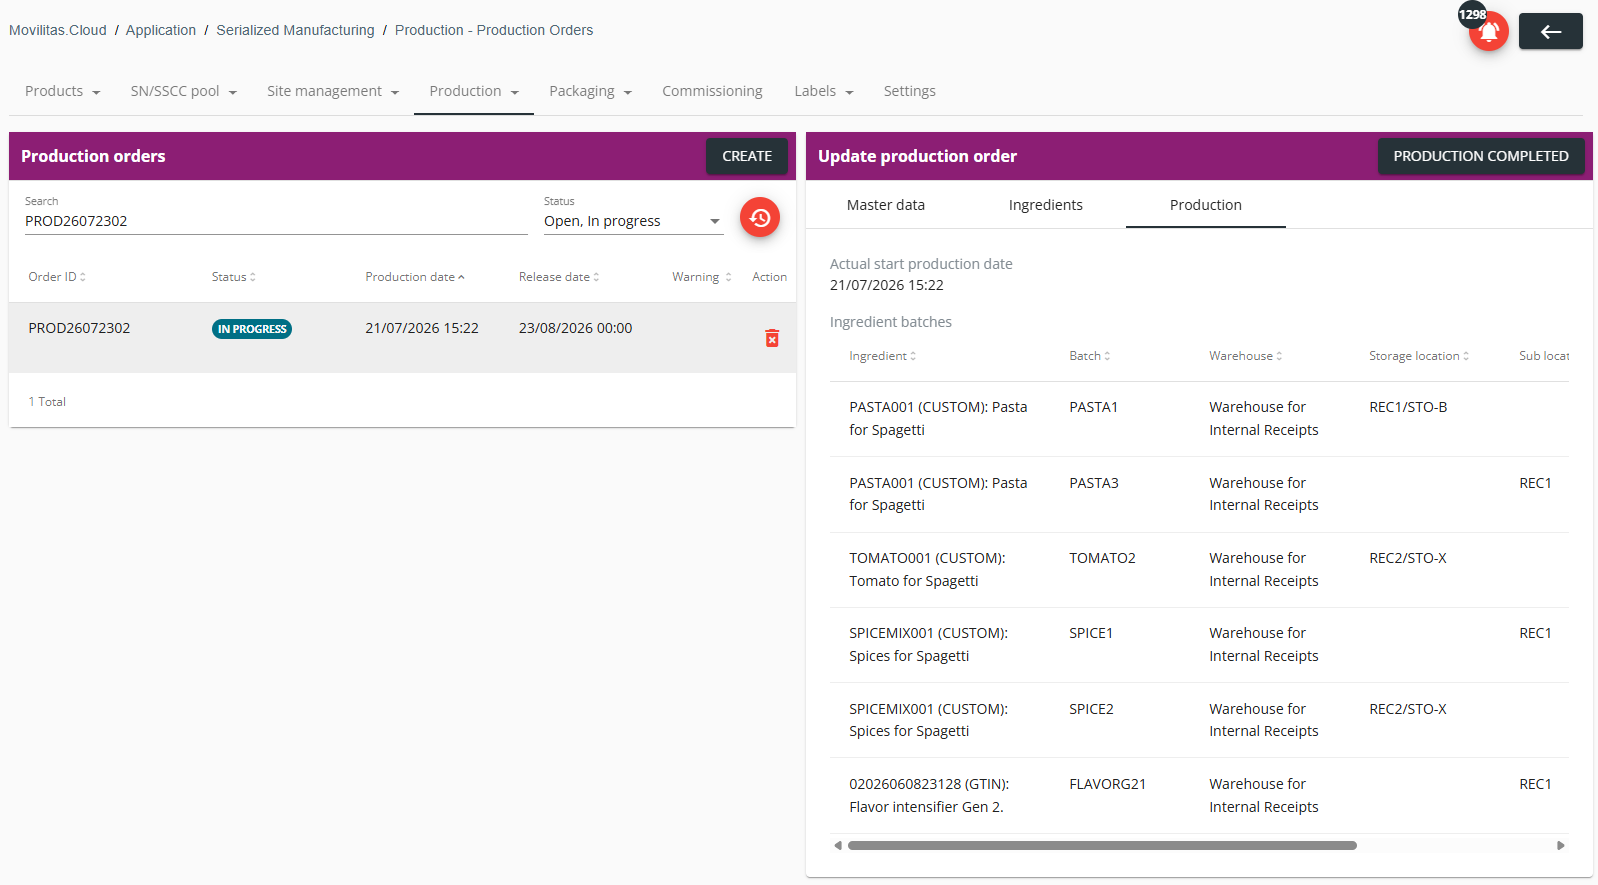
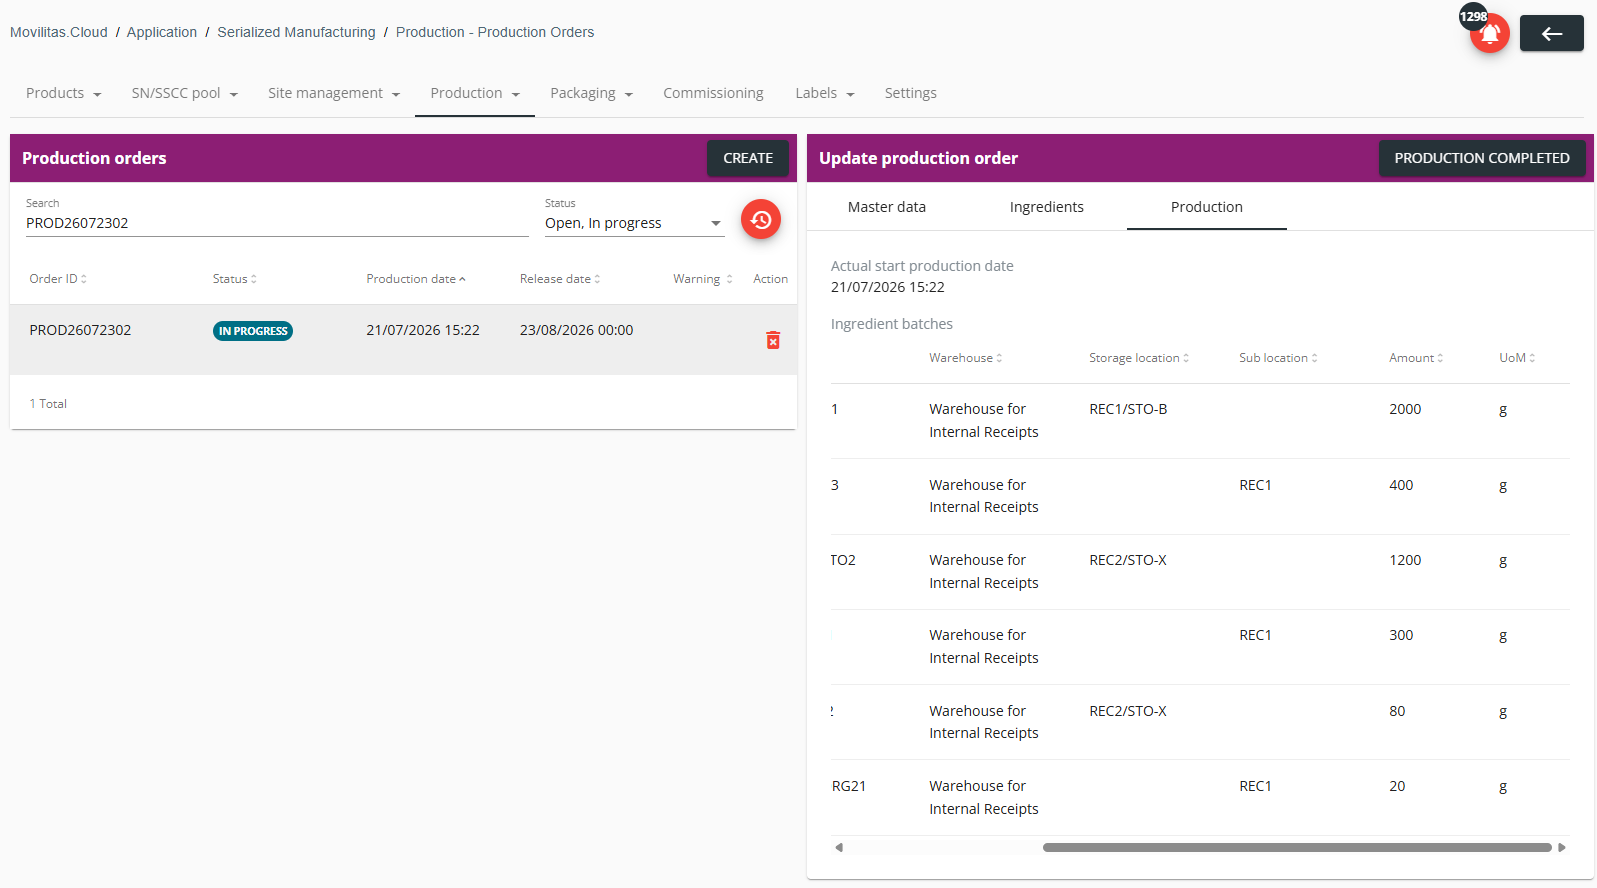
8. On the Update production order panel, select the Production tab, and verify the production details:
- Actual start production date as per your local time.
- Ingredient batches (ingredient, batch, warehouse, storage location if any, sub location if any, amount, and UoM).
Example:
Next Steps
Complete the production order.
Back to the list of procedures
Finishing a Production Order
Once the production is completed for an order, you can finish the production order.
Procedure
1. In the Serialized Manufacturing application, select Production → Production orders tab. The application displays the list of production orders with their status.
2. Find and select the production order you want to finish.
Example:
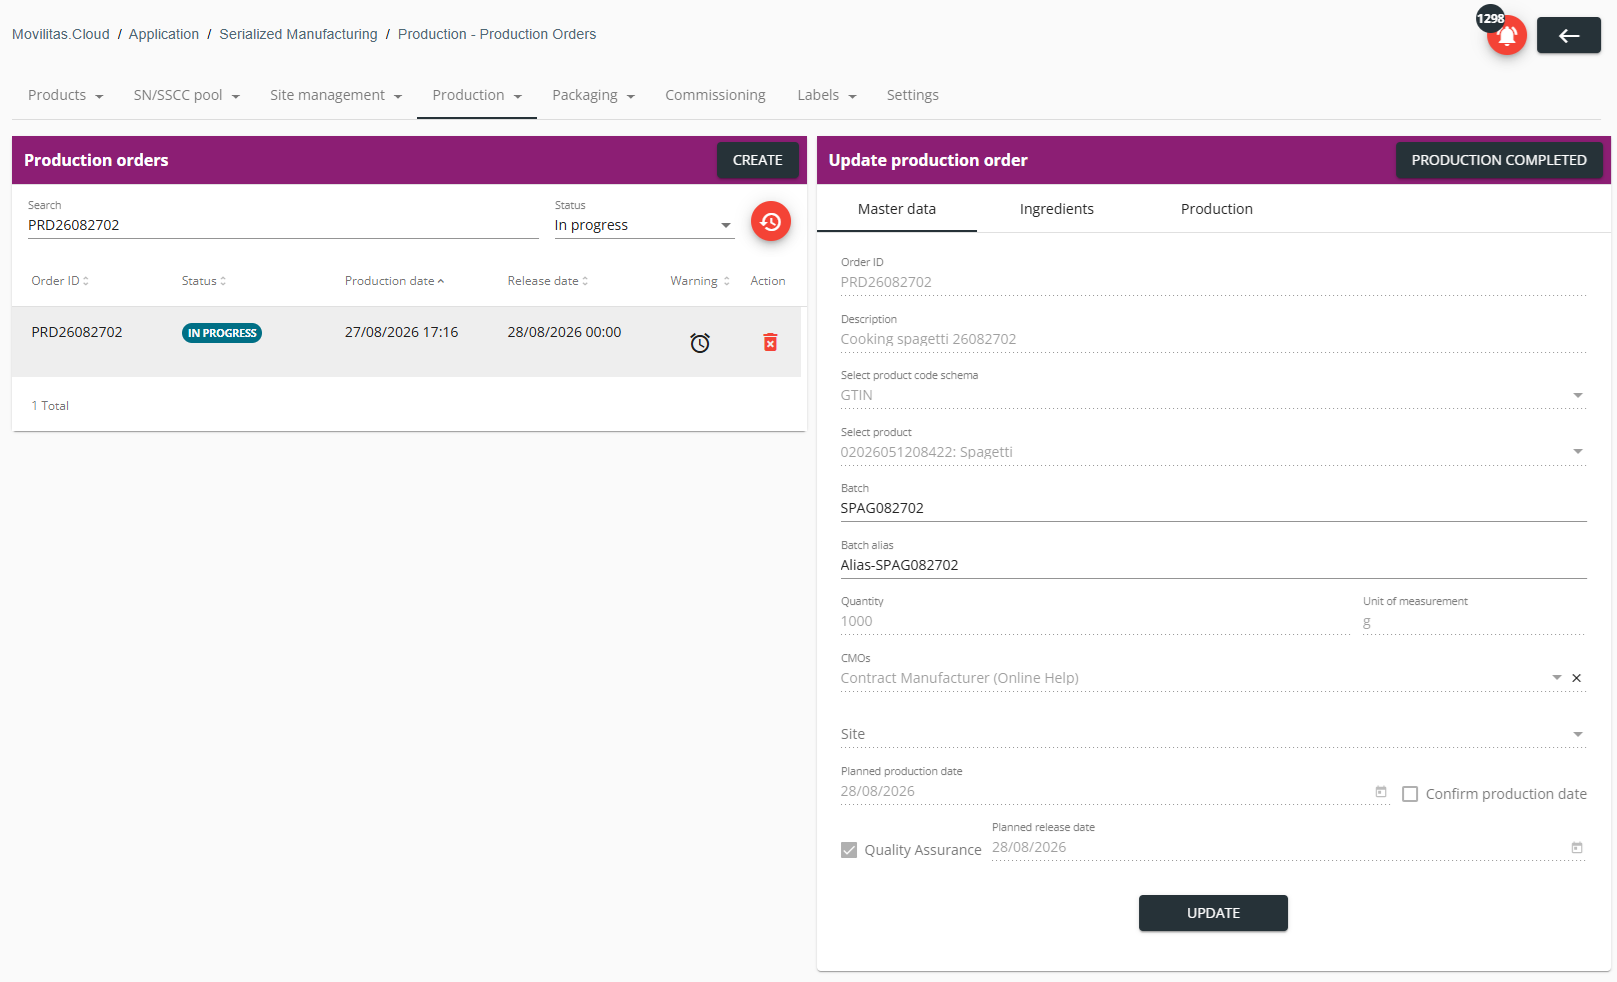
3. In the top right corner of the Update production order panel, click Production Completed.
Example:

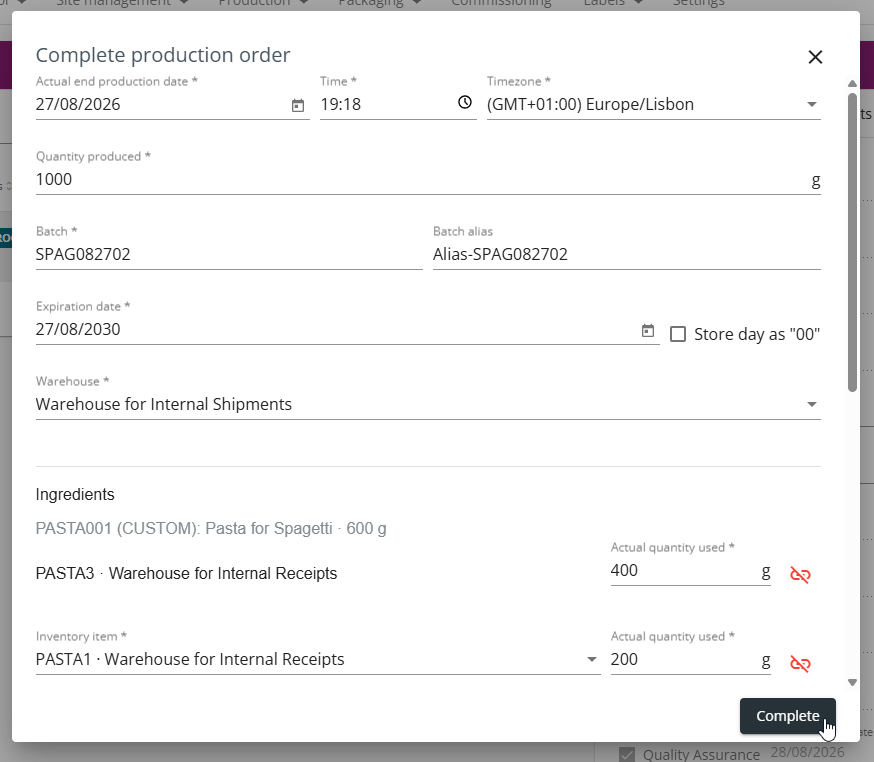
The application displays the Complete production order pop-up with prefilled data. The data is taken from the production order.
Example:
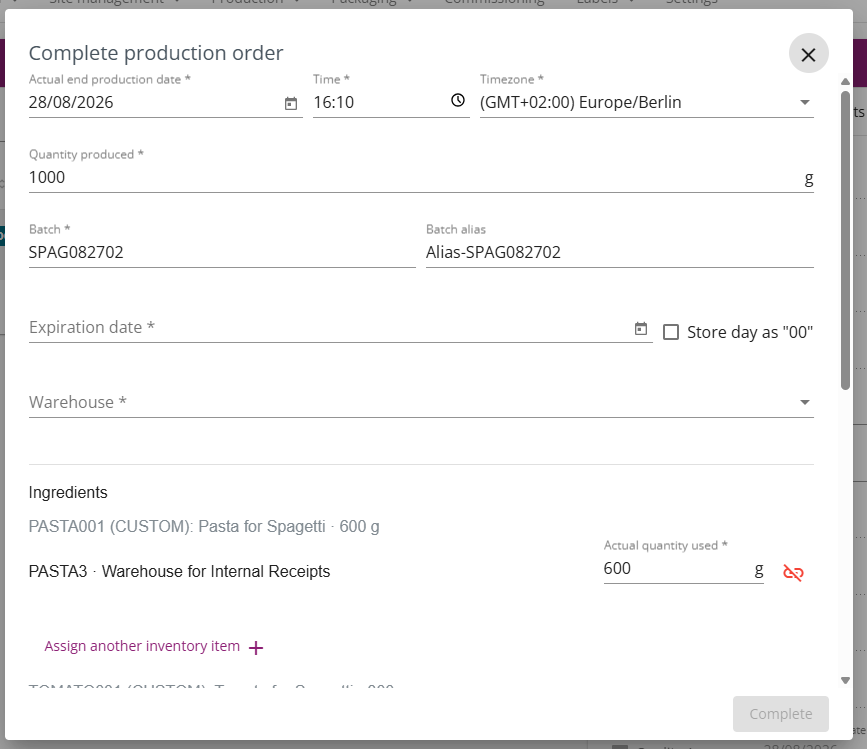
4. Complete the production order data.
| Field | Action |
|---|---|
| Actual end production date | Set the actual end production date by using the datepicker. By default, the application offers the current date of the user's computer. Example: 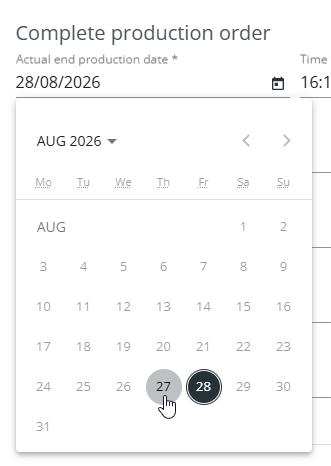 |
| Time | Specify the time by using the interactive clock (HH:MM) and click OK. By default, the application offers the current time of the user's computer.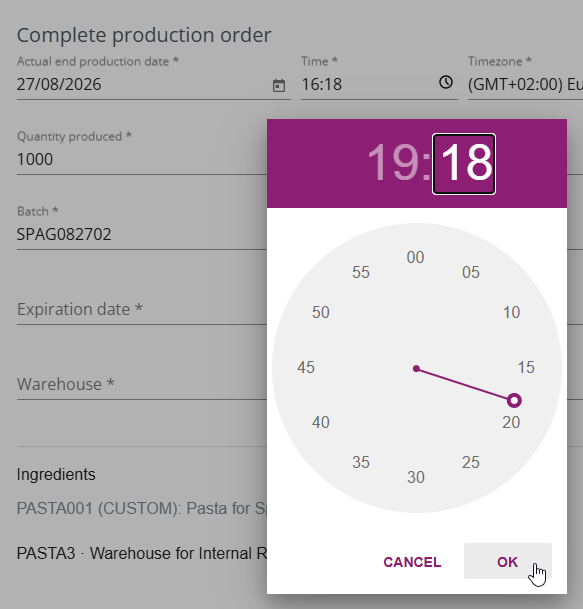 |
| Timezone | Select the timezone. By default, the application offers the timezone of the user's browser. |
| Quantity produced | Confirm the produced quantity that is the planned quantity by default. If necessary, adjust the value. You cannot change the UoM. |
| Batch | Confirm the batch. If necessary, change the batch. |
| Batch alias | Confirm the batch alias. If necessary, change the batch alias. |
| Expiration date | Specify the batch expiration date by using the datepicker. If you want to store the batch without a specific expiration day, select the Store day as "00" checkbox. |
| Warehouse | Select the warehouse where the produced product will be stored. The application offers the warehouses in the Serialized Logistics application. When the production order is completed, an inventory item is created in Available status for the warehouse. |
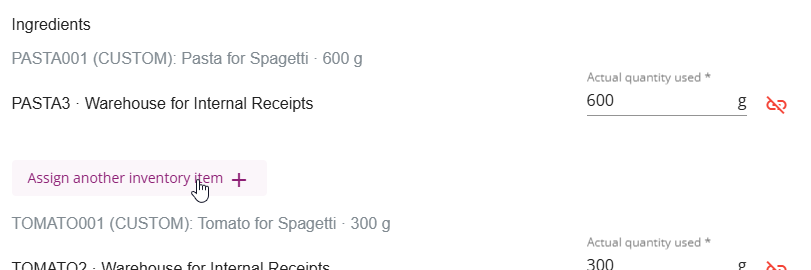
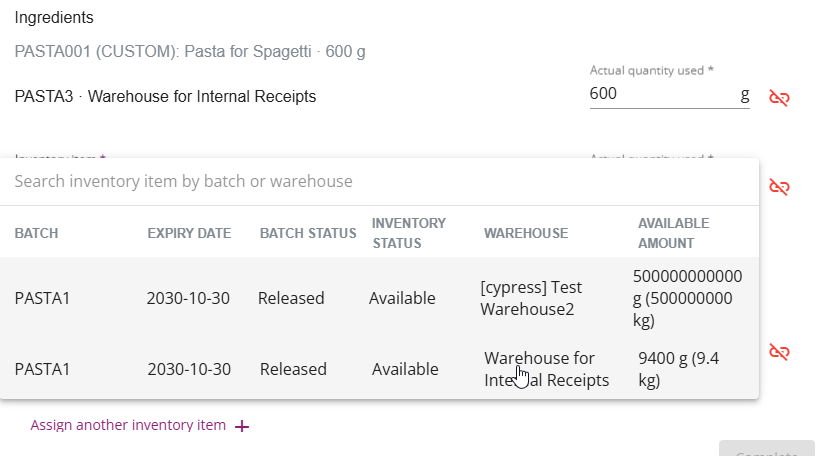
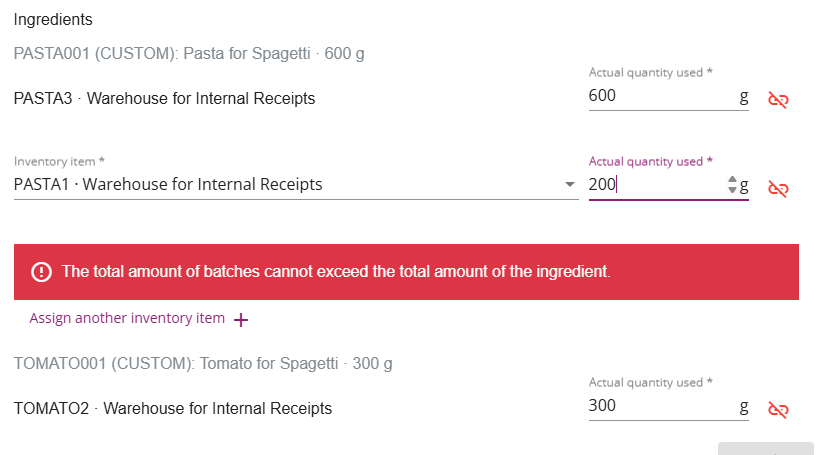
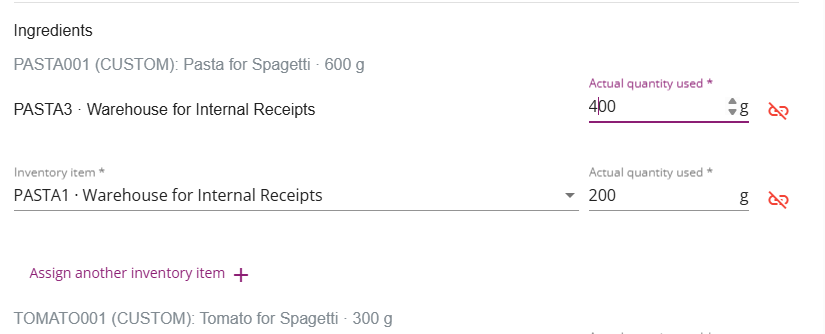
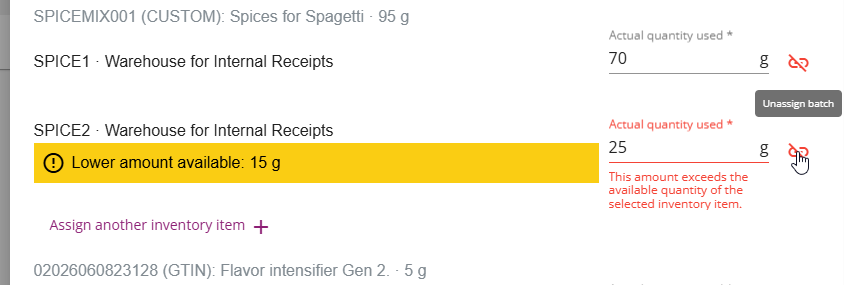
| Ingredients | Confirm the used ingredients. If necessary, adjust the ingredients:
Consider the following:
Example of assigning another inventory item (batch) that ends up exceeding the total amount of the ingredient:
Example of adjusting the actual quantity used for an inventory item:
Example of unassigning an inventory item (batch) because lower amount is available than what was originally assigned:
|
Example:
5. Click Complete.
The production order goes to Done status and disappears from the list of orders, by default. You can find the order by setting the status filter to show orders in Done status.
- The production date changes to the actual end production date as per your local time on the panel that lists the order.
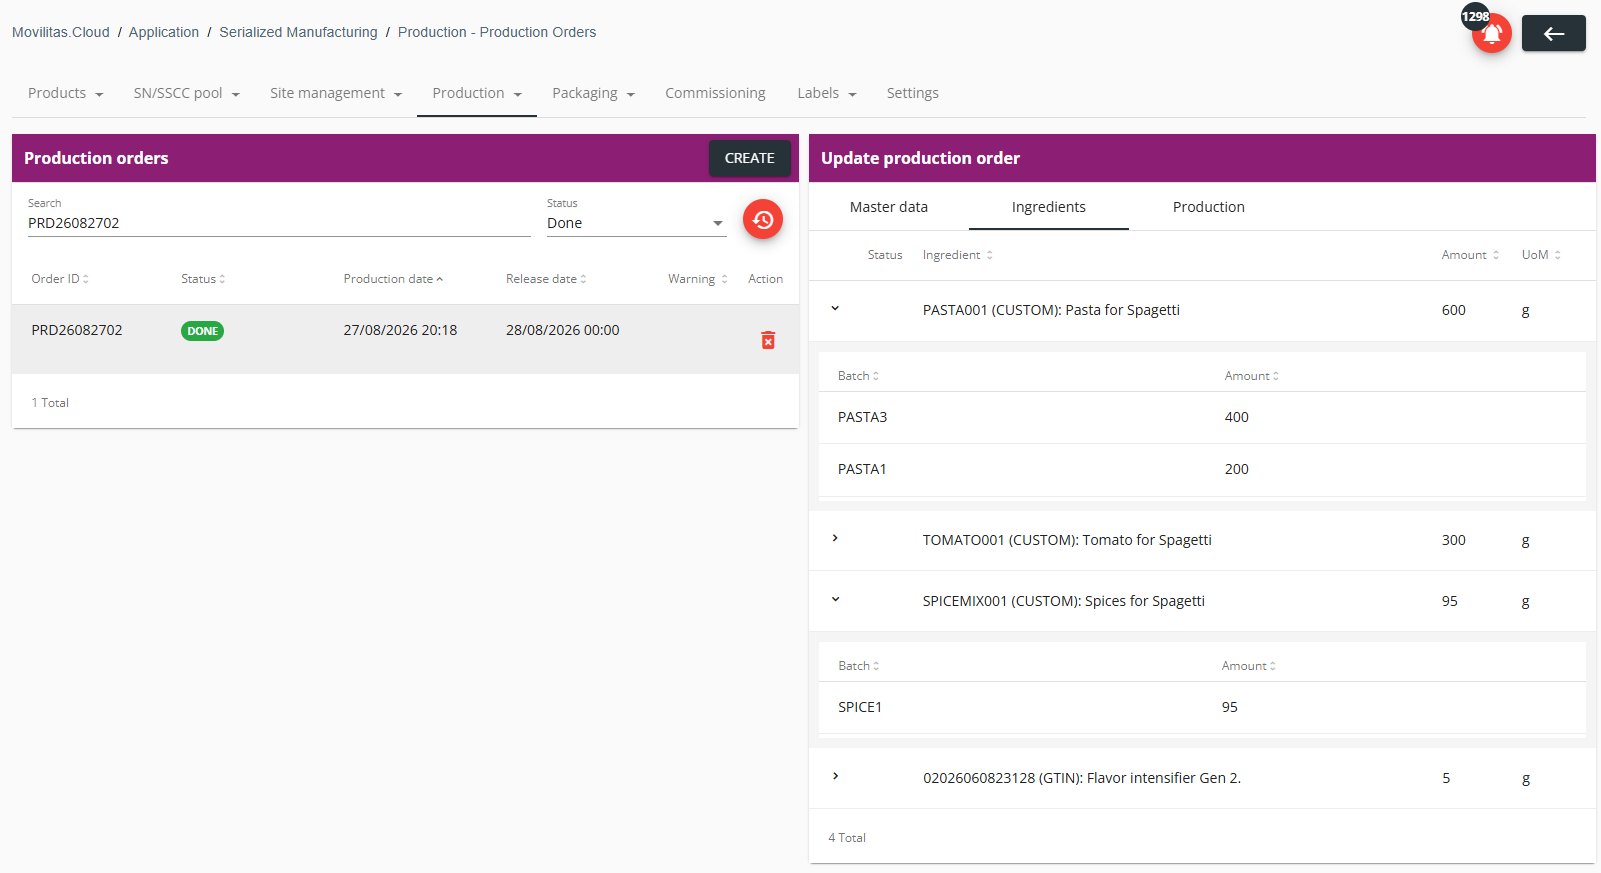
- If the inventory items (batches) assigned to the ingredients were changed, the Ingredients tab is also updated.
- The inventory of the respective warehouses is updated:
- For the inventory items of the ingredients, the used quantity is deducted from the quantity of the inventory items, or the complete inventory item is removed from the related warehouse.
- A new inventory item in Available status is added to the warehouse where the produced product is stored, based on the data given during completion.
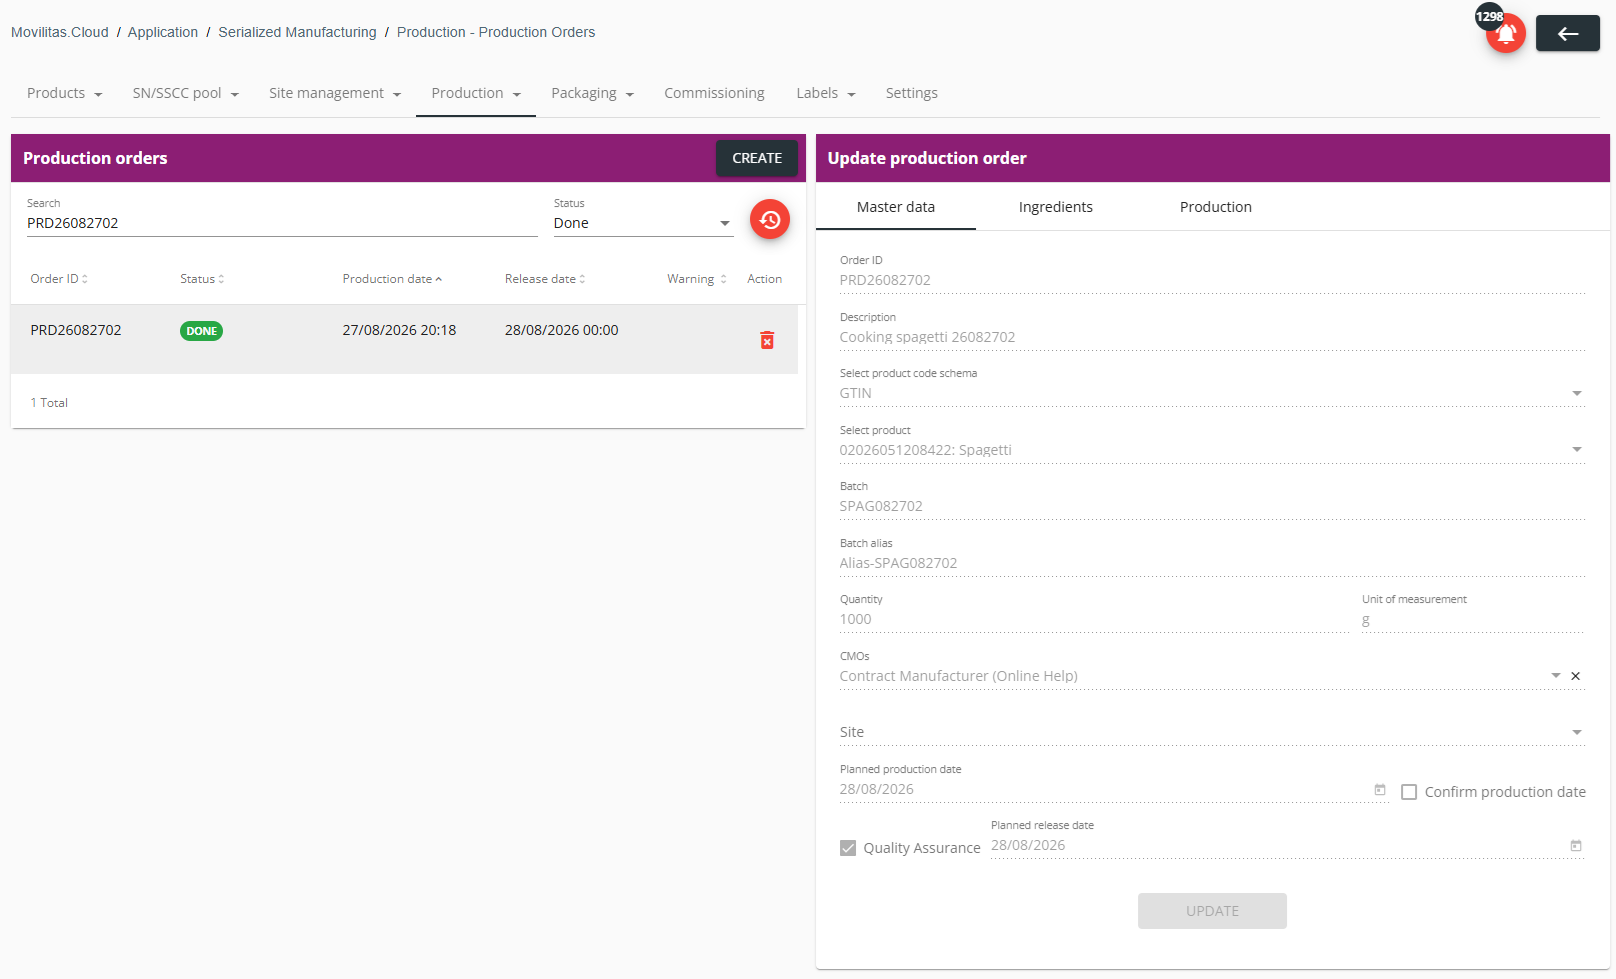
The following example illustrates the master data and ingredients of the previously completed production order:
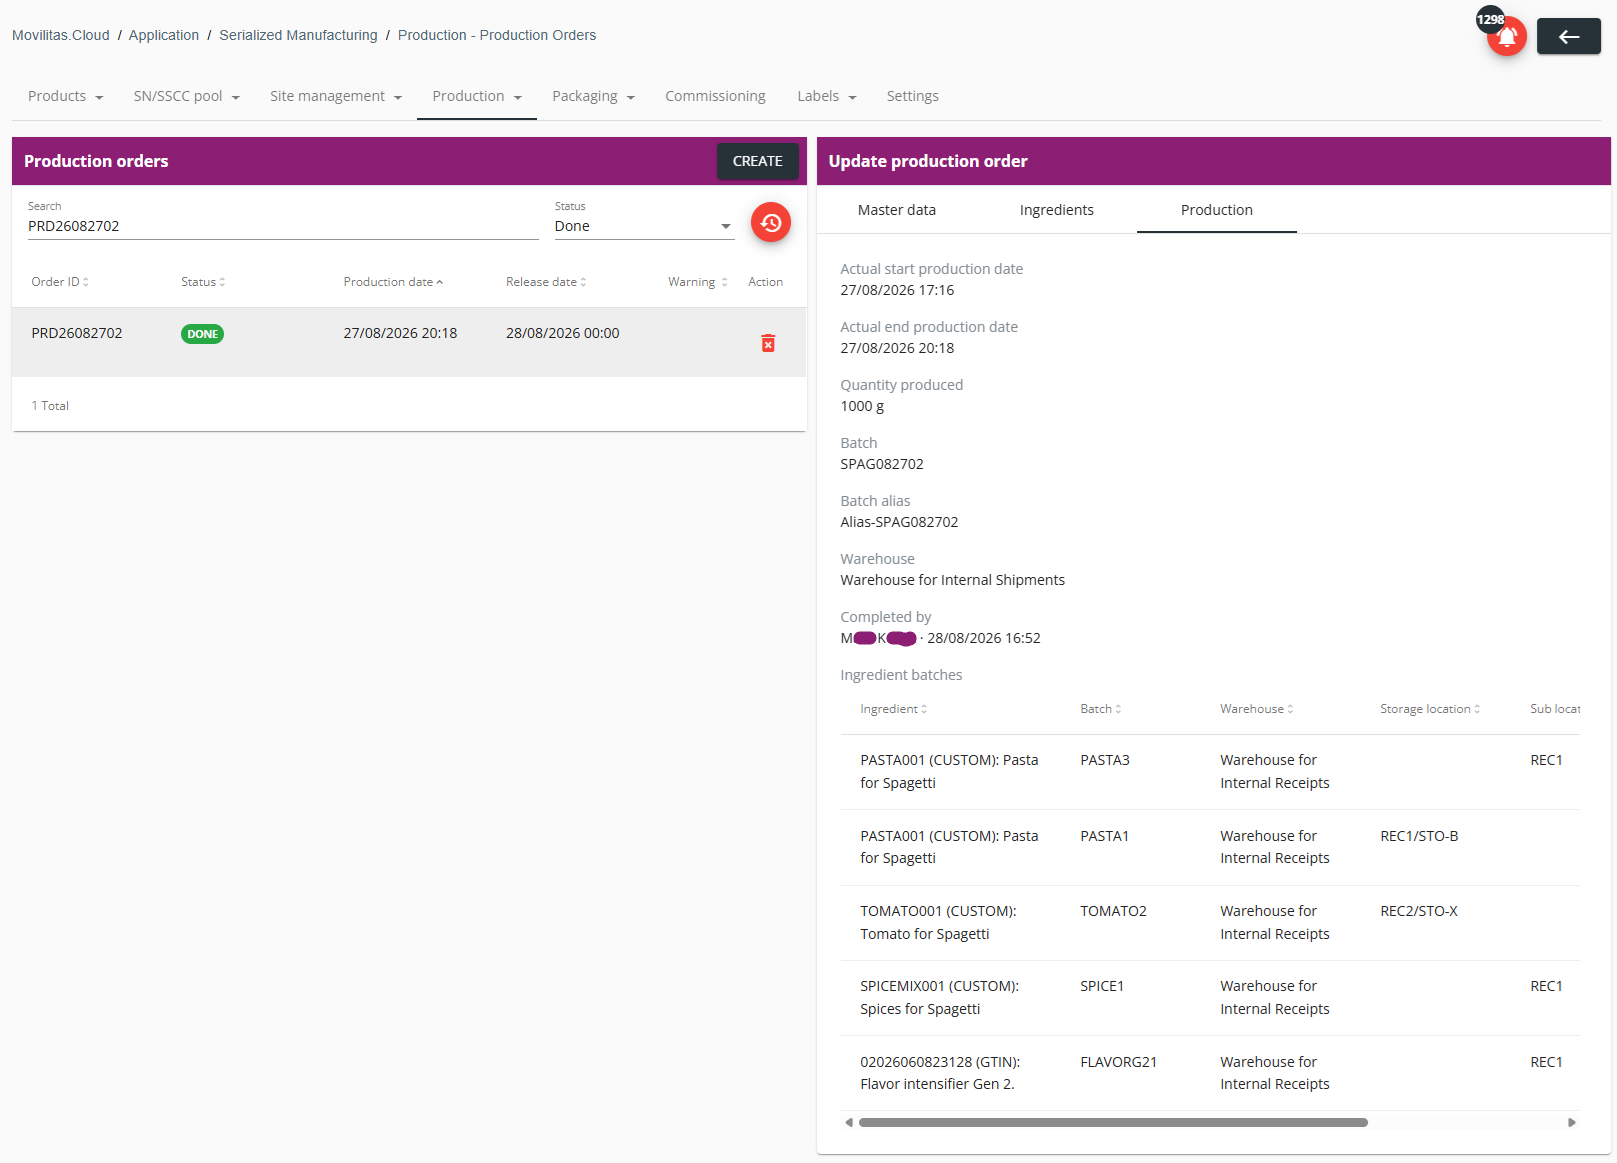
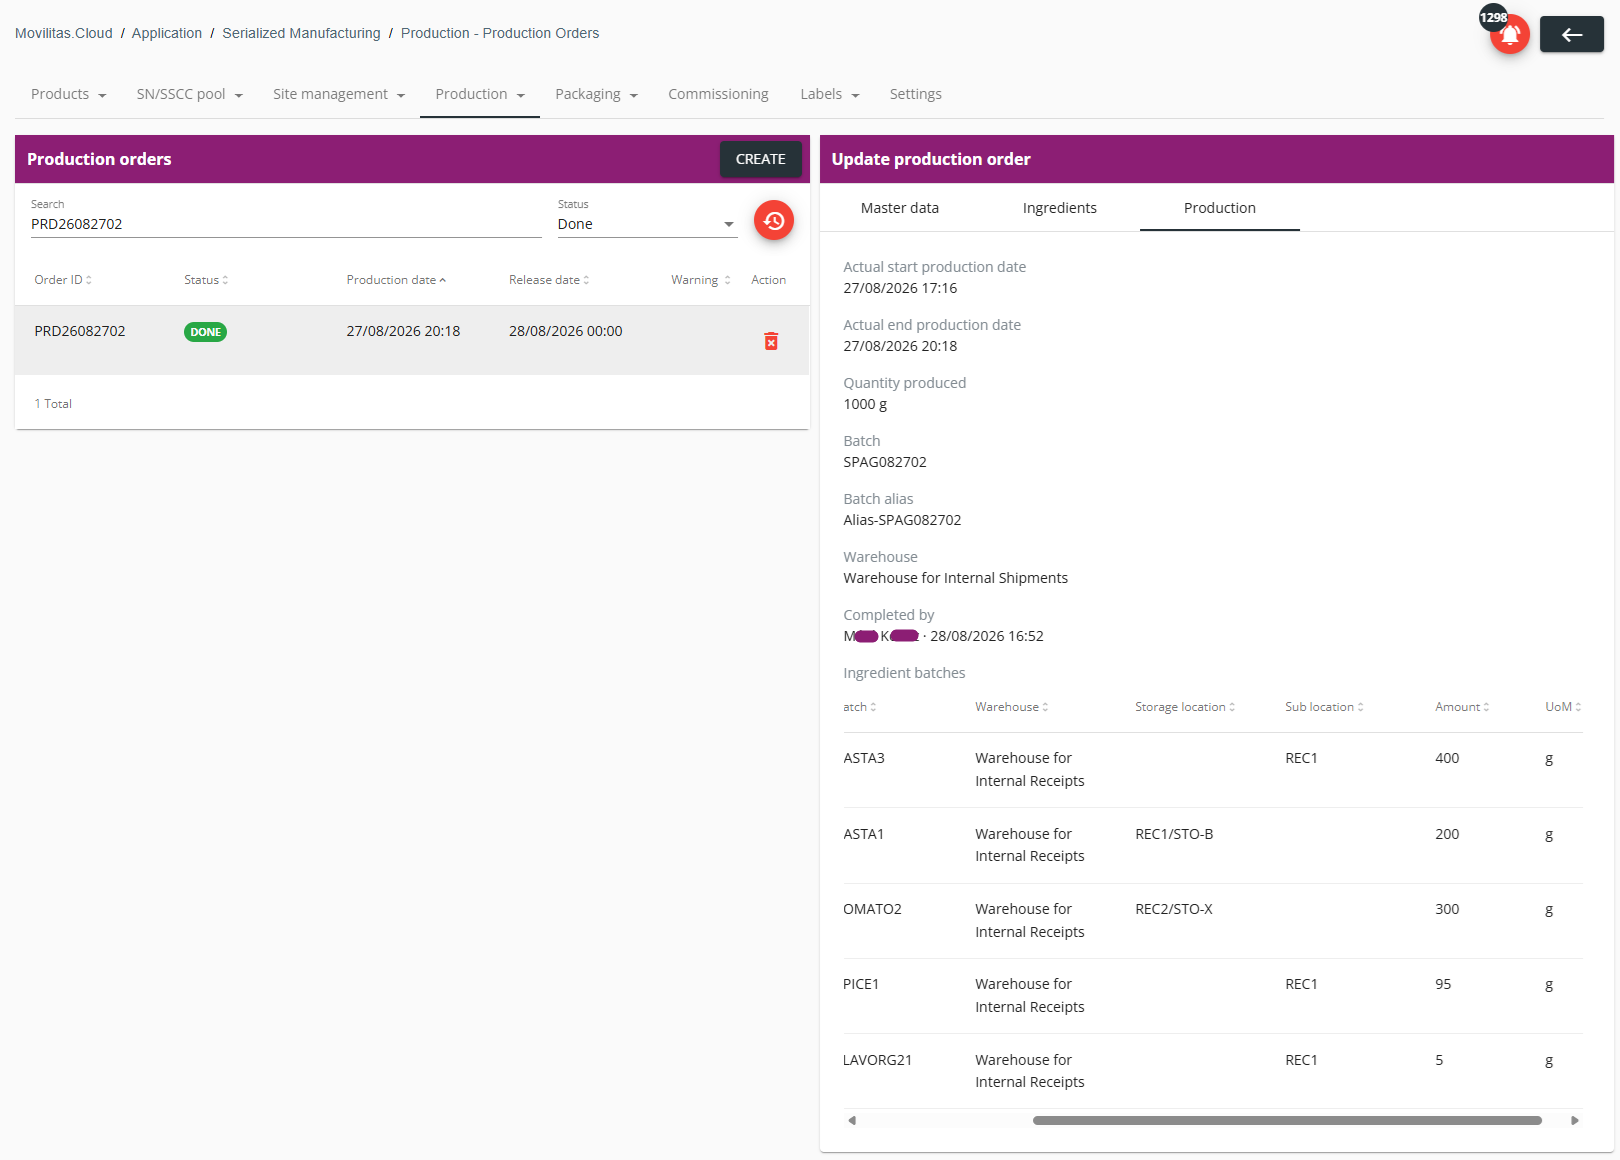
6. On the Update production order panel, select the Production tab, and verify the production details.
The application displays the data that was given during the production order completion. The application also displays the name of the person who completed the production order together with the date and time.
Example:
Back to the list of procedures
Deleting a Production Order
Procedure
1. In the Serialized Manufacturing application, select Production --> Production orders tab. The application displays the list of production orders with their status.
2. Find the production order in the list you want to delete.
Example:
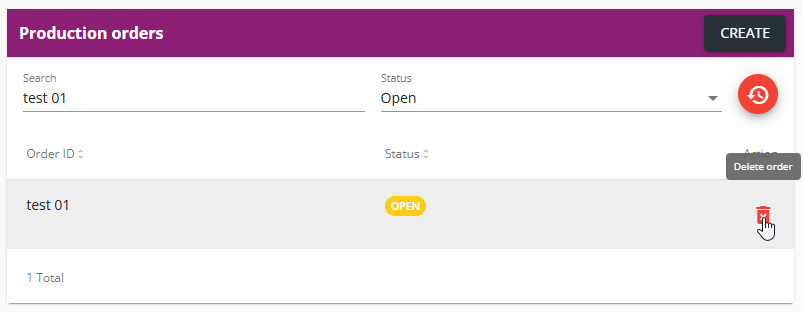
3. Click the delete icon and confirm the deletion by clicking Yes.
Back to the list of procedures
