As a tenant administrator, you can change the details you provided about your company and yourself when you registered.
You can manage the following settings of the tenant:
- Add tenant SGLN.
- Change the details of the tenant, like the name or address.
- Registration over mobile application.
- Availability of contact list on mobile application.
- Billing information, including the setup of automatic charging on bank (credit) card.
- Company logo.
- Single Sign-On (SSO).
List of Procedures
- Managing the Company Information, Global Settings, and Company Logo
- Setting Up Single Sign-On for a Tenant
- Enforcing Single Sign-On for a Tenant
- Providing Billing Information for a Tenant
- Saving Card Details for Automatic Charging
- Canceling Subscription
Managing the Company Information, Global Settings, and Company Logo
Procedure
1. Go to Movilitas.Cloud Console --> My tenants.
2. Select the tenant or click Open tenant next to it.
3. On the tenant dashboard, click Settings. The application displays the Tenant Settings page.
Example:

4. On the Settings tab, configure the general settings.
| GUI section | Action |
|---|---|
| Company information | Fill in the form with the company information and click Save Settings.
For the tenant SLGN Enter the location number of your company in the SGLN format: <GS1 company prefix>.<location reference>.<extension or "0" when no extension>. For example, "1234567.00012.0". If your company sells items and reports the shipment in an EPCIS file, the tenant SGLN is required. This SGLN is the sender and the source-owning party (sold-from) in the EPCIS file. To use the built-in GLN to SGLN converter, click on the conversion button (Help me to define the SGLN) on the right.
The application displays a pop-up. Provide the following data and click Convert:
Example:
The provided GLN value is converted to the SGLN format and the field is populated. Example:
|
| Global configuration | 1. Set the global configuration by selecting or clearing the checkboxes:
Note: The Enable manual approval of mobile users checkbox is only visible when public registration over the mobile application is activated. If this checkbox is selected, you have control over the public registration and you can manually approve or reject the request. Otherwise, the user is automatically assigned to the tenant. 2. Click Save Settings to save your changes. |
| Change logo | 1. Click Select Image. 2. Browse for an image and open it. 3. Crop the image and check the preview. 4. Click Upload Image. |


Back to the list of procedures
Setting Up Single Sign-On for a Tenant
As an alternative to the standard login with username and password, you can configure Single Sign-On (SSO) on your tenant. The supported authentication protocol is OpenID Connect (OIDC).
Procedure
1. Go to Movilitas.Cloud Console --> My tenants.
2. Select the tenant or click Open tenant next to it.
3. On the tenant dashboard, click Settings. The application displays the Tenant Settings page.
4. On the Settings tab, find the Single Sign-On (OpenID Connect) section.
5. To activate SSO, select the Enable Single Sign-On toggle button.
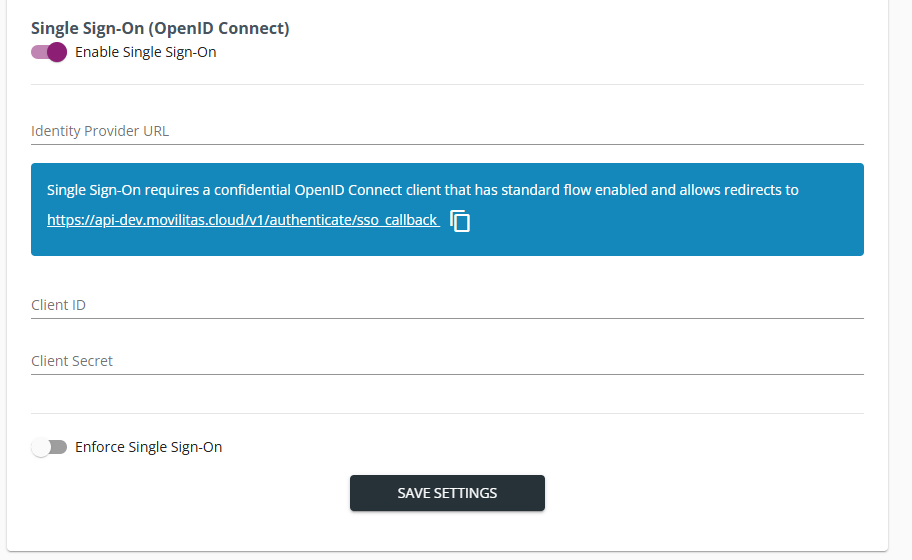
The application displays a form:
- Fields to provide the identity provider endpoint URL and credentials for the SSO.
- A blue message about the required setup in the Identity Provider and the callback URL to be used by the Identity Provider.
Alternatively, to turn off SSO, clear the Enable Single Sign-On toggle button.
6. Provide the details to connect to the Identity Provider:
- Identity provider URL.
- Client ID.
- Client Secret.
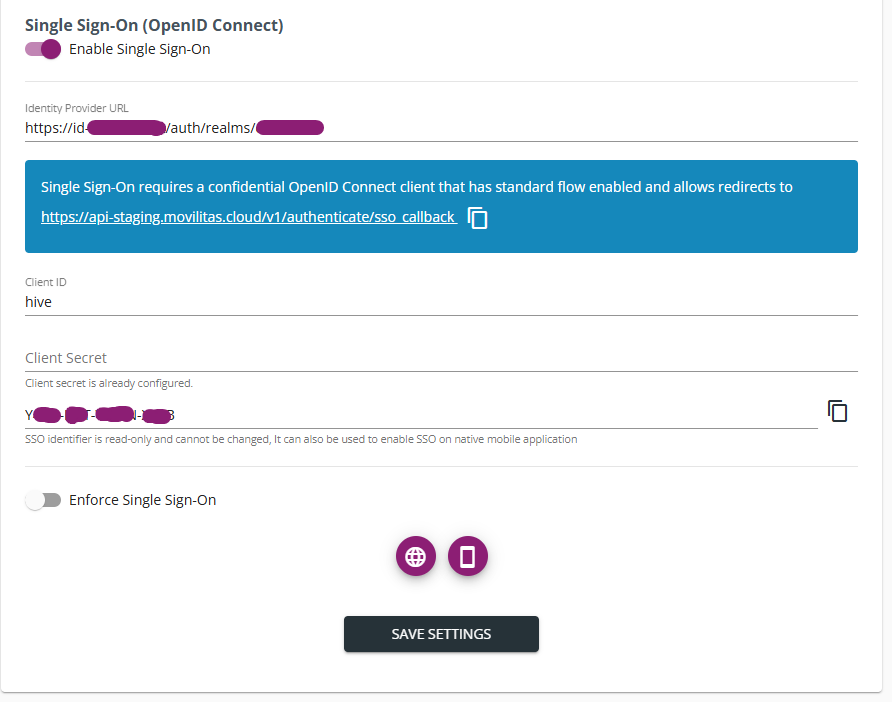
7. Click Save Settings. The application displays additional information and functions:
- A unique SSO identifier for the tenant. This code is necessary to log in via SSO. You will need the SSO identifier to activate SSO on the Movilitas Mobile application installed on a mobile device.
- Show URL buttons. You can use the following URLs to access the application through SSO:
- Web UI SSO URL - Access to the Admin UI.
- Mobile Web SSO URL - Access to Movilitas Mobile Web.
Note: If you change any of the three SSO fields (identity provider URL, client ID, and client secret) and save the settings, a new SSO identifier will be generated, which also has an impact on the access URLs.
Example:

8. Copy the callback URL to your clipboard by using the copy button in the blue message.
Note: Only one value can be copied to the clipboard at a time.
Example:

9. Copy the SSO identifier to your clipboard by using the copy button next to the identifier on the right.
Note: Only one value can be copied to the clipboard at a time.
Example:

10. Show the web UI SSO URL by clicking on the corresponding button.
Example:

11. Copy the URL to your clipboard by using the copy button next to the URL on the right.
Note: Only one value can be copied to the clipboard at a time.
Example:

12. Show the mobile web SSO URL by clicking on the corresponding button.
Example:

13. Copy the URL to your clipboard by using the copy button next to the URL on the right.
Note: Only one value can be copied to the clipboard at a time.

Next Steps
Use the copied URLs in the appropriate systems (One at a time).
Use the SSO identifier to set up SSO in the mobile application on a mobile device (one-time action).
Back to the list of procedures
Enforcing Single Sign-On for a Tenant
Once Single Sign-On is set up on the tenant, a tenant administrator currently logging in through SSO can enforce SSO login for the tenant. If SSO is enforced, non-SSO users (if any) cannot access the tenant.
Before You Begin
Make sure that you are logging in through SSO.
Procedure
1. Go to Movilitas.Cloud Console --> My tenants.
2. Select the tenant or click Open tenant next to it.
3. On the tenant dashboard, click Settings. The application displays the Tenant Settings page.
4. On the Settings tab, find the Single Sign-On (OpenID Connect) section.
Example:
5. Select the Enforce Single Sign-On toggle button.
Example:
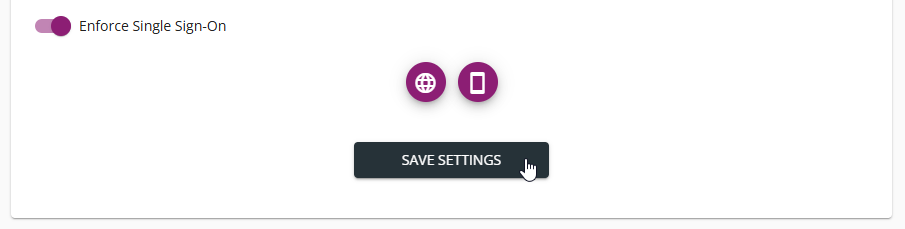
6. Click Save Settings.
Login through SSO is enforced on the tenant, unless you are a non-SSO user of the tenant. In the latter case, the application displays an error message and blocks the activation to avoid accidental lockout.
Back to the list of procedures
Providing Billing Information for a Tenant
You have completed the registration to Movilitas.Cloud and have set up the system for use for your company. Before the end of the first month of using the product, you need to provide your billing information. In case of any change, you can update the billing information.
Procedure
1. Go to Movilitas.Cloud Console --> My tenants.
2. Select the tenant or click Open tenant next to it.
3. On the tenant dashboard, click Settings.
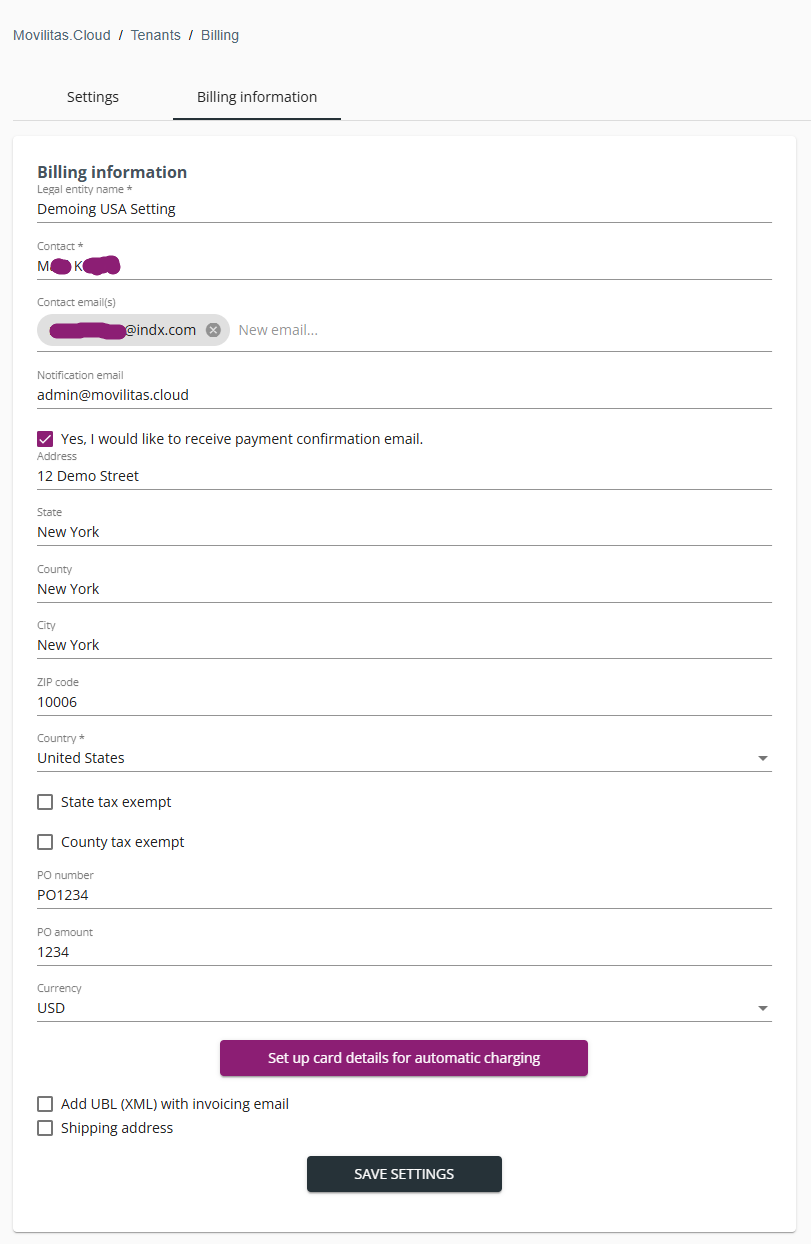
4. Select the Billing information tab. The application displays the Billing information form.
Example:

5. Provide the required details in the form. The mandatory fields are marked with an asterisk (*) in the form.
Filling in the form is self-explanatory, but the following list collects some best practices:
- Contact email(s) - These are the addresses where Movilitas.Cloud sends the invoice. You can provide one or more email addresses. To add an email address to the list, enter the email address, and then hit enter or click on another part of the form. The emails are added as chips that you can remove by clicking on the X button.
- Notification email - This is the address where Movilitas.Cloud sends payment reminders and the confirmation when the payment is received.
- Yes, I would like to receive payment confirmation email - This checkbox enables you to turn on or off payment confirmations. By default, the checkbox is selected meaning that Movilitas.Cloud sends a confirmation when the payment is received.
- VAT number - The field behavior is driven by the selected country:
- Once the country is given, a country-specific VAT number validator is activated.
- If a shipping address is specified, the field is moved to the shipping address section, and the VAT number must be compliant with the country of the shipping address.
- The field does not apply to the United States. This field is automatically hidden when the selected country is the United States, except for the case when the shipping address points to another country.
If the country is the United States or a US territory (Puerto Rico, U.S. Virgin Islands, American Samoa, Northern Mariana Islands, and Guam), the following additional fields/functions are available:
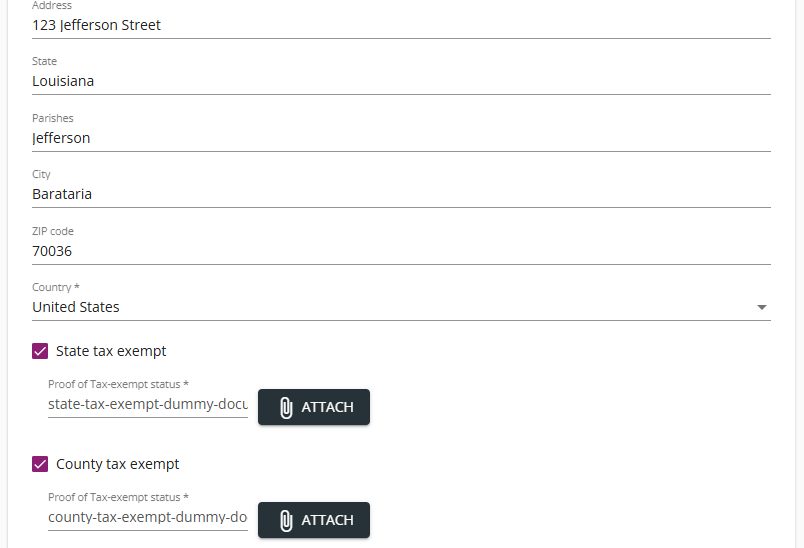
- County / Parishes / Boroughs - Depending on the provided state, the application displays one of these fields. If the state is Louisiana, the application displays Parishes. If the state is Alaska, the application displays Boroughs. For other states, the application displays County. If you enter the ZIP code, the application automatically populates the field.
- State tax exempt and Attach - If the company is exempt from state tax, select the State tax exempt checkbox and upload the exempt document as Proof of Tax-exempt status by using the Attach button. The application accepts PDF.
- County tax exempt and Attach - If the company is exempt from county tax, select the County tax exempt checkbox and upload the exempt document as Proof of Tax-exempt status by using the Attach button. The application accepts PDF.
Example of a USA-based billing address with county (parishes) information and tax exempt:
6. Set up card details for automatic charging. It is recommended to complete the billing settings first and return to the setup of automatic charging. For more information, see Saving Card Details for Automatic Charging.
7. To receive the UBL (XML) file as an attachment along with the invoice, select the Add UBL (XML) with invoicing email checkbox.
Note: When the Add UBL (XML) with invoicing email checkbox is selected, it is mandatory to fill in the PO fields.
8. If there is a separate shipping address, select the Shipping address checkbox and provide the details.
Once the Shipping address checkbox is selected, the VAT number field is automatically moved to the shipping address section. As a result, the country of the shipping address determines what VAT number structure is accepted.
9. Click Save Settings.
Example:

Next Steps
Check your emails for the monthly invoice.
Movilitas.Cloud uses the given billing information when generating the invoice. For tenants (customers) in Belgium listed in Peppol, Movilitas.Cloud also generates a UBL file and sends it over the Peppol network. If there is an update on the invoice, Movilitas.Cloud gets notified by Peppol.
Back to the list of procedures
Saving Card Details for Automatic Charging
You can give the bank (credit) card details to pay Movilitas.Cloud invoices automatically.
Procedure
1. Go to Movilitas.Cloud Console --> My tenants.
2. Select the tenant or click Open tenant next to it.
3. On the tenant dashboard, click Settings.
4. Select the Billing information tab. The application displays the Billing information form.
Example:
5. Click Set up card details for automatic charging.
You are redirected to a webpage where you can save the card details:
- Card information
- Cardholder name
- Country/region and ZIP code.
Example:

Note: The payment site also offers payment with Link or creating a Link account and activating 1-click checkout. Paying with Link is out of scope.
6. Click Save card.
The details are saved and Movilitas.Cloud returns a confirmation message.

In the billing information settings, the button Set up card details for automatic charging turns into Update card details for automatic charging. You can change the card details on demand.
Each time an invoice is created, Movilitas.Cloud sends two emails:
- A notification about the invoice and informing the user that the invoice will be automatically charged. The invoice is attached to the email.
- A confirmation that the automatic charge on the bank (credit) card was successful.
Back to the list of procedures
Canceling Subscription
You can cancel your subscription to Movilitas.Cloud any time in the Tenant Settings.
If you cancel your subscription within 30 days after you registered, your company will not be charged for using Movilitas.Cloud.
Procedure
1. Deactivate the tenant by selecting the Delete Tenant button:
- If you are the only administrator of the tenant, the tenant is deactivated immediately.
- If the tenant has multiple administrators, a second administrator must confirm the deactivation within one week by selecting the Confirm Deletion button.
- After the week passes, tenant deactivation is not possible through the UI. Contact Movilitas.Cloud Support.
Movilitas.Cloud Support receives an email about the tenant deletion request.
2. Wait for Movilitas.Cloud Support to contact you for confirmation.
- Only Movilitas.Cloud Support can initiate the scheduled deletion. Once the deletion is scheduled, 3 days are left before the permanent deletion.
- If you do not change your mind, the tenant is permanently deleted after 3 days.
Back to the list of procedures