
Use the Serialized Manufacturing mobile application to repack from labels. The activity is a two-step process:
- Decommissioning the old (sourced) items. Decommissioned items are reported to the EU Hub.
- Note: If the old (sourced) items are non-serialized, the decommissioning step is skipped.
- Repacking, thus creating the new (repacked) items.
The mobile action is available only in Movilitas Mobile Web.
Note: For devices with external (table) scanners, you can point the scanner to the barcode to scan and you can ignore the GUI buttons on the screen related to scanning.
List of Procedures
- Decommissioning
- Skipping Decommissioning for Non-Serialized Old (Source) Items
- Repacking - Scanning Repacked Packs
- Repacking - Scanning Leftovers
Decommissioning
If you want to decommission the old (sourced) items that are serialized, follow the procedure below.
Before You Begin
Make sure the administrator has assigned you as an operator to the Serialized Manufacturing application and authorized you to repack from labels in Movilitas.Cloud.
Procedure
1. Open the Serialized Manufacturing application in Movilitas Mobile.
2. Select Repack from Labels.
Example:

The application displays the label (printing) orders in Decommissioning, Repacking, or without any status. For decommissioning, only an order without any status or in Decommissioning status applies.
- An order without any status indicates that the label (printing) order has been released (executed), but the decommissioning phase has not yet started.
- An order in Decommissioning status indicates that the decommissioning phase is ongoing.
Example:
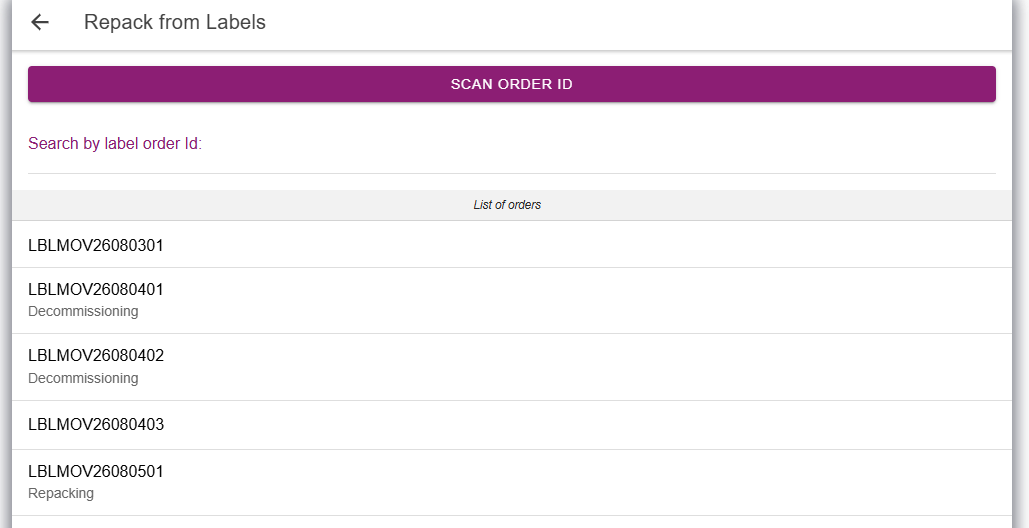
3. Find the order by entering the order ID in the search field or by scanning the order ID. The application filters the list of orders based on the search criteria.
4. Select the order. The application displays the order ID, origin product GTIN, origin product custom code (if any), and the origin batch.
5. Scan the old (sourced) items (SGTINs and/or SSCCSs) to be decommissioned.
- To view the details of the scanned item or remove the scanned item, slide the item to the left and select Preview or Remove.
- The application counts the number of items. When an SSCC is scanned, the included items (SGTINs) are counted.
- The application checks the scanned items. For scanned containers (SSCCs), the application checks the underlying packs (SGTINs).
- If the origin product code is a custom code on the label (printing) order, the application checks whether the scanned (or included) GTIN is linked to the custom code in the system. Also, the application checks whether the scanned batch matches the origin batch on the label (printing) order:
- If an invalid item is scanned (issue with the product code and/or batch), the application highlights the item in red, displays an appropriate error message, and does not allow further scanning until the item is removed from the list.
- You can exit the session and resume later. The scanned items are saved for the label (printing) order.
Example:
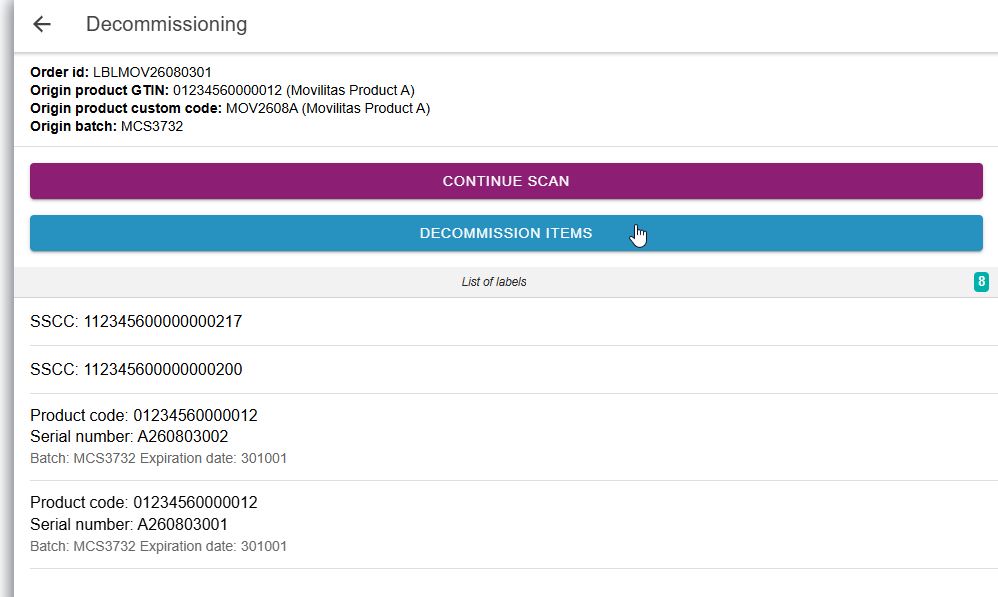
6. If the scanning for decommissioning is completed, click Decommission Items.
The application checks whether all the old (sourced) items have been scanned. If the ratio between the amount of consumed (old, sourced) items and the amount of repacked items to be produced is not logical, the application asks the user for confirmation: The ratio between the number of consumed packs (<number>) and the number of repacked packs to produce (<number>) does not look logical. Are you sure that all the correct source packs have been scanned?
- If you are sure that all old (sourced) items have been scanned, select Yes.
- Otherwise, select No and complete the scanning.
Once the check about the ratio passed, the application asks you to confirm decommissioning to the EU Hub: Confirm decommissioning scanned items to EU-Hub?
- Click Accept, and the scanned items are sent for decommissioning to the EU Hub.
- Click Back, and you resume the decommissioning process.
Example:
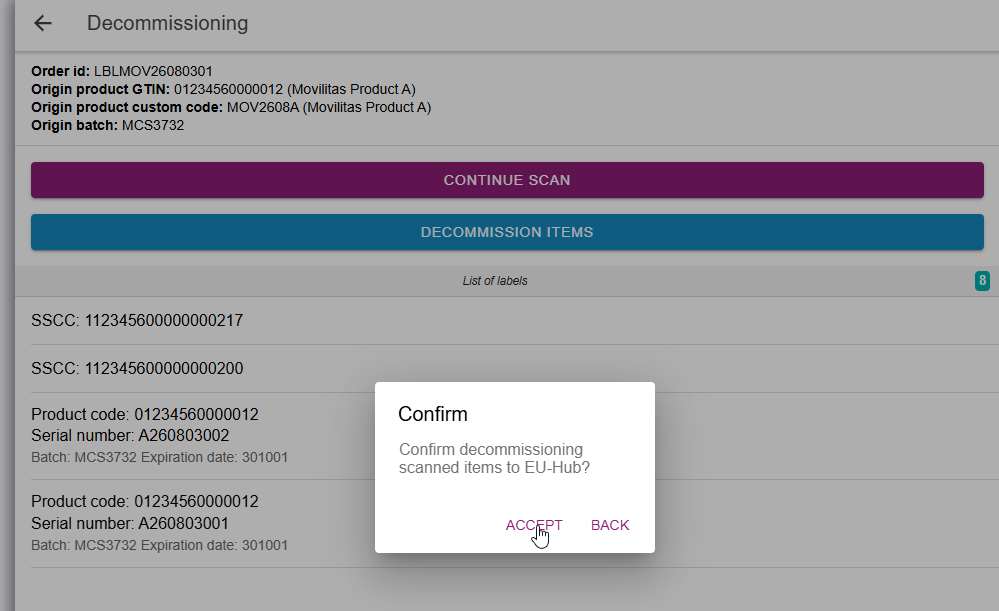
Once the scanned items are sent for decommissioning to the EU Hub, the application does not allow further scanning and displays the Refresh Status button.
Example:
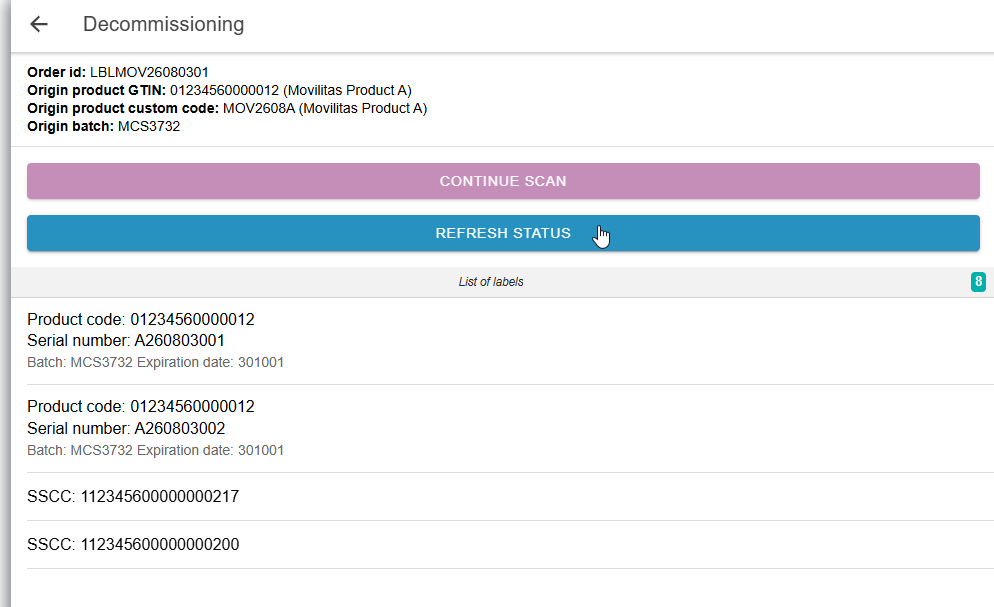
The application sends one decommissioning request per scanned container (SSCC), and if any packs (SGTINs) were scanned separately, then there is one request for all packs (SGTINs) that were scanned separately. The requests are logged on the EU Hub channel with “Update pack state” request type.
7. Click Refresh Status.
The application updates the status of each scanned item based on the response from the EU Hub:
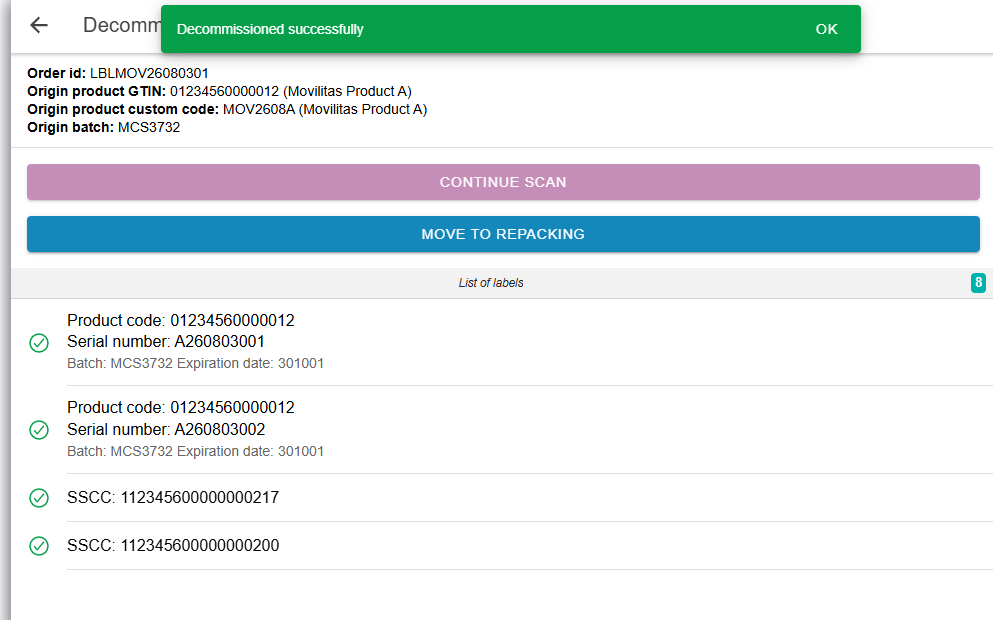
Decommissioning is successful for all items
- Each item is highlighted in green. The status of the item changes to Decommissioned with reason “Check-out” in Movilitas.Cloud.
- For a scanned container (SSCC), the container and all of its descendant containers and packs are put to status Decommissioned with reason “Check-out” in Movilitas.Cloud.
- The application displays the Move to Repacking button. Move to the next step.
Example:
Decommissioning completely failed for all items
- Each standalone pack (SGTIN) is highlighted in red. The application displays the error code and error message returned by the EU Hub.
- Slide the item to the left and click Preview to view the details separately.
- Each container (SSCC) has the Partial Decommissioning indicator.
- Slide the item to the left and click Preview to view the container (SSCC).
- To view the problematic child items (content), click Partial Decommissioning.
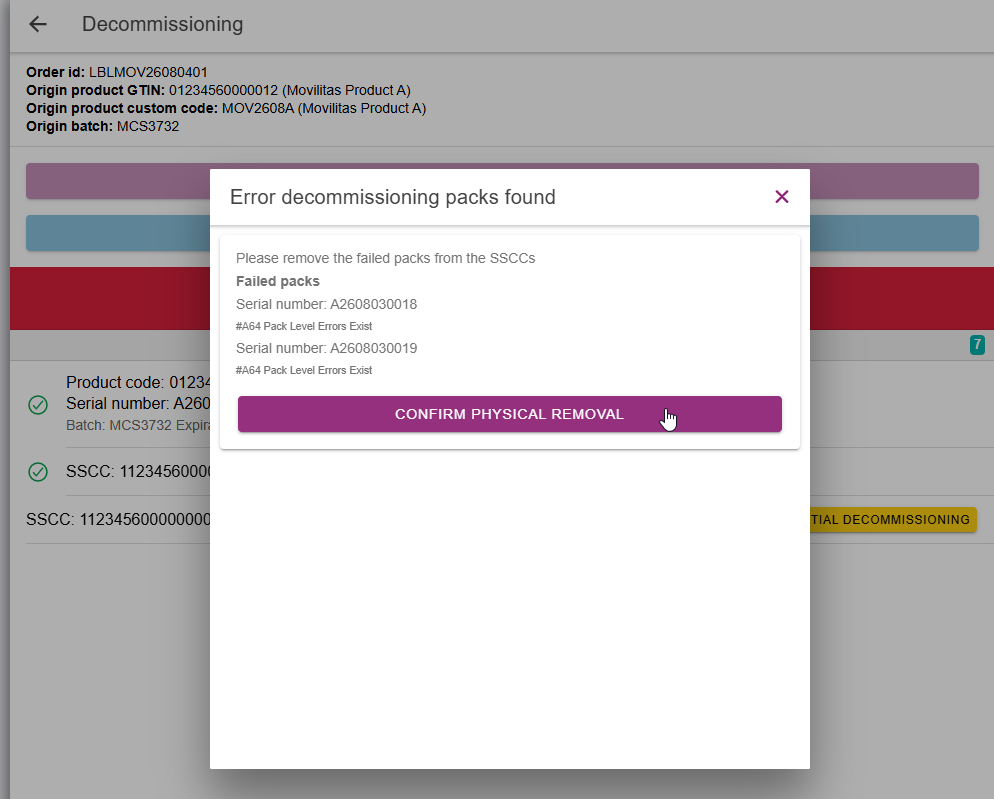
- The application displays the Error decommissioning packs found pop-up and lists the serial numbers of the problematic items with the error code and error message returned by the EU Hub. The pop-up contains the Confirm Physical Removal button.
- Remove all items from the list and restart the decommissioning procedure. To remove the items, do the following:
- To remove a standalone pack (SGTIN), slide the item to the left and click Remove.
- To remove the failed packs (SGTINs) from the container (SSCC), click Confirm Physical Removal in the Error decommissioning packs found pop-up.
- The empty container (SSCC) is still put to Decommissioned status with reason “Check-out” in Movilitas.Cloud.
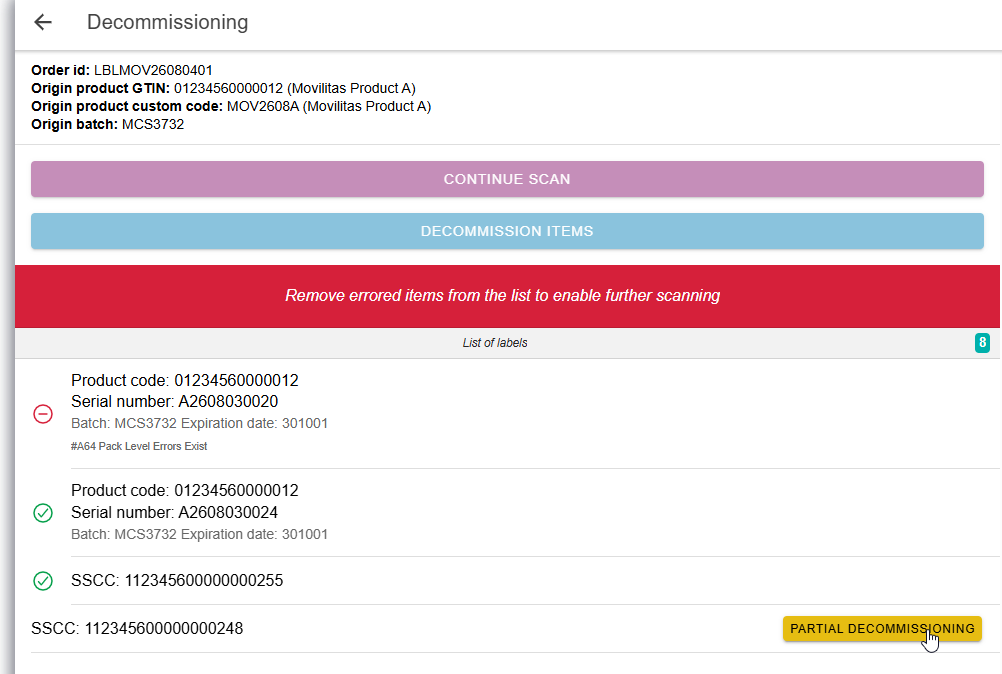
If the decommissioning partially failed for some items
- The correct containers (SSCCs) and standalone packs (SGTINs) are highlighted in green. No action here.
- The problematic standalone packs (SGTINs) are highlighted in red. The application displays the error code and error message returned by the EU Hub for each problematic item.
- Slide the item to the left and click Preview to view the details separately.
- The problematic containers (SSCCs) have the Partial Decommissioning indicator.
- Slide the item to the left and click Preview to view the container (SSCC).
- To view the problematic child items (content), click Partial Decommissioning.
- The application displays the Error decommissioning packs found pop-up and lists the serial numbers of the problematic items with the error code and error message returned by the EU Hub. The pop-up contains the Confirm Physical Removal button.
- Remove the problematic items from the list and move on to the next step.
- To remove a standalone pack (SGTIN), slide the item to the left and click Remove.
- To remove the failed packs (SGTINs) from the container (SSCC), click Confirm Physical Removal in the Error decommissioning packs found pop-up.
- The failed packs (SGTINs) are unpacked from the container (SSCC).
- The successfully decommissioned packs (SGTINs) and the parent container (SSCC) are put to Decommissioned status with reason “Check-out” in Movilitas.Cloud.
- Once the problematic items are removed, the application displays the Move to Repacking button. Because not all packs were decommissioned, you can repack fewer items than the quantity of the label (printing) order. Move to the next step.
Example:
8. If all the scanned items in the list are successfully decommissioned (highlighted in green), click Move to Repacking.
Example:
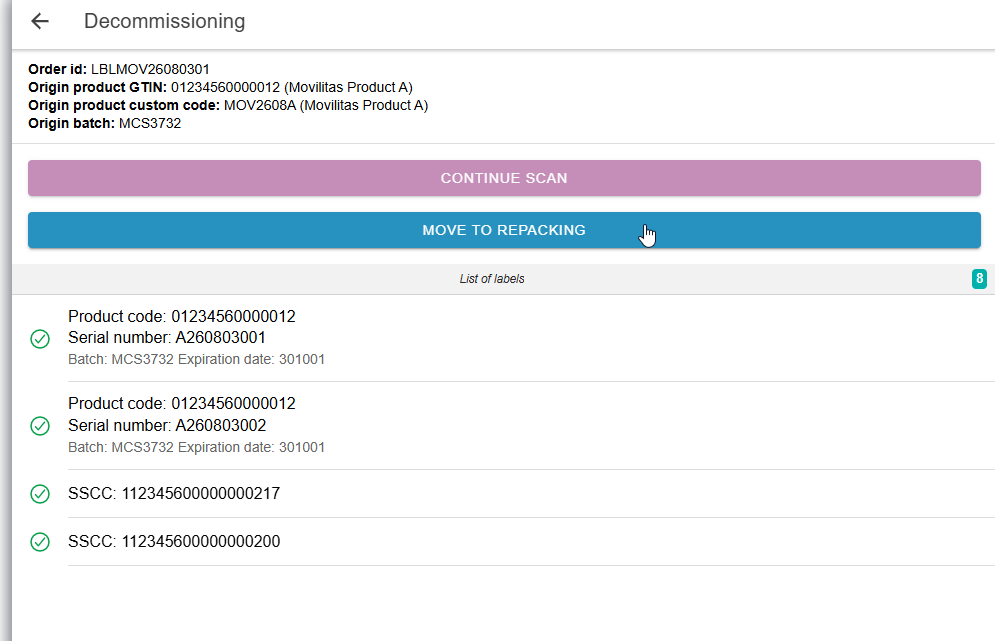
The application displays the Repacking page. You can start the repackaging by scanning either the repacked packs (SGTINs) or the leftovers (SGTINs) of the label (printing) order.
Example:
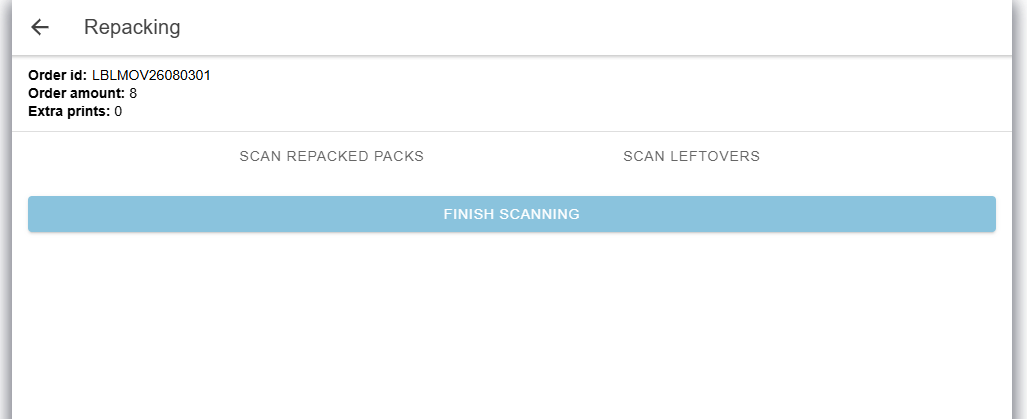
The label (printing) order status changes to Repacking.
Next Steps
Continue with the repacking phase.
Back to the list of procedures
Skipping Decommissioning for Non-Serialized Old (Source) Items
If you did not scan any old (sourced) item during receipt but manually added the batch, expiration date, and amount, the application treats the label (printing) orders with that origin batch as non-serialized. When selecting a label (printing) order as such, the application asks you to confirm that the old (sourced) items are non-serialized, so that you can skip the decommissioning step and continue with repacking immediately.
Before You Begin
Make sure the administrator has assigned you as an operator to the Serialized Manufacturing application and authorized you to repack from labels in Movilitas.Cloud.
Procedure
1. Open the Serialized Manufacturing application in Movilitas Mobile.
2. Select Repack from Labels.
Example:
The application displays the label (printing) orders in Decommissioning, Repacking, or without any status. An order without any status indicates that the label (printing) order has been released (executed), but the decommissioning phase has not yet started. Orders without any status are candidates for this procedure.
3. Find the order by entering the order ID in the search field or by scanning the order ID. The application filters the list of orders based on the search criteria.
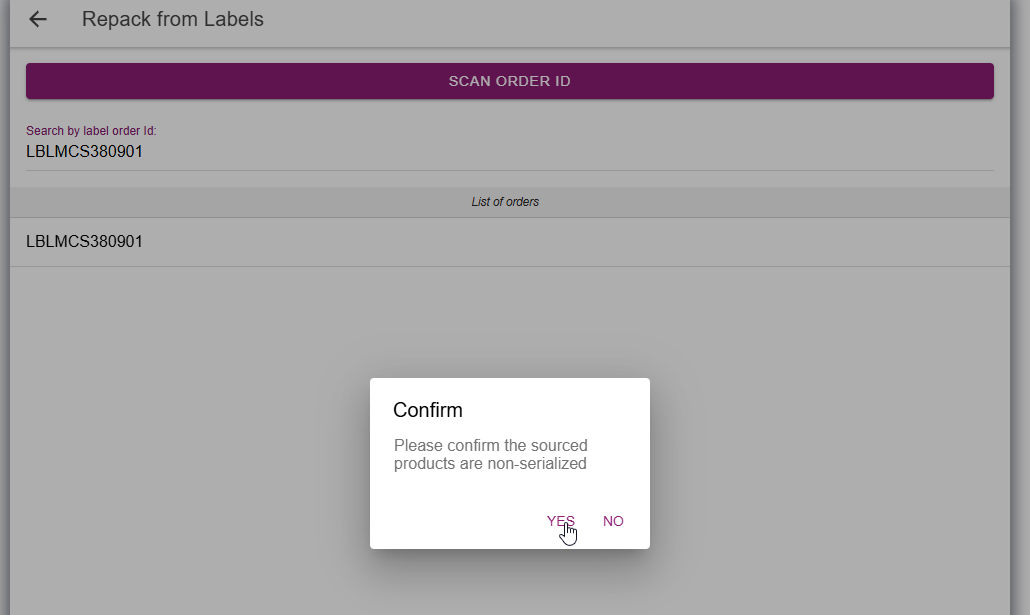
4. Select the order. The application detects that the old (sourced) items for the origin batch are non-serialized and asks you to confirm: Please confirm the sourced products are non-serialized.
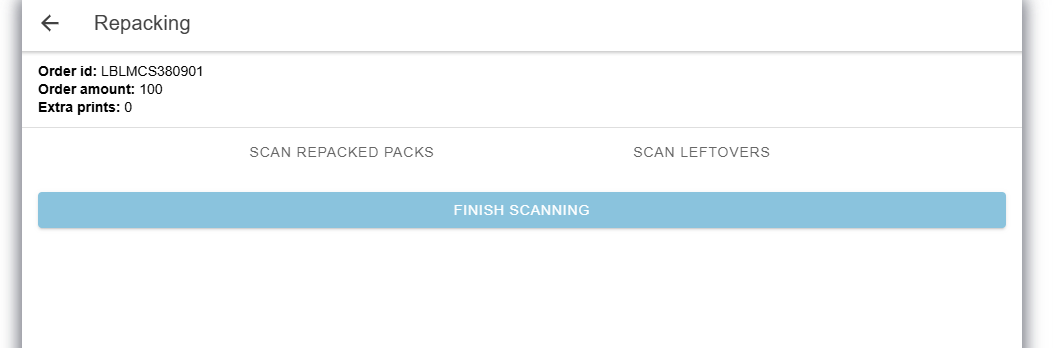
- Click Yes, and the application displays the Repacking page. You can start the repackaging by scanning either the repacked packs (SGTINs) or the leftovers (SGTINs) of the label (printing) order. The label (printing) order status changes to Repacking.
- Click No, and the label (printing) order remains unchanged, in the same status.
The following example illustrates selecting "Yes":
Next Steps
Continue with the repacking phase.
Back to the list of procedures
Repacking - Scanning Repacked Packs
If you want to scan the resulting physically repacked packs, follow the procedure below.
Before You Begin
Make sure the administrator has assigned you as an operator to the Serialized Manufacturing application and authorized you to repack from labels in Movilitas.Cloud.
Procedure
1. Open the Serialized Manufacturing application in Movilitas Mobile.
2. Select Repack from Labels.
The application displays the label (printing) orders in Decommissioning, Repacking, or without any status. For repacking, only an order in Repacking status applies.
3. Find the order by entering the order ID in the search field or by scanning the order ID. The application filters the list of orders based on the search criteria.
4. Select the order.
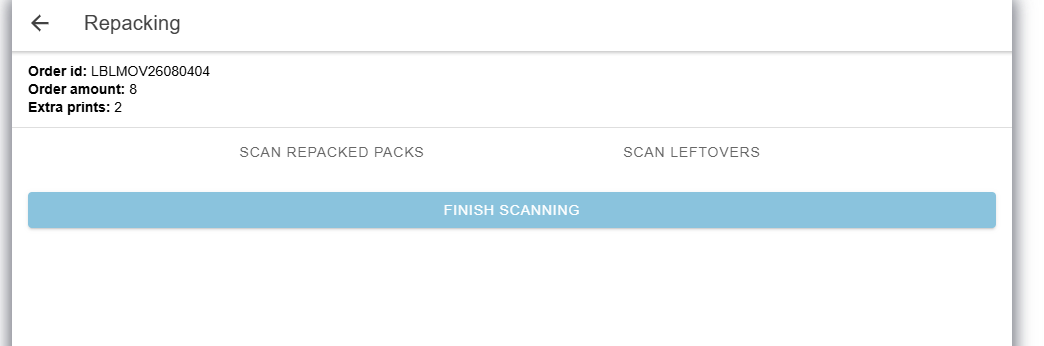
The application displays the order ID, order amount, and the number of extra prints.
You can choose a scanning mode:
- Scan Repacked Packs.
- Scan Leftovers.
Example:
5. Select Scan Repacked Packs.
Example:
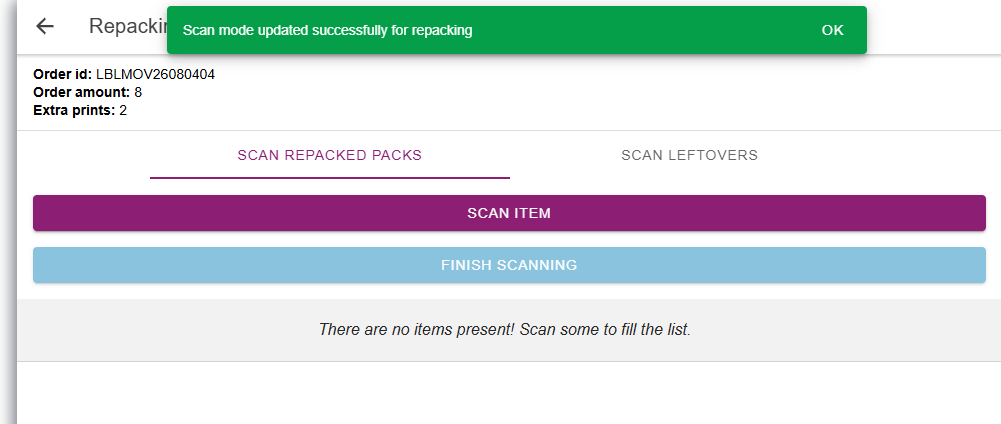
6. Scan the repacked packs (SGTINs) one by one.
- To remove an item from the list, slide the item to the left and click Remove.
- You can exit the procedure and resume later. The scanning mode and the scanned items are saved.
- When selecting the Scan Leftovers scanning mode, the application displays a pop-up that all the scanning made so far will be cleared: Changing the scan mode will clear all previously scanned items. Do you want to continue?
- By selecting Accept, the scanned items are cleared and the application enters the Scan Leftovers mode. Go to Repacking - Scanning Leftovers.
- By selecting Back, the current session is resumed.
Example:
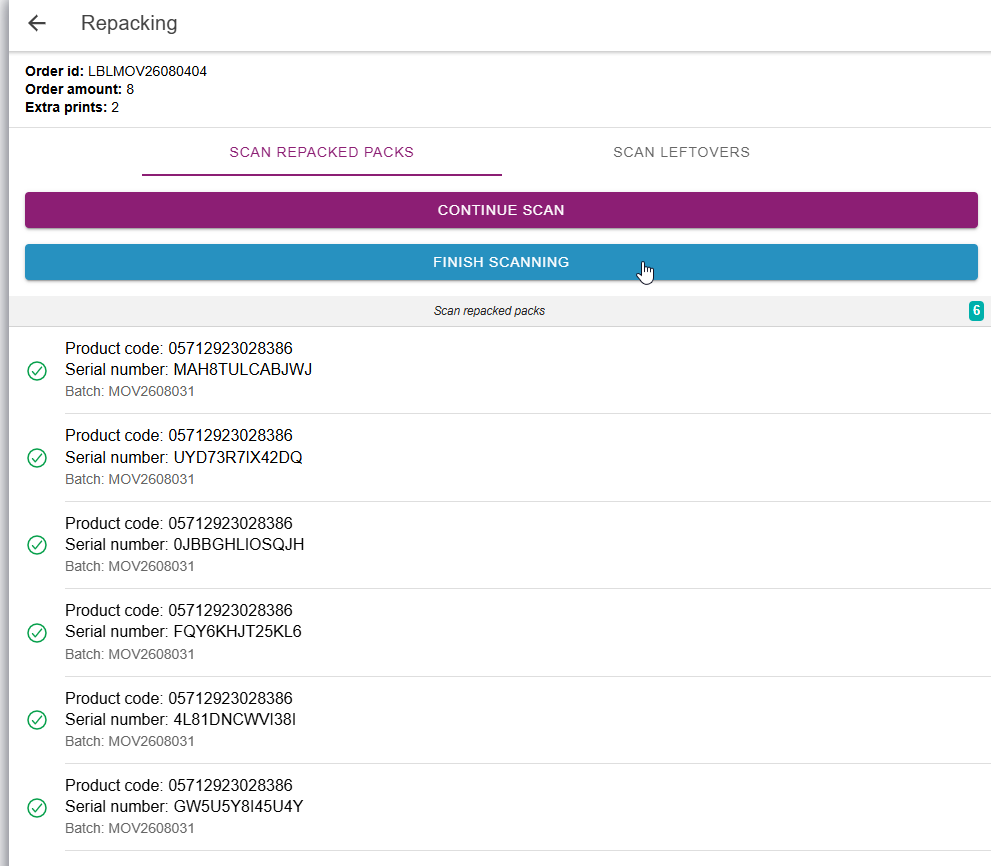
7. If all repacked packs (SGTINs) are scanned for the label (printing) order, click Finish Scanning.
The application displays the following counts and asks you to confirm (or cancel):
- Order amount - Quantity from the label (printing) order.
- Extra prints - The number of extra prints that were made, based on the label (printing) order configuration.
- Repacked packs - The number of scanned repacked packs.
- Leftovers - The order amount plus extra prints minus the number of scanned repacked packs.
Example:
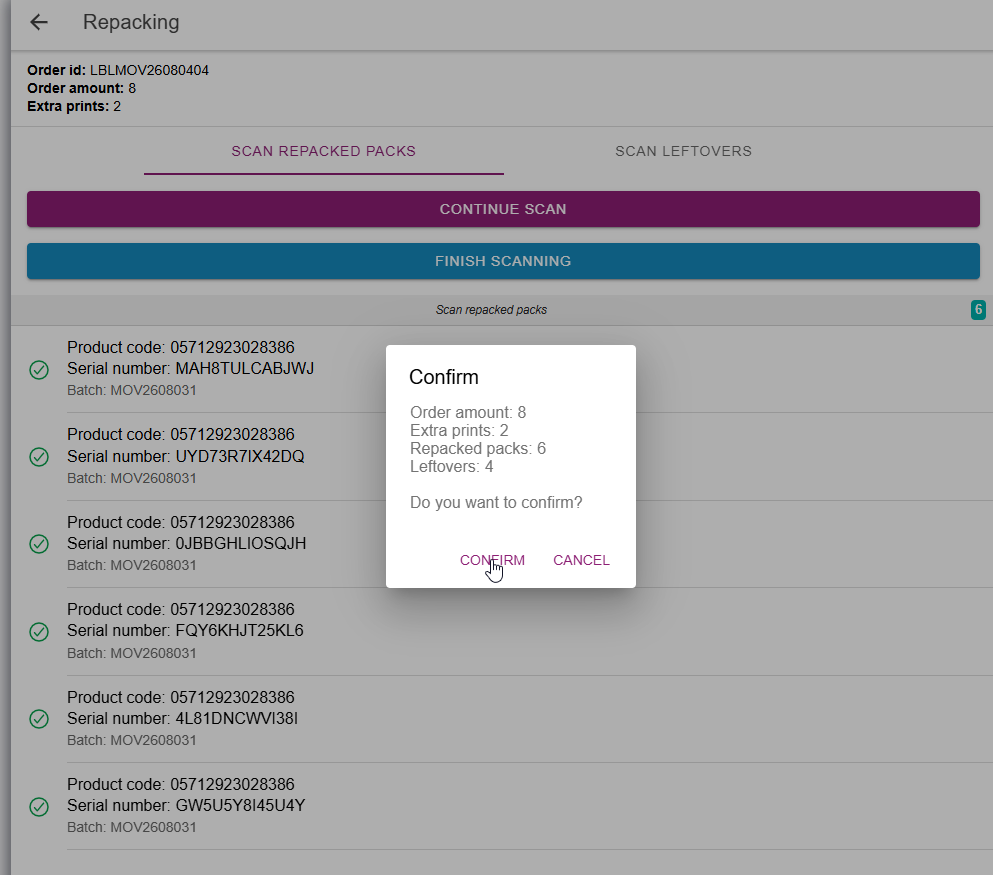
8. Select Confirm in the pop-up.
- The repacked packs (SGTINs) are created as trade items with status Active in Movilitas.Cloud. The items are displayed on the Commissioning page in the Admin UI, ready for commissioning to the EU Hub.
- The leftovers (SGTINs) are created as trade items with status Decommissioned and reason “Destroy“ in Movilitas.Cloud. This can be verified in the pack history under the SN/SSCC pool > Pack history tab in the Admin UI.
- The status of the label (printing) order changes to Repacked. This can be verified under the Labels > Orders tab in the Admin UI.
- If webhook is configured on the Manufacturer V2 API channel, a message is sent to the external system subscribed for notifications through a webhook. The message contains the order ID and the number of repacked items. The message is logged on the Manufacturer V2 API channel, on the Webhook Logs panel.
- You are taken back to the Repack from Labels page with the list of label (printing) orders in the mobile application.
Example:
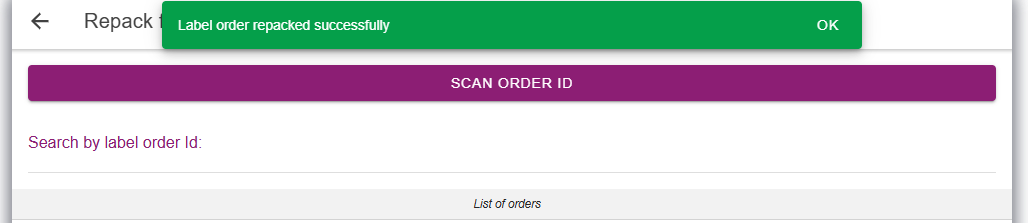
Back to the list of procedures
Repacking - Scanning Leftovers
If you want to scan the labels that do not correspond to a produced repacked pack, follow the procedure below.
Before You Begin
Make sure the administrator has assigned you as an operator to the Serialized Manufacturing application and authorized you to repack from labels in Movilitas.Cloud.
Procedure
1. Open the Serialized Manufacturing application in Movilitas Mobile.
2. Select Repack from Labels.
The application displays the label (printing) orders in Decommissioning, Repacking, or without any status. For repacking, only an order in Repacking status applies.
3. Find the order by entering the order ID in the search field or by scanning the order ID. The application filters the list of orders based on the search criteria.
4. Select the order.
The application displays the order ID, order amount, and the number of extra prints.
You can choose a scanning mode:
- Scan Repacked Packs.
- Scan Leftovers.
Example:
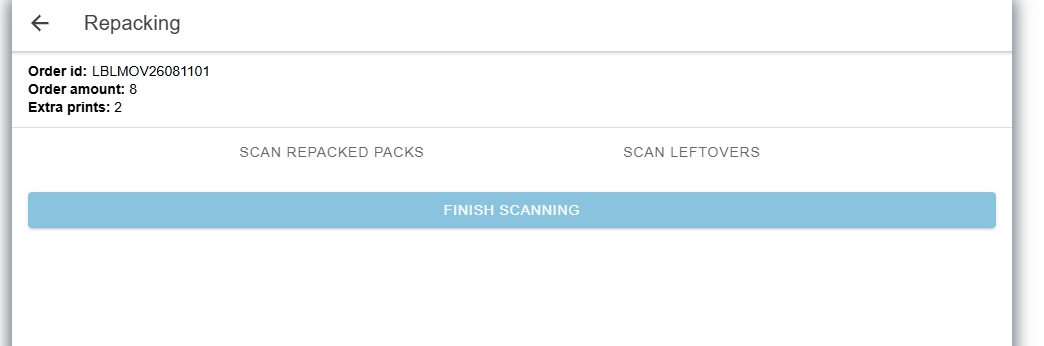
5. Select Scan Leftovers.
Example:
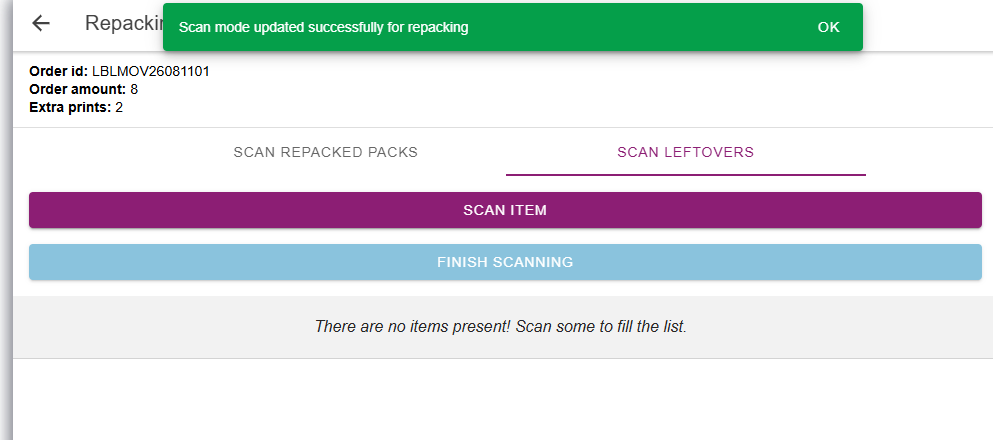
6. Scan the leftover packs (SGTINs) one by one.
- To remove an item from the list, slide the item to the left and click Remove.
- You can exit the procedure and resume later. The scanning mode and the scanned items are saved.
- When selecting the Scan Repacked Packs scanning mode, the application displays a pop-up that all the scanning made so far will be cleared: Changing the scan mode will clear all previously scanned items. Do you want to continue?
- By selecting Accept, the scanned items are cleared and the application enters the Scan Repacked Packs mode. Go to Repacking - Scanning Repacked Packs.
- By selecting Back, the current session is resumed.
Example:
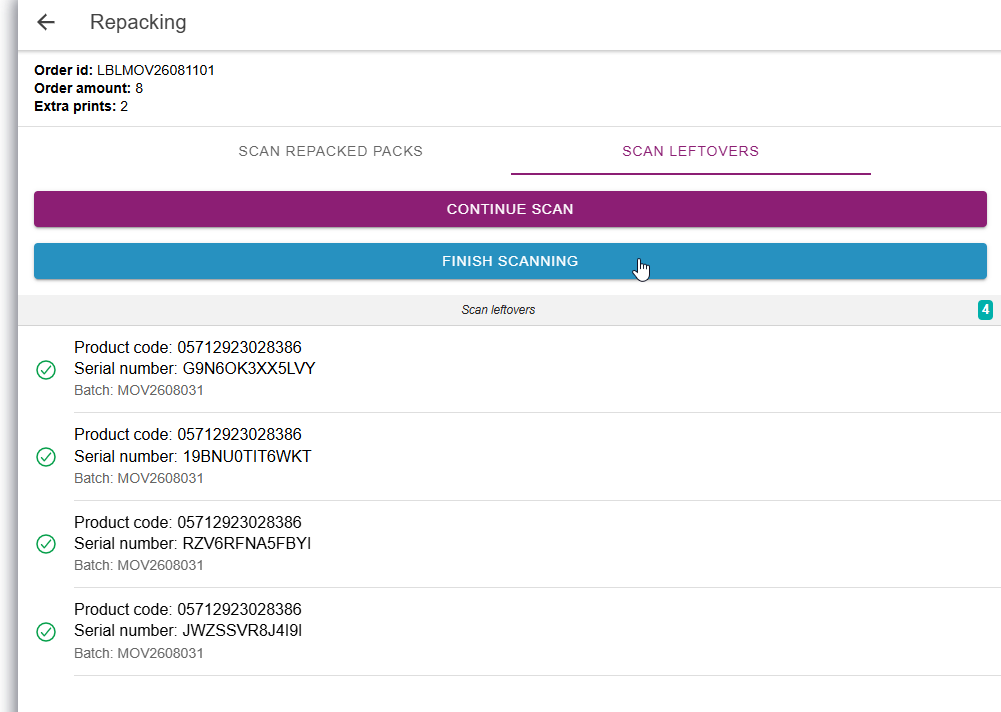
7. If all leftovers (SGTINs) are scanned for the label (printing) order, click Finish Scanning.
The application displays the following counts and asks you to confirm (or cancel):
- Order amount - Quantity from the label (printing) order.
- Extra prints - The number of extra prints that were made, based on the label (printing) order configuration.
- Repacked packs - The order amount plus extra prints minus the number of scanned leftovers.
- Leftovers - The number of scanned leftovers.
Example:
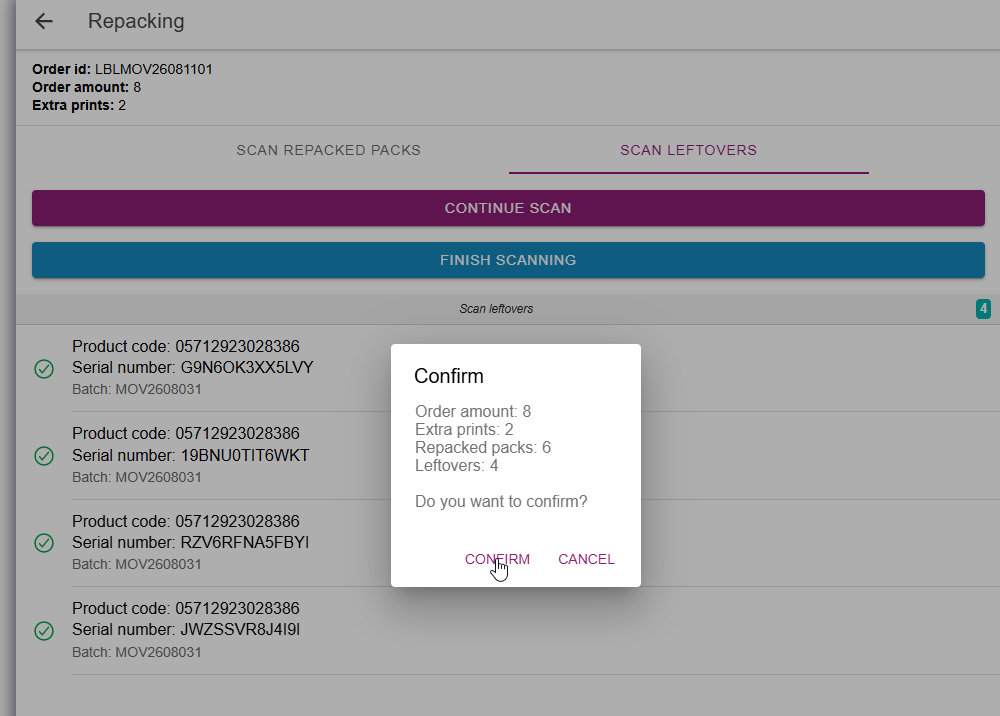
8. Select Confirm in the pop-up.
- The repacked packs (SGTINs) are created as trade items with status Active in Movilitas.Cloud. The items are displayed on the Commissioning page in the Admin UI, ready for commissioning to the EU Hub.
- The leftovers (SGTINs) are created as trade items with status Decommissioned and reason “Destroy“ in Movilitas.Cloud. This can be verified in the pack history under the SN/SSCC pool > Pack history tab in the Admin UI.
- The status of the label (printing) order changes to Repacked. This can be verified under the Labels > Orders tab in the Admin UI.
- If webhook is configured on the Manufacturer V2 API channel, a message is sent to the external system subscribed for notifications through a webhook. The message contains the order ID and the number of repacked items. The message is logged on the Manufacturer V2 API channel, on the Webhook Logs panel.
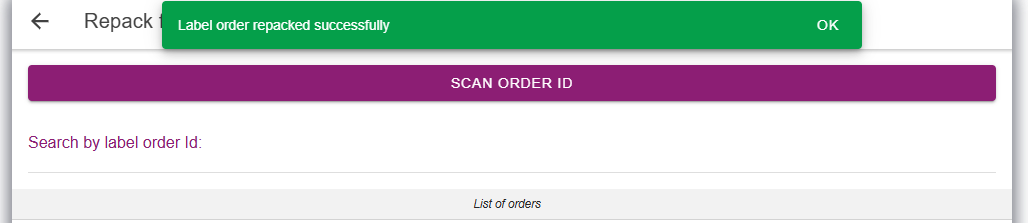
- You are taken back to the Repack from Labels page with the list of label (printing) orders in the mobile application.
Example:
Back to the list of procedures
